


How to Replace the Thermostat on a 2021 Toyota Corolla 2.0L
Step-by-step DIY thermostat replacement with tools, parts list, torque specs, bleeding procedure, and safety tips
How to Replace the Thermostat on a 2021 Toyota Corolla 2.0L
Step-by-step DIY thermostat replacement with tools, parts list, torque specs, bleeding procedure, and safety tips
🔧 Corolla - Thermostat Replacement
You’ll be removing the thermostat housing on your Corolla, swapping in a new thermostat (with seal), then refilling and bleeding the cooling system. This restores correct engine temperature control and can fix overheating or slow-warm-up issues.
Difficulty Level: Intermediate | Estimated Time: 2–3 hours
⚠️ Safety & Precautions
- ⚠️ Only work on the cooling system when the engine is completely cool; hot coolant can cause serious burns.
- ⚠️ Coolant is poisonous; keep it off skin, paint, and away from children and animals.
- ⚠️ Support the car with jack stands; never rely only on a floor jack.
- ⚠️ Avoid starting the engine with loose hoses or open coolant passages to prevent spills and damage.
- ⚠️ Disconnect the negative battery terminal if your tools will be close to the starter, alternator, or main wiring harness.
🔧 Required Tools
You'll need the following tools for this repair:
- 🔹 Floor jack (rated 3-ton minimum)
- 🔹 Jack stands (rated 3-ton minimum)
- 🔹 Wheel chocks
- 🔹 Safety glasses
- 🔹 Mechanic gloves
- 🔹 Drain pan (at least 10-liter capacity)
- 🔹 Ratchet 3/8"
- 🔹 Ratchet 1/4"
- 🔹 Extension 3/8" (3"–6")
- 🔹 10mm socket
- 🔹 12mm socket
- 🔹 14mm socket
- 🔹 Torque wrench 1/4" drive (2–20 Nm range)
- 🔹 Torque wrench 3/8" drive (10–80 Nm range)
- 🔹 Flathead screwdriver (medium)
- 🔹 Needle-nose pliers
- 🔹 Hose clamp pliers (specialty)
- 🔹 Plastic trim clip removal tool
- 🔹 Clean funnel with narrow spout
- 🔹 Coolant fill / spill-free funnel kit (specialty)
- 🔹 Shop towels or rags
🔩 Required Parts
HowToo sells all the parts you need for this repair:
- 🔹 Engine thermostat with seal/gasket (for 2.0L M20A-FKS) - Qty: 1
- 🔹 Thermostat housing O-ring or gasket - Qty: 1 (if not included with thermostat)
- 🔹 Toyota Super Long Life coolant (pink, concentrate or premix) - Qty: 2–3 liters concentrate or 4–6 liters premix
- 🔹 New hose clamps (spring-type or screw-type) for any removed hoses - Qty: 2–4
- 🔹 Engine under-cover clips / push pins - Qty: 2–4 (optional, in case originals break)
- 🔹 Distilled water - Qty: 4–6 liters (only if using concentrate coolant)
- 🔹 Brake cleaner or engine-safe cleaner - Qty: 1 can (for cleaning spilled coolant)
📋 Before You Begin
- Park the Corolla on a flat surface, set the parking brake, and place wheel chocks behind the rear wheels.
- Let the engine cool fully—ideally sit for at least 2–3 hours so the upper radiator hose is cool to the touch.
- Note your radio presets and settings if you plan to disconnect the battery.
- Open the hood and locate the coolant reservoir and radiator cap. Do not remove the radiator cap yet.
- If you will disconnect the battery: loosen the negative terminal nut with a 10mm socket and move the cable aside.
🔨 Step-by-Step Instructions
Follow these steps in order:
Step 1: Raise and secure the front of the car
- Use the floor jack (rated 3-ton minimum) at the front center jacking point to lift the front of the Corolla.
- Place jack stands (rated 3-ton minimum) under the pinch welds on both sides and slowly lower the car onto them.
- Give the car a gentle push to confirm it is stable. Never work under an unsupported car.
Step 2: Remove the engine under cover
- Put on safety glasses and mechanic gloves.
- Use a plastic trim clip removal tool to remove plastic clips from the front under cover.
- Use a 10mm socket and ratchet 1/4" to remove any bolts holding the cover.
- Lower the cover and set it aside. Keep clips and bolts together.
Step 3: Drain enough coolant
- Place a drain pan (at least 10-liter capacity) under the radiator drain cock (petcock) on the bottom of the radiator.
- Slowly loosen the radiator cap by hand to relieve any remaining pressure, then remove it.
- Use a flathead screwdriver if needed to gently turn the drain cock counterclockwise and let coolant flow into the drain pan.
- Drain 3–4 liters; this is usually enough to drop the level below the thermostat housing.
- When done, close the drain cock by hand and then snug it with the flathead screwdriver. Torque to 13 Nm (10 ft-lbs) if a hex drain plug is used.
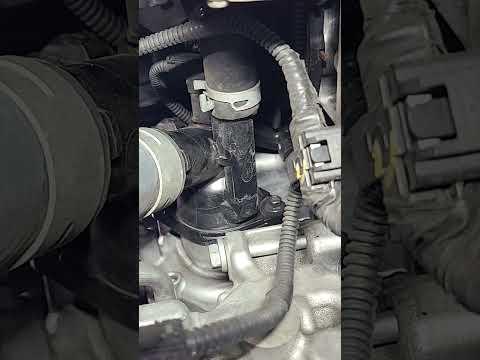
Step 4: Locate the thermostat housing
- From above, look down near the engine where the lower radiator hose connects; from below, follow the lower radiator hose to the engine block.
- The part where the lower hose connects to the engine is the thermostat housing / water inlet assembly.
- Note the electrical connectors or small hoses nearby so you do not stress them later.
Step 5: Remove any components blocking access (if needed)
- On your Corolla, space is a bit tight. From the top, you may need to remove the air intake snorkel.
- Use a 10mm socket to remove the air duct bolts and a flathead screwdriver to loosen any hose clamps, then lift the duct out.
- If any splash shields block access from below, remove them with a 10mm socket.
Step 6: Remove the lower radiator hose from the thermostat housing
- Place the drain pan (at least 10-liter capacity) directly under the hose connection to catch remaining coolant.
- Use hose clamp pliers (specialty) or needle-nose pliers to squeeze the spring clamp and slide it back on the hose.
- Gently twist the hose by hand to break it loose, then pull it off the thermostat housing. Use a twisting motion, not forceful pulling.
- Let any coolant drain into the pan.
Step 7: Remove the thermostat housing
- Identify the housing bolts (typically 2–3 small bolts around the hose neck).
- Use a 10mm socket, extension 3/8", and ratchet 3/8" to remove the bolts.
- Keep track of bolt length and location as you remove them.
- Gently pry the thermostat housing away from the engine using a flathead screwdriver if it is stuck—only at the cast tabs or ears, not on the sealing surface.
- Lower the housing and thermostat assembly carefully; more coolant may drip out.
Step 8: Remove the old thermostat
- Note the position and orientation of the old thermostat (which side faces the engine, which side faces the hose). Match the new part exactly.
- Pull the thermostat straight out from its bore in the engine.
- Remove the old O-ring or gasket from the housing or engine surface.
Step 9: Clean sealing surfaces
- Use a clean shop towel to wipe the thermostat recess and the housing flange until clean and smooth.
- Do not use sandpaper or metal scrapers on the aluminum sealing surfaces; they can scratch and cause leaks.
- If any gasket material is stuck, gently work it off with a plastic trim clip removal tool used as a scraper.
Step 10: Install the new thermostat
- Install the new O-ring or gasket on the thermostat or housing as designed. Some thermostats have a groove for the O-ring.
- Orient the thermostat the same way as the original. If there is a small “jiggle valve” (tiny pin/bleed hole), position it at the top (12 o’clock) to help air escape.
- Push the thermostat straight into its bore until it is fully seated and even all around.
Step 11: Reinstall the thermostat housing
- Position the housing over the new thermostat carefully, making sure the O-ring/gasket stays in place.
- Install the housing bolts by hand first to avoid cross-threading.
- Use a 10mm socket and ratchet 3/8" to snug all bolts evenly in a crisscross pattern.
- Then use a torque wrench 1/4" drive (2–20 Nm range) and 10mm socket to tighten the housing bolts to 10 Nm (89 in-lbs).
- Wipe away any coolant around the housing with a shop towel.
Step 12: Reinstall the lower radiator hose
- Slide the hose fully onto the thermostat housing neck until it stops.
- Use hose clamp pliers (specialty) or needle-nose pliers to move the clamp back into its original position over the raised bead on the neck.
- Check that the hose is not twisted and that the clamp is seated evenly.
Step 13: Reinstall any removed intake parts and covers
- Reinstall the air intake duct using the 10mm socket for bolts and flathead screwdriver for hose clamps. Torque to 5–7 Nm (44–62 in-lbs) if specified.
- From underneath, reinstall any small splash shields removed using the 10mm socket.
Step 14: Reinstall engine under cover
- Lift the under cover into position.
- Install bolts with the 10mm socket by hand first, then snug them with the ratchet 1/4". Torque to 9 Nm (80 in-lbs) if desired.
- Push the plastic clips back in using your fingers. Replace any broken clips with new ones.
Step 15: Lower the car
- Use the floor jack (rated 3-ton minimum) to raise the front slightly, remove the jack stands (rated 3-ton minimum), and then lower the car to the ground.
Step 16: Refill the cooling system
- Make sure the radiator drain cock is fully closed.
- Mix Toyota Super Long Life concentrate with distilled water if needed (usually 50/50), or use premixed coolant.
- Insert a coolant fill / spill-free funnel kit (specialty) into the radiator neck or reservoir, following the kit instructions.
- Slowly pour coolant into the radiator until it is full. Then fill the reservoir to the “FULL” mark.
Step 17: Bleed air from the cooling system
- Leave the radiator cap off (or spill-free funnel installed).
- Start the engine and let it idle. Turn the heater to maximum heat and fan speed to help coolant circulate through the heater core.
- Watch the coolant level in the funnel; as air bubbles escape, the level will drop. Add more coolant as needed to keep the funnel at least half full.
- Let the engine reach operating temperature. You should see the upper radiator hose get hot when the thermostat opens.
- Once bubbles mostly stop and the engine has idled for about 10–15 minutes at operating temperature, turn the engine off and let it cool for at least 30–45 minutes.
Step 18: Final coolant level check and cap installation
- When the engine is cool again, check the coolant level in the radiator and reservoir.
- Top off the radiator if needed, then install the cap firmly by hand.
- Adjust the reservoir level to the “FULL” or “MAX” line with the engine cool.
Step 19: Clean up and check for leaks
- Use shop towels and brake cleaner or engine-safe cleaner to remove any spilled coolant from hoses, the engine, and the ground.
- Start the engine again and let it idle while you visually inspect the thermostat housing, hose connection, and under the car for any leaks.
- If you disconnected the battery earlier, reconnect the negative terminal with a 10mm socket and snug it. Torque to 5 Nm (44 in-lbs) if desired.
✅ After Repair
- Take a short test drive (10–15 minutes) while watching the temperature gauge; it should stay in the normal range and not fluctuate.
- After the drive, let the engine cool completely and recheck the coolant level in the reservoir; top off if slightly low.
- Inspect under the front of the Corolla and around the thermostat housing for any fresh coolant drips.
- Over the next few days, glance at the coolant level and the ground where you park to ensure there are no slow leaks.
💰 DIY vs Shop Cost
Shop Cost: $280–$450 (parts + labor)
DIY Cost: $70–$140 (parts only)
You Save: $210–$310 by doing it yourself!
Shop labor rates vary but typically run $100–$150/hour. This repair takes a shop approximately 1.5–2.0 hours.
🎯 Ready to get started?
HowToo makes it easy: same-day/2-day shipping on every part, plus all the tools and specialty tools you need! Check out the parts and tools sections above to add everything to your cart.
