









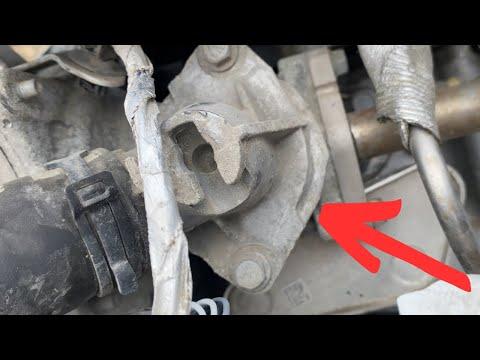





How to Replace the Thermostat on a 2018-2020 Chevrolet Equinox (Engine: Inline 4 2.0L)
Step-by-step thermostat replacement with tools, parts, torque specs, and coolant bleeding tips
How to Replace the Thermostat on a 2018-2020 Chevrolet Equinox (Engine: Inline 4 2.0L)
Step-by-step thermostat replacement with tools, parts, torque specs, and coolant bleeding tips for 2018, 2019, 2020


🔧 Thermostat - Replacement
The thermostat on your Equinox controls engine coolant flow so the engine can reach and hold the right temperature. A failed thermostat can cause overheating, poor heat, or slow warm-up, so this repair restores proper cooling system control.
Difficulty Level: Intermediate | Estimated Time: 2-4 hours
⚠️ Safety & Precautions
- Let the engine cool completely before opening the cooling system. Hot coolant can cause severe burns.
- Use gloves and safety glasses. Coolant is harmful to skin, paint, and pets.
- Relieve cooling system pressure slowly by removing the reservoir cap only when fully cool.
- Drain coolant into a clean container and dispose of it properly.
- Battery disconnect is not required for this repair unless you will work near exposed electrical connectors for an extended time.
🔧 Required Tools
You'll need the following tools for this repair:
- Metric socket set
- 7mm socket
- 8mm socket
- 10mm socket
- Ratchet
- Extension bar
- Torque wrench
- Flat-blade screwdriver
- Hose clamp pliers
- Drain pan
- Funnel
- Shop towels
- Safety glasses
- Nitrile gloves
🔩 Required Parts
HowToo sells all the parts you need for this repair:
- Thermostat assembly - Qty: 1
- Thermostat housing seal or gasket - Qty: 1
- Engine coolant Dex-Cool 50/50 premix - Qty: 2-3 gallons
- Radiator cap - Qty: 1, if damaged or worn
📋 Before You Begin
- Park on level ground and set the parking brake.
- Let the engine cool fully.
- Put a drain pan under the radiator drain area before opening the system.
- Have fresh coolant ready before you start reassembly.
🔨 Step-by-Step Instructions
Follow these steps in order:
Step 1: Drain the coolant
- Remove the coolant reservoir cap only after the engine is cool.
- Use a drain pan under the radiator drain point.
- Open the drain and remove enough coolant to drop the level below the thermostat housing.
- Keep coolant off painted surfaces.
Step 2: Remove intake ducting for access
- Use a 7mm socket or flat-blade screwdriver to loosen the intake tube clamps.
- Disconnect any attached breather hoses.
- Lift the air inlet duct out of the way to expose the thermostat area.
Step 3: Remove the thermostat hose connections
- Use hose clamp pliers to move the spring clamps back.
- Twist the coolant hoses gently to break them free, then pull them off the housing.
- Catch any remaining coolant with shop towels.
Step 4: Remove the thermostat housing
- Use a 10mm socket, ratchet, and extension bar to remove the housing bolts.
- Pull the housing away carefully and remove the thermostat assembly.
- Clean the mating surfaces with a shop towel. Do not scratch the aluminum sealing surface.
- A clean seal prevents leaks.
Step 5: Install the new thermostat
- Install the new thermostat and seal in the same orientation as the old parts.
- Set the housing in place by hand first to avoid cross-threading.
- Use a 10mm socket and torque wrench to tighten the housing bolts evenly.
- Torque to 10 Nm (89 in-lbs).
Step 6: Reconnect hoses and intake parts
- Push the coolant hoses fully onto the housing nipples.
- Move the clamps back into position with hose clamp pliers.
- Reinstall the intake ducting and tighten the clamps with a 7mm socket or flat-blade screwdriver.
Step 7: Refill and bleed the cooling system
- Use a funnel to refill with Dex-Cool 50/50 premix.
- Fill the reservoir to the proper mark.
- Start the engine and let it idle with the cap off until the thermostat opens and the level stabilizes.
- Top off as needed. Watch for air bubbles.
- Torque the coolant reservoir cap by hand until fully seated.
Step 8: Check for leaks
- Inspect the thermostat housing, hose connections, and drain point for leaks.
- Let the engine reach operating temperature and confirm the heater blows hot air.
- Recheck the coolant level after a short test drive.
✅ After Repair
- Verify the temperature gauge reaches normal and stays steady.
- Check for coolant leaks after the first drive and again after the engine fully cools.
- Top off coolant if the level drops after bleeding.
- If the check engine light returns, scan for cooling system codes and inspect for trapped air.
💰 DIY vs Shop Cost
Shop Cost: $350-$650 (parts + labor)
DIY Cost: $60-$160 (parts only)
You Save: $290-$490 by doing it yourself!
Shop labor rates vary but typically run $100-$150/hour. This repair takes a shop approximately 2-4 hours.
🎯 Ready to get started?
HowToo makes it easy: same-day/2-day shipping on every part, plus all the tools and specialty tools you need! Check out the parts and tools sections below to add everything to your cart.
Guide for Engine Coolant Thermostat replace for these Chevrolet vehicles
| Year Make Model | Sub Model | Engine | Body Style |
|---|---|---|---|
| 2020 Chevrolet Equinox | - | Inline 4 1.5L | - |
| 2020 Chevrolet Equinox | - | Inline 4 2.0L | - |
| 2019 Chevrolet Equinox | - | Inline 4 1.5L | - |
| 2019 Chevrolet Equinox | - | Inline 4 1.6L | - |
| 2019 Chevrolet Equinox | - | Inline 4 2.0L | - |
| 2018 Chevrolet Equinox | - | Inline 4 1.5L | - |
| 2018 Chevrolet Equinox | - | Inline 4 1.6L | - |
| 2018 Chevrolet Equinox | - | Inline 4 2.0L | - |