









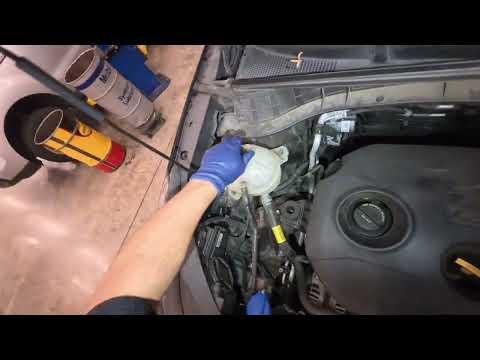






How to Replace the Thermostat on a 2011-2015 Hyundai Tucson (Trim: GL | Engine: Inline 4 2.0L)
Step-by-step cooling system repair guide with tools, parts, torque specs, and safety tips
How to Replace the Thermostat on a 2011-2015 Hyundai Tucson (Trim: GL | Engine: Inline 4 2.0L)
Step-by-step cooling system repair guide with tools, parts, torque specs, and safety tips for 2011, 2012, 2013


🔧 Tucson - Thermostat Replacement
Replacing the thermostat on your Tucson involves draining some coolant, removing the thermostat housing, installing a new thermostat and seal, then refilling and bleeding the cooling system. The thermostat controls engine warm-up and operating temperature, so a stuck thermostat can cause overheating, slow warm-up, or poor cabin heat.
Difficulty Level: Beginner to Intermediate | Estimated Time: 1.5-2.5 hours
⚠️ Safety & Precautions
- ⚠️ Only work on the cooling system when the engine is completely cool. Hot coolant can cause serious burns.
- ⚠️ Do not remove the radiator cap or reservoir cap while the engine is hot.
- ⚠️ Keep coolant away from pets and children. It is toxic and has a sweet smell.
- ⚠️ Support the vehicle securely if you raise the front. Never rely on a jack alone.
- ⚠️ Battery disconnect is not normally required for this thermostat replacement, but keep tools away from the battery terminals.
🔧 Required Tools
You'll need the following tools for this repair:
- 10mm socket
- 12mm socket
- 3/8-inch ratchet
- 3/8-inch extension
- Torque wrench rated 5-50 Nm
- Flat-blade screwdriver
- Hose clamp pliers
- Plastic scraper
- Drain pan rated 2 gallons minimum
- Coolant funnel kit
- Floor jack rated 2-ton minimum
- Jack stands rated 2-ton minimum
- Wheel chocks
- Nitrile gloves
- Safety glasses
- Shop towels
🔩 Required Parts
HowToo sells all the parts you need for this repair:
- Engine coolant thermostat - Qty: 1
- Thermostat seal or gasket - Qty: 1
- Asian vehicle coolant concentrate or premix compatible with Hyundai - Qty: 1-2 gallons
- Distilled water - Qty: 1 gallon if using concentrate
📋 Before You Begin
- 🅿️ Park your Tucson on level ground and let the engine cool fully, ideally for several hours.
- 🧱 Place wheel chocks behind the rear wheels.
- 🧤 Put on safety glasses and nitrile gloves before opening the cooling system.
- 🚗 If more room is needed underneath, use a floor jack rated 2-ton minimum and support the front with jack stands rated 2-ton minimum.
- 🧰 A torque wrench is a tool that tightens bolts to a measured amount so small aluminum parts are not cracked or stripped.
- 🧰 Hose clamp pliers are pliers shaped to squeeze spring hose clamps evenly without slipping.
- 🧰 A coolant funnel kit locks into the radiator neck and helps remove trapped air while refilling.
🔨 Step-by-Step Instructions
Follow these steps in order:
Step 1: Remove Cooling System Pressure
- Make sure the engine is cold to the touch.
- Use your hand with a shop towel to slowly loosen the radiator cap or coolant reservoir cap.
- If you hear pressure escaping, stop and wait until it finishes before fully removing the cap.
- Cold engine only.
Step 2: Raise and Support the Front if Needed
- Use wheel chocks behind the rear wheels.
- Use a floor jack rated 2-ton minimum to lift the front of your Tucson only if you need extra access.
- Place jack stands rated 2-ton minimum under the proper front support points.
- Gently lower the vehicle onto the jack stands before working underneath.
Step 3: Drain Enough Coolant
- Place a drain pan rated 2 gallons minimum under the radiator drain area.
- Use a flat-blade screwdriver by hand if the radiator drain plug has a slotted head.
- Open the drain plug slowly and drain about 1 gallon of coolant, or enough to lower the coolant below the thermostat housing.
- If your drain plug is hard to access, use hose clamp pliers to loosen the lower radiator hose clamp slightly and carefully drain from the hose instead.
- Close the drain plug by hand and snug it gently with the flat-blade screwdriver if used. Do not overtighten plastic drain plugs.
Step 4: Locate the Thermostat Housing
- Follow the lower radiator hose to the engine side. The metal or plastic piece it attaches to is the thermostat housing.
- Use shop towels to wipe dirt away from the housing area so debris does not enter the cooling system.
- The thermostat sits inside this housing where the hose meets the engine.
Step 5: Remove the Lower Radiator Hose from the Housing
- Use hose clamp pliers to squeeze the spring clamp on the lower radiator hose.
- Slide the clamp back onto the hose, away from the thermostat housing neck.
- Use your hand to twist the hose gently to break it loose.
- If stuck, use a flat-blade screwdriver carefully between the hose and housing edge, but do not gouge the sealing surface.
- Pull the hose off the housing and aim any leftover coolant into the drain pan.
- Twist first, then pull.
Step 6: Remove the Thermostat Housing
- Use a 10mm socket, 3/8-inch extension, and 3/8-inch ratchet to remove the thermostat housing bolts.
- Some Tucson 2.0L housings may use 12mm bolt heads. If so, use a 12mm socket instead.
- Pull the housing straight away from the engine.
- Catch any coolant that spills with the drain pan and shop towels.
Step 7: Remove the Old Thermostat and Seal
- Use your hand to remove the old thermostat from the engine opening.
- Note the direction of the thermostat before removing it. The spring side usually faces into the engine.
- Remove the old seal or gasket from the thermostat or housing.
- Use a plastic scraper to clean the mating surfaces. A mating surface is the flat area where two parts seal together.
- Do not use a metal scraper because it can scratch the aluminum sealing surface.
Step 8: Install the New Thermostat
- Install the new thermostat seal or gasket onto the new thermostat.
- Place the new thermostat into the engine opening in the same direction as the old one.
- Make sure the spring side faces the engine.
- If the thermostat has a small jiggle valve or bleed pin, position it at the top, around the 12 o'clock position.
- Top bleed pin helps air escape.
Step 9: Reinstall the Thermostat Housing
- Set the thermostat housing squarely against the engine.
- Start the bolts by hand first to avoid cross-threading.
- Use a 10mm socket or 12mm socket with the 3/8-inch ratchet to snug the bolts evenly.
- Use a torque wrench rated 5-50 Nm to tighten the thermostat housing bolts evenly.
- Torque to 18-22 Nm (13-16 ft-lbs)
Step 10: Reconnect the Lower Radiator Hose
- Push the lower radiator hose fully onto the thermostat housing neck by hand.
- Use hose clamp pliers to move the spring clamp back to its original position.
- Make sure the clamp sits behind the raised bead on the housing neck.
- Wipe the area dry with shop towels so leaks are easier to spot later.
Step 11: Refill the Cooling System
- Install the coolant funnel kit onto the radiator fill neck or fill point.
- Pour Hyundai-compatible Asian vehicle coolant premix slowly into the funnel.
- If using concentrate, mix coolant and distilled water to a 50/50 mixture before filling.
- Fill until coolant stays visible in the funnel and the radiator is full.
- Fill the coolant reservoir to the “FULL” mark.
Step 12: Bleed Air from the Cooling System
- Leave the coolant funnel kit installed.
- Start the engine and let it idle.
- Set the cabin heater to full hot and blower to low using the climate controls.
- Watch the coolant level in the funnel and add coolant as the level drops.
- Use your hand carefully to feel for warm air from the vents as the engine warms up.
- Wait for the radiator fan to cycle on, or until the upper radiator hose becomes hot, showing the thermostat has opened.
- Do not rev the engine hard while bleeding.
Step 13: Cap the System and Check for Leaks
- Turn the engine off.
- Use the stopper from the coolant funnel kit to remove the funnel without spilling.
- Install the radiator cap or reservoir cap by hand until fully seated.
- Use a flashlight if available and inspect around the thermostat housing, hose clamp, radiator drain plug, and lower hose.
- Use shop towels to dry any wet spots, then recheck for fresh leaks.
Step 14: Lower the Vehicle
- If the vehicle was raised, use the floor jack rated 2-ton minimum to lift slightly off the jack stands.
- Remove the jack stands rated 2-ton minimum.
- Lower your Tucson slowly to the ground with the floor jack.
- Remove the wheel chocks.
✅ After Repair
- ✅ Let the engine cool completely, then recheck the coolant level in the radiator and reservoir.
- ✅ Top off with Hyundai-compatible coolant if the level drops after the first heat cycle.
- ✅ Test drive for 10-15 minutes while watching the temperature gauge.
- ✅ After the test drive, park and inspect the thermostat housing and lower hose for leaks.
- ✅ Dispose of used coolant properly at a recycling center or repair shop. Do not pour it onto the ground or into a drain.
💰 DIY vs Shop Cost
Shop Cost: $180-$330 (parts + labor)
DIY Cost: $35-$90 (parts only)
You Save: $145-$240 by doing it yourself!
Shop labor rates vary but typically run $100-$150/hour. This repair takes a shop approximately 1-1.5 hours.
🎯 Ready to get started?
HowToo makes it easy: same-day/2-day shipping on every part, plus all the tools and specialty tools you need! Check out the parts and tools sections below to add everything to your cart.
Guide for Engine Coolant Thermostat replace for these Hyundai vehicles
| Year Make Model | Sub Model | Engine | Body Style |
|---|---|---|---|
| 2015 Hyundai Tucson | Limited | Inline 4 2.4L | - |
| 2015 Hyundai Tucson | GLS | Inline 4 2.0L | - |
| 2015 Hyundai Tucson | SE | Inline 4 2.4L | - |
| 2014 Hyundai Tucson | Limited | Inline 4 2.4L | - |
| 2014 Hyundai Tucson | GLS | Inline 4 2.0L | - |
| 2014 Hyundai Tucson | SE | Inline 4 2.4L | - |
| 2013 Hyundai Tucson | GL | Inline 4 2.0L | - |
| 2013 Hyundai Tucson | GLS | Inline 4 2.4L | - |
| 2013 Hyundai Tucson | Limited | Inline 4 2.4L | - |
| 2012 Hyundai Tucson | GL | Inline 4 2.0L | - |
| 2012 Hyundai Tucson | GLS | Inline 4 2.4L | - |
| 2012 Hyundai Tucson | Limited | Inline 4 2.4L | - |
| 2011 Hyundai Tucson | GL | Inline 4 2.0L | - |
| 2011 Hyundai Tucson | GLS | Inline 4 2.4L | - |
| 2011 Hyundai Tucson | Limited | Inline 4 2.4L | - |