


How to Replace the Starter Motor on a 2017-2021 Cadillac XT5 3.6L V6 (Intake Removal) (Engine: V6 3.6L)
Step-by-step valley-mounted starter replacement with tools, parts list, safety tips, and reassembly notes
How to Replace the Starter Motor on a 2017-2021 Cadillac XT5 3.6L V6 (Intake Removal) (Engine: V6 3.6L)
Step-by-step valley-mounted starter replacement with tools, parts list, safety tips, and reassembly notes for 2017, 2018, 2019, 2020, 2021
🔧 XT5 - Starter Motor Replacement
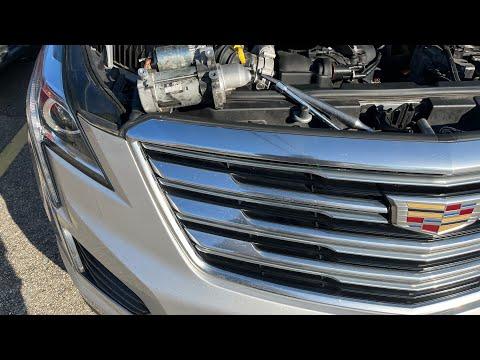
On your XT5 with the 3.6L V6, the starter is mounted in the engine “valley” under the intake manifold. Replacing it typically requires removing the intake manifold to access the starter and its wiring.
Difficulty Level: Advanced | Estimated Time: 3-6 hours
⚠️ Safety & Precautions
- ⚠️ Disconnect the negative battery cable first to prevent a short or accidental cranking.
- ⚠️ Work only on a cool engine; intake and coolant passages can burn you.
- ⚠️ Fuel vapor risk: keep sparks/flames away; relieve fuel pressure before disconnecting any fuel line.
- ⚠️ Keep dirt out of the intake ports; stuff ports with clean shop towels once the manifold is off.
🔧 Required Tools
You'll need the following tools for this repair:
- Safety glasses
- Nitrile gloves
- 10mm socket
- 13mm socket
- 15mm socket
- 3/8" drive ratchet
- 3/8" drive torque wrench (10–100 Nm range)
- 1/4" drive ratchet
- 1/4" drive torque wrench (2–20 Nm range)
- Socket extensions set (3", 6", 10")
- Universal swivel adapter
- Torx bit set (T20–T30)
- Trim clip removal tool
- Flat blade screwdriver
- Pliers (hose clamp)
- Fuel line disconnect tool set (specialty)
- Shop rags
- Labeling tape and marker
- Magnetic pickup tool
- Flashlight
🔩 Required Parts
HowToo sells all the parts you need for this repair:
- Starter motor - Qty: 1
- Intake manifold gasket set - Qty: 1
- Throttle body gasket - Qty: 1
- Replacement hose clamps (assorted) - Qty: 1
- Dielectric grease - Qty: 1
📋 Before You Begin
- Park on level ground, set the parking brake, and open the hood.
- Save radio presets if desired; you’ll be disconnecting the battery.
- Let the engine cool fully.
- Label connectors and vacuum lines as you remove them (use labeling tape).
🔨 Step-by-Step Instructions
Follow these steps in order:
Step 1: Confirm access path (quick question)
- Before I give exact connector/fastener locations and torque specs, tell me: is your XT5 AWD or FWD? (Look for “AWD” on the tailgate or in the driver info screen.)
- Also: does it have auto start/stop? (If you’re not sure, tell me if it restarts automatically at stop lights.)
Step 2: Disconnect the battery
- Use a 10mm socket to disconnect the negative battery cable and isolate it so it can’t spring back.
- Tip: Wrap the cable end in a rag.
Step 3: Remove the engine cover and intake ducting
- Pull up to remove the engine cover (it’s retained by rubber grommets).
- Use a flat blade screwdriver and 10mm socket to loosen the air inlet hose clamps, then remove the intake ducting.
Step 4: Disconnect throttle body and vacuum/EVAP connections
- Unplug the throttle body electrical connector by releasing the lock tab by hand (use a trim clip removal tool if needed).
- Remove vacuum/EVAP lines using pliers (hose clamp) and a trim clip removal tool for any push clips.
- Tip: Take photos before unplugging lines.
Step 5: Relieve fuel pressure (if a fuel line must be moved)
- If your intake removal requires moving a fuel feed line, relieve fuel pressure first.
- Use a fuel line disconnect tool set (specialty) and shop rags to catch any fuel.
- Tip: Keep rags under the fitting.
Step 6: Remove the intake manifold
- Disconnect remaining electrical connectors and brackets in the way (use 10mm socket, Torx bit set (T20–T30), and socket extensions set as needed).
- Remove the intake manifold bolts using a 10mm socket and 3/8" drive ratchet.
- Lift the intake manifold off carefully and set it aside.
- Immediately cover the intake ports with clean shop rags.
Step 7: Remove the starter electrical connections
- Locate the starter in the valley. Remove the starter solenoid connector by hand (small plug).
- Remove the main battery cable nut at the starter using a 13mm socket, then move the cable aside.
- Apply a small amount of dielectric grease during reassembly (on connector seals only).
Step 8: Remove the starter motor
- Remove the starter mounting bolts using a 15mm socket, socket extensions set, and a universal swivel adapter if needed.
- Lift the starter out carefully. Use a magnetic pickup tool if a bolt tries to drop into the valley.
Step 9: Install the new starter
- Set the new starter into place and start the mounting bolts by hand to avoid cross-threading.
- Tighten using a 3/8" drive torque wrench: Torque to (OEM spec will be provided after your AWD/FWD answer).
- Reconnect the main cable and solenoid connector using a 13mm socket: Torque to (OEM spec will be provided after your AWD/FWD answer).
Step 10: Reinstall intake manifold with new gaskets
- Remove the shop rags from the intake ports.
- Install the new intake manifold gaskets and reinstall the manifold.
- Tighten intake manifold bolts in the proper sequence using a 1/4" or 3/8" drive torque wrench: Torque to (OEM spec will be provided after your AWD/FWD answer).
- Reconnect all vacuum/EVAP lines and electrical connectors.
Step 11: Reinstall intake ducting and engine cover
- Reinstall intake ducting using a flat blade screwdriver and 10mm socket to tighten clamps.
- Reinstall the engine cover by pressing it onto the grommets.
Step 12: Reconnect the battery
- Reconnect the negative battery cable using a 10mm socket.
✅ After Repair
- Turn the ignition on (engine off) for 10 seconds, then off, a few times to help the fuel system prime if any line was opened.
- Start the engine and listen for abnormal noises; verify it cranks strongly.
- Check for vacuum leaks (rough idle, hissing) and fuel smell near any disconnected fuel fittings.
- If the check engine light appears, scan for codes and recheck any unplugged connectors.
💰 DIY vs Shop Cost
Shop Cost: $700-$1,400 (parts + labor)
DIY Cost: $180-$450 (parts only)
You Save: $520-$950 by doing it yourself!
Shop labor rates vary but typically run $100-$150/hour. This repair takes a shop approximately 3-6 hours.
🎯 Ready to get started?
HowToo makes it easy: same-day/2-day shipping on every part, plus all the tools and specialty tools you need! Check out the parts and tools sections below to add everything to your cart.
Guide for Starter Motor replace for these Cadillac vehicles
| Year Make Model | Sub Model | Engine | Body Style |
|---|---|---|---|
| 2021 Cadillac XT5 | - | V6 3.6L | - |
| 2020 Cadillac XT5 | - | V6 3.6L | - |
| 2019 Cadillac XT5 | - | V6 3.6L | - |
| 2018 Cadillac XT5 | - | V6 3.6L | - |
| 2017 Cadillac XT5 | - | V6 3.6L | - |