
















How to Replace the Starter Motor on a 2011-2017 Buick Regal (Step-by-Step Guide)
Tools, parts list, safety tips, and torque specs for a smooth starter replacement from underneath
How to Replace the Starter Motor on a 2011-2017 Buick Regal (Step-by-Step Guide)
Tools, parts list, safety tips, and torque specs for a smooth starter replacement from underneath for 2011, 2012, 2013, 2014, 2015, 2016, 2017


🔧 Regal - Starter Motor Replacement
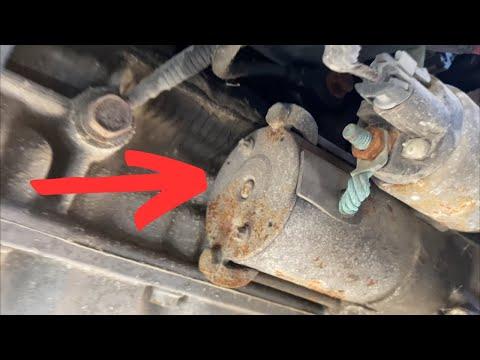
The starter motor spins the engine so it can start. If it’s failing, you may hear a single click, slow cranking, or no crank at all. On your Regal, the starter is bolted to the transmission bellhousing and is typically accessed from underneath.
Difficulty Level: Intermediate | Estimated Time: 1.5-3.0 hours
Assumption: Stock intake/undertray; access is from below.
⚠️ Safety & Precautions
- ⚠️ Disconnect the battery negative cable before touching the starter wiring (prevents shorts and burns).
- ⚠️ Support the car with jack stands on solid, level ground; never rely on a floor jack alone.
- ⚠️ Let the exhaust cool completely; the starter sits near hot exhaust parts.
- ⚠️ Keep the key fob away from the car while working so it can’t accidentally crank.
🔧 Required Tools
You'll need the following tools for this repair:
- Floor jack (rated 3-ton minimum)
- Jack stands (rated 3-ton minimum)
- Wheel chocks
- Safety glasses
- Mechanic gloves
- 10mm socket
- 13mm socket
- 15mm socket
- 3/8" ratchet
- 3/8" torque wrench (10-100 Nm range)
- 6" extension
- 12" extension
- Swivel socket adapter
- Flat trim tool
- Needle-nose pliers
- Small wire brush
- Work light
🔩 Required Parts
HowToo sells all the parts you need for this repair:
- Starter motor - Qty: 1
- Battery terminal grease - Qty: 1
- Dielectric grease - Qty: 1
📋 Before You Begin
- 🅿️ Park on level ground, shift to Park, and set the parking brake.
- 🧱 Chock the rear wheels with wheel chocks.
- 🔋 Open the hood and disconnect the battery negative cable using a 10mm socket; move it aside so it can’t spring back.
- 💡 Set up a work light under the front of the car so you can clearly see the starter.
🔨 Step-by-Step Instructions
Follow these steps in order:
Step 1: Raise and support the front of the car
- Use a floor jack to lift the front at the proper front jacking point.
- Place jack stands under the front support points and lower the car onto them.
- Give the car a gentle shake to confirm it’s stable before you get underneath.
Step 2: Remove the lower splash shield (undertray)
- Use a 10mm socket to remove the bolts.
- Use a flat trim tool to pop any plastic clips (a trim tool is a flat pry tool that helps remove clips without breaking them).
- Set all hardware aside in a tray so nothing gets lost.
Step 3: Locate the starter motor
- From underneath, look where the engine meets the transmission (the “bellhousing,” which is the housing where the transmission bolts to the engine).
- The starter is a small motor with a thicker battery cable going to it.
Step 4: Disconnect the starter wiring
- Remove the small connector (starter solenoid trigger wire) by releasing the lock tab using needle-nose pliers as needed, then pull straight off.
- Remove the nut holding the main battery cable to the starter using a 13mm socket.
- Pull the cable off and tuck it safely aside.
- Apply a tiny amount of dielectric grease to the small connector seal during reassembly. Helps prevent moisture problems.
Step 5: Remove the starter mounting bolts
- Support the starter with one hand while removing bolts with the other.
- Use a 15mm socket with a 6" extension and swivel socket adapter if access is tight.
- Remove the starter mounting bolts and keep them for reuse unless your new starter includes replacements.
Step 6: Remove the starter
- Carefully lower the starter out of the bellhousing area.
- If it hangs up, rotate it slowly to clear nearby brackets/lines—don’t force it.
Step 7: Prep the mounting surface
- Use a small wire brush to clean the starter mounting area on the transmission/engine.
- This helps the starter sit flat and helps grounding (the starter grounds through its mounting).
Step 8: Install the new starter
- Position the new starter in place by hand.
- Start the mounting bolts by hand first (prevents cross-threading).
- Tighten with a 15mm socket, then final-tighten with a torque wrench: Torque to 50 Nm (37 ft-lbs).
Step 9: Reconnect the starter wiring
- Install the main battery cable onto the starter terminal using a 13mm socket: Torque to 13 Nm (115 in-lbs).
- Reconnect the small solenoid connector until it clicks into place.
- Double-check both connections are fully seated and routed away from exhaust/rotating parts.
Step 10: Reinstall the undertray and lower the car
- Reinstall the splash shield using the 10mm socket and flat trim tool for clips.
- Lift slightly with the floor jack, remove jack stands, and lower the car.
Step 11: Reconnect the battery
- Reconnect the battery negative cable using a 10mm socket.
- Apply a light coat of battery terminal grease to reduce corrosion.
✅ After Repair
- 🔑 Start the engine and listen: cranking should be strong and smooth.
- 🔍 Check under the hood and underneath for any loose tools, dangling wires, or rubbing cables.
- 🛑 If you hear grinding or the starter stays engaged after starting, shut the engine off immediately and recheck mounting and wiring.
💰 DIY vs Shop Cost
Shop Cost: $450-$900 (parts + labor)
DIY Cost: $180-$350 (parts only)
You Save: $270-$550 by doing it yourself!
Shop labor rates vary but typically run $100-$150/hour. This repair takes a shop approximately 1.5-3.0 hours.
🎯 Ready to get started?
HowToo makes it easy: same-day/2-day shipping on every part, plus all the tools and specialty tools you need! Check out the parts and tools sections below to add everything to your cart.
Guide for Starter Motor replace for these Buick vehicles
| Year Make Model | Sub Model | Engine | Body Style |
|---|---|---|---|
| 2017 Buick Regal | - | - | - |
| 2016 Buick Regal | - | - | - |
| 2015 Buick Regal | - | - | - |
| 2014 Buick Regal | - | - | - |
| 2013 Buick Regal | - | - | - |
| 2012 Buick Regal | - | - | - |
| 2011 Buick Regal | - | - | - |