


How to Replace the Side View Mirror on a 2015 Toyota Corolla (DIY Guide)
Step-by-step instructions with tools, parts, wiring tips, and torque specs (66 in-lbs / 7.5 Nm)
How to Replace the Side View Mirror on a 2015 Toyota Corolla (DIY Guide)
Step-by-step instructions with tools, parts, wiring tips, and torque specs (66 in-lbs / 7.5 Nm)


🔧 Corolla - Side View Mirror Replacement
You’ll remove the small interior trim cover at the front top of the door, unplug the mirror wiring, then unbolt and swap the mirror assembly. This is mostly trim work—go slow so you don’t break clips or scratch paint.
Quick questions (so I match your mirror wiring): Which side are you replacing (driver/left or passenger/right)? Does your mirror have an integrated turn signal and/or heat?
Difficulty Level: Beginner | Estimated Time: 0.5-1.0 hours
⚠️ Safety & Precautions
- 🧤 Wear gloves and safety glasses; trim edges can be sharp.
- ⚡ Disconnect the negative battery cable before unplugging door wiring to avoid shorting the mirror circuit.
- 🧼 Put painter’s tape around the mirror base on the outside to protect the paint while you lift the mirror off.
- 🚪 Support the mirror with one hand while removing the last nut so it doesn’t fall and chip the door.
🔧 Required Tools
You'll need the following tools for this repair:
- 10mm socket
- 1/4" ratchet
- 6" socket extension
- Inch-pound torque wrench
- Plastic trim removal tool
- Phillips #2 screwdriver
- Needle-nose pliers
- Painter’s tape
- Flashlight
- Safety glasses
- Mechanic’s gloves
🔩 Required Parts
HowToo sells all the parts you need for this repair:
- Side view mirror assembly (correct side) - Qty: 1
- Door trim panel clips - Qty: 2-6 (only if any break)
📋 Before You Begin
- Park on level ground, shift to Park, and turn the ignition off.
- Lower the window on the door you’re working on (easier access if a clip drops).
- Use a 10mm socket to disconnect the negative battery terminal, then wait at least 90 seconds before unplugging connectors.
- Apply painter’s tape around the outside mirror base where it meets the door.
🔨 Step-by-Step Instructions
Follow these steps in order:
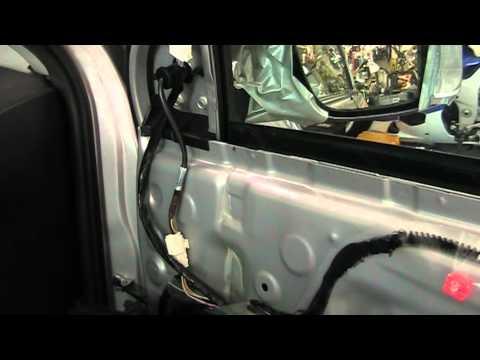
Step 1: Remove the interior mirror sail panel
- Use a plastic trim removal tool to gently pry off the small triangular trim cover at the top-front corner of the door (inside, by the mirror).
- Pull straight outward to release clips.
- If your sail panel has a small cover cap or screw on some builds, remove it with a Phillips #2 screwdriver first.
Step 2: Unplug the mirror electrical connector
- Locate the mirror connector behind the sail panel.
- Press the locking tab and unplug it by hand. If tight, use needle-nose pliers gently on the connector body (not the wires).
- Common variants: basic power mirror (one connector) vs. mirror with turn signal/heat (may have additional pins or an additional connector).
Step 3: Remove the mirror mounting nuts
- Support the mirror from the outside with one hand.
- Use a 10mm socket, 1/4" ratchet, and 6" extension to remove the three mirror mounting nuts.
- Place the nuts somewhere safe; don’t drop them into the door.
Step 4: Remove the old mirror
- From outside the door, pull the mirror straight away from the door while guiding the wiring harness through the opening.
- Remove the mirror and gasket together.
- Use a flashlight to confirm the mirror mounting surface is clean and the old gasket isn’t stuck to the door.
Step 5: Install the new mirror
- Feed the new mirror wiring harness through the door opening.
- Seat the mirror squarely against the door so the gasket sits flat (no folds).
- Hand-start all three nuts to avoid cross-threading, then snug them with the 10mm socket.
- Use an inch-pound torque wrench to finish tightening: Torque to 7.5 Nm (66 in-lbs).
Step 6: Reconnect wiring and reinstall trim
- Plug the mirror connector(s) back in until you feel/hear the lock click.
- Reinstall the sail panel by lining up the clips and pressing it straight into place by hand.
Step 7: Reconnect the battery
- Reconnect the negative battery terminal using a 10mm socket.
- Remove the painter’s tape from the door.
✅ After Repair
- Turn the ignition on and test mirror movement in all directions using the mirror switch.
- If equipped, verify the mirror turn signal works and that mirror heat comes on with the rear defogger.
- Check mirror fitment outside: gasket should be fully seated, no wind-gap.
- Take a short drive and listen for wind noise around the mirror base.
💰 DIY vs Shop Cost
Shop Cost: $250-$650 (parts + labor)
DIY Cost: $80-$400 (parts only)
You Save: $170-$250+ by doing it yourself!
Shop labor rates vary but typically run $100-$150/hour. This repair takes a shop approximately 0.5-1.0 hours.
🎯 Ready to get started?
HowToo makes it easy: same-day/2-day shipping on every part, plus all the tools and specialty tools you need! Check out the parts and tools sections below to add everything to your cart.
