


How to Replace the Serpentine Belt on a 2019 Nissan Altima 2.5L
Step-by-step DIY guide with required tools, parts list, torque specs, safety tips, and cost comparison
How to Replace the Serpentine Belt on a 2019 Nissan Altima 2.5L
Step-by-step DIY guide with required tools, parts list, torque specs, safety tips, and cost comparison
🔧 Altima - Serpentine Belt Replacement
The serpentine belt drives your alternator, A/C compressor, and other accessories. You’ll remove tension from the belt, route a new one on the pulleys, and reinstall any covers you remove for access.
Difficulty Level: Intermediate | Estimated Time: 1–2 hours
⚠️ Safety & Precautions
- ⚠️ Work on a cool engine only; belts and pulleys can be very hot after driving.
- ⚠️ Disconnect the negative battery cable if you might touch the starter or main power cables accidentally.
- ⚠️ Always support the front of the car with jack stands, never rely only on a floor jack.
- ⚠️ Keep fingers and tools clear of pulleys; even hand-rotating can pinch skin.
- ⚠️ Do not start the engine until the belt is fully installed and properly routed.
🔧 Required Tools
You'll need the following tools for this repair:
- 🛠️ Floor jack (rated 3-ton minimum)
- 🛠️ Jack stands (rated 3-ton minimum, Qty: 2)
- 🛠️ Wheel chocks
- 🛠️ 3/8" drive ratchet
- 🛠️ 1/2" drive breaker bar
- 🛠️ 14mm socket
- 🛠️ 10mm socket
- 🛠️ 3/8" drive extension (6")
- 🛠️ Serpentine belt tool (slim profile) (specialty)
- 🛠️ Torque wrench 3/8" drive (5–80 ft-lbs range)
- 🛠️ Flat-blade trim tool
- 🛠️ Needle-nose pliers
- 🛠️ Work light
- 🛠️ Mechanic’s gloves
- 🛠️ Safety glasses
🔩 Required Parts
HowToo sells all the parts you need for this repair:
- 🔩 Serpentine drive belt (2.5L with A/C) - Qty: 1
- 🔩 Belt tensioner assembly - Qty: 1 (optional but recommended if noisy or original)
- 🔩 Idler pulley - Qty: 1 (optional but recommended if rough or noisy)
- 🔩 Plastic push clips for splash shield - Qty: 4–6 (in case any break)
- 🔩 Dielectric grease - Qty: small tube (optional for battery terminal if disconnected)
📋 Before You Begin
- Park the Altima on level ground, set the parking brake, and place wheel chocks behind the rear wheels.
- Turn the ignition off and remove the key; make sure the engine is completely cool.
- If you want extra safety, disconnect the negative battery cable with a 10mm socket.
- Loosen the front passenger-side wheel lug nuts slightly before lifting the car.
- Have a notepad or phone ready to take a picture of the existing belt routing before removal.
🔨 Step-by-Step Instructions
Follow these steps in order:
Step 1: Lift and secure the front passenger side
- Use the floor jack (3-ton) to lift under the front passenger-side jacking point (reinforced pinch weld behind the wheel).
- Place jack stands (3-ton) under the proper support points and gently lower the car onto them.
- Remove the front passenger wheel using the 3/8" ratchet and correct lug socket (usually 21mm; use whatever fits your lugs).
- Always shake car slightly to confirm stability.
Step 2: Remove the inner fender splash shield
- Use the flat-blade trim tool to pop out the plastic clips holding the front part of the inner fender liner and lower splash shield.
- Use the 10mm socket and 3/8" ratchet to remove any small bolts in the liner area.
- Pull back or remove the liner enough to clearly see the crankshaft pulley and the rest of the belt path.
- Keep clips and bolts in a small tray.
Step 3: Study and record belt routing
- Use the work light to see all pulleys from the wheel well and top of the engine bay.
- Look for a belt routing diagram sticker under the hood; if present, take a picture.
- If no sticker, take clear photos of how the belt is routed over and under each pulley.
- A clear photo saves huge headaches later.
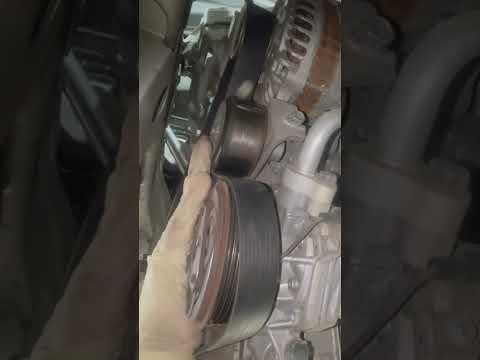
Step 4: Locate the belt tensioner
- The belt tensioner is a spring-loaded pulley assembly; on the 2.5L, it is mounted on the front of the engine with a small pulley and a 14mm hex on the arm.
- Identify the 14mm bolt head or square drive where your tool fits to relieve tension.
- Confirm which pulley moves when pushing on belt.
Step 5: Relieve tension and remove the old belt
- Install the 14mm socket on the tensioner bolt, connected to the serpentine belt tool or 1/2" breaker bar with extension if needed.
- Rotate the tensioner in the direction that loosens the belt (usually clockwise when viewed from the passenger wheel well).
- While holding the tensioner, slip the belt off the easiest-access pulley (often the alternator or idler) with your free hand.
- Slowly release the tensioner back to its resting position; do not let it snap back.
- Remove the belt completely from all pulleys and take it out through the wheel well.
- Note wear patterns on old belt for future reference.
Step 6: Inspect pulleys and tensioner
- Spin each accessible pulley by hand (alternator, idler, A/C, tensioner). It should turn smoothly and quietly, with no grinding or wobble.
- Check the tensioner arm for smooth spring movement if you move it with the 14mm socket again.
- If any pulley feels rough, noisy, or loose, replace that pulley or the whole tensioner now using the same access.
Step 7: (If needed) Replace the tensioner or idler
- Use the 14mm socket and 3/8" ratchet to remove the mounting bolts for the tensioner assembly.
- Remove the old tensioner and position the new one in the same orientation.
- Install the bolts finger-tight, then tighten with the torque wrench and 14mm socket to 50 Nm (37 ft-lbs).
- For an idler pulley, remove the center bolt with the 14mm socket, swap the pulley, and torque the center bolt to 25 Nm (18 ft-lbs).
- Do not over-tighten; you can damage threads.
Step 8: Route the new belt (without tension yet)
- Compare the new belt length and rib count to the old belt to confirm match.
- Starting at the bottom crankshaft pulley, route the belt around the pulleys following your photo or the diagram.
- Make sure the ribbed side of the belt sits in ribbed pulleys and the smooth side runs on any smooth pulley.
- Leave the easiest-access upper pulley (usually idler or alternator) for last so you can slip the belt on after pulling the tensioner.
- Double-check each groove is fully seated.
Step 9: Apply tension and seat the belt
- Again place the 14mm socket and serpentine belt tool or breaker bar on the tensioner.
- Rotate the tensioner to create slack in the belt.
- With your free hand, slide the belt over the final pulley.
- Carefully release the tensioner so it takes up the slack and tensions the belt.
- Visually inspect from both the wheel well and top of the engine to confirm the belt is centered in every pulley groove.
Step 10: Final inspection before reassembly
- Check that the belt follows the exact same path as your picture/diagram.
- Look for any twist in the belt; it must lie flat on each pulley.
- Using a gloved hand, rotate the crank pulley slightly by hand (if possible) to confirm the belt tracks correctly and stays centered.
- If anything looks off, remove and re-route now.
Step 11: Reinstall splash shield and wheel
- Reposition the inner fender liner and lower splash shield.
- Install all bolts with the 10mm socket and snug them to about 7 Nm (62 in-lbs) with the torque wrench if desired.
- Reinstall plastic clips using your hands or needle-nose pliers if tight.
- Reinstall the wheel and hand-thread all lug nuts.
- Raise the car slightly with the floor jack, remove the jack stands, and lower the car to the ground.
- Tighten the lug nuts with a torque wrench and proper socket to the factory spec (commonly around 110 Nm (80 ft-lbs) if you don’t have the exact value).
Step 12: Reconnect battery and test
- If you disconnected the battery, reinstall the negative cable using the 10mm socket and tighten to 5 Nm (44 in-lbs) (snug, not overtight).
- Start the engine and let it idle while you watch the belt from the top.
- Make sure the belt runs smoothly with no wobble, squeal, or visible jumping.
- Turn on A/C, headlights, and steering input (light turns) to lightly load the belt system and listen for noises.
✅ After Repair
- Check under the hood again after 5–10 minutes of idling to confirm the belt is still centered and running smoothly.
- After your first short drive (5–10 km), recheck belt alignment and listen for any squealing or chirping.
- If you hear noise, shut the engine off and re-check routing and pulley condition.
- Keep your old belt in the trunk as an emergency spare if it’s not badly damaged.
💰 DIY vs Shop Cost
Shop Cost: $220–$380 (parts + labor)
DIY Cost: $35–$90 (belt only) or $90–$180 (belt + tensioner/idler)
You Save: $130–$290 by doing it yourself!
Shop labor rates vary but typically run $100–$150/hour. This repair takes a shop approximately 1.0–1.5 hours.
🎯 Ready to get started?
HowToo makes it easy: same-day/2-day shipping on every part, plus all the tools and specialty tools you need! Check out the parts and tools sections above to add everything to your cart.
