









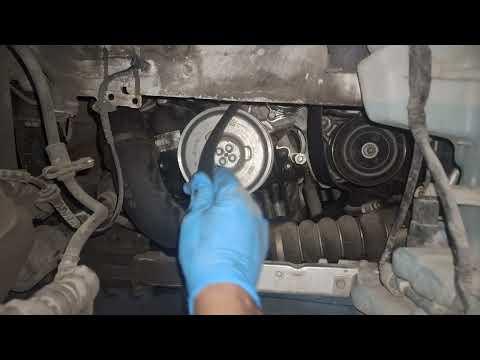







How to Replace the Serpentine Belt on a 2016-2019 BMW X1 (Drive Belt Guide) (Engine: Inline 4 2.0L)
Step-by-step instructions with required tools, parts, safety tips, and belt routing checks
How to Replace the Serpentine Belt on a 2016-2019 BMW X1 (Drive Belt Guide) (Engine: Inline 4 2.0L)
Step-by-step instructions with required tools, parts, safety tips, and belt routing checks for 2016, 2017, 2018, 2019


🔧 X1 - Serpentine Belt Replacement
The serpentine belt (drive belt) runs the alternator and A/C compressor. Replacing it fixes squealing, cracking, glazing, or a belt that’s slipping, and helps prevent a sudden no-charge/overheat situation if it breaks.
Difficulty Level: Intermediate | Estimated Time: 1.0-2.0 hours
Assumption: Your X1 uses the transverse 2.0T belt setup with access through the RH wheel well.
⚠️ Safety & Precautions
- ⚠️ Work on a cool engine; keep hands clear of rotating pulleys.
- ⚠️ Support the X1 with jack stands; never rely on a floor jack alone.
- ⚠️ Keep the key/fob away from the vehicle so it can’t wake up unexpectedly.
- ⚠️ Do not start the engine until all tools are removed from the belt area.
- ⚠️ Battery disconnect is not required for belt replacement, but avoid shorting the alternator area with metal tools.
🔧 Required Tools
You'll need the following tools for this repair:
- Floor jack (rated 3-ton minimum)
- Jack stands (rated 3-ton minimum)
- Wheel chocks
- 17mm socket
- Breaker bar (1/2")
- Torque wrench (20-200 Nm range)
- 8mm socket
- 10mm socket
- Ratchet (3/8")
- Torx T25 bit
- Torx T30 bit
- 16mm socket
- Serpentine belt tool (specialty)
- Trim clip removal tool
- Work light
- Mechanic gloves
- Safety glasses
🔩 Required Parts
HowToo sells all the parts you need for this repair:
- Serpentine belt - Qty: 1
- Serpentine belt tensioner - Qty: 1 Optional but recommended if noisy/weak
- Idler pulley - Qty: 1 Optional if bearing is noisy
- Fender liner clips/screws assortment - Qty: 1 Optional if any break
📋 Before You Begin
- Park on level ground, shift to Park, and set the parking brake.
- Chock the rear wheels with wheel chocks.
- Open the hood and let the engine cool.
- Take a clear photo of the belt routing before removal (it’s your “map”).
🔨 Step-by-Step Instructions
Follow these steps in order:
Step 1: Lift and secure the front-right corner
- Use a breaker bar (1/2") with a 17mm socket to slightly loosen the front-right wheel bolts.
- Lift the front-right corner using the floor jack (rated 3-ton minimum).
- Set the vehicle onto jack stands (rated 3-ton minimum).
- Remove the wheel bolts using the 17mm socket and remove the wheel.
Step 2: Remove the lower splash shield and right fender liner section
- Use an 8mm socket and 10mm socket to remove the fasteners holding the lower splash shield (undertray) near the belt area.
- Use Torx T25 bit and Torx T30 bit to remove the fender liner screws.
- Use a trim clip removal tool to pop any plastic clips without breaking them. (A trim clip tool is a fork-shaped pry tool made for plastic fasteners.)
- Pull the liner back enough to clearly see the belt, tensioner, and pulleys.
Step 3: Locate the belt tensioner and unload belt tension
- Find the belt tensioner (the spring-loaded arm with a pulley).
- Install a 16mm socket on the tensioner’s hex, then attach a serpentine belt tool (specialty) or your ratchet (3/8") if it fits.
- Rotate the tensioner smoothly to relieve belt tension. Move slowly; it’s spring-loaded.
- While holding the tensioner rotated, slide the belt off the easiest-to-reach pulley (often the alternator).
Step 4: Remove the old belt
- Release the tensioner slowly back to its resting position using the 16mm socket.
- Remove the belt from all pulleys by hand.
- Inspect the pulleys for wobble or roughness by spinning them by hand. Rough spin = likely bad bearing.
Step 5: Route the new belt (keep it fully seated in grooves)
- Compare the new belt to the old belt (length and rib count must match).
- Route the belt around the pulleys following your photo.
- Make sure the ribbed side sits in ribbed pulleys, and the smooth back rides on smooth pulleys.
- Use a work light to verify the belt ribs are centered in every pulley groove.
Step 6: Apply tension and finish installation
- Use the 16mm socket with the serpentine belt tool (specialty) to rotate the tensioner again.
- Slip the belt onto the last pulley, then slowly release the tensioner so it tightens the belt.
- Re-check every pulley: the belt must not ride on the edge or be one rib off.
Step 7: Reinstall liners, undertray, and wheel
- Reinstall the fender liner using Torx T25 bit / Torx T30 bit and any clips using the trim clip removal tool (to press clips back in straight).
- Reinstall the lower splash shield fasteners using the 8mm socket / 10mm socket.
- Reinstall the wheel and hand-thread the bolts.
- Lower the X1 off the jack stands (rated 3-ton minimum) using the floor jack (rated 3-ton minimum).
- Tighten wheel bolts using a torque wrench: Torque to 140 Nm (103 ft-lbs)
✅ After Repair
- Start the engine and let it idle while you watch the belt for 30-60 seconds (from a safe distance).
- Listen for chirping/squealing or a grinding sound (can indicate a bad tensioner/idler).
- Turn the A/C on and off and confirm the belt runs smoothly.
- After a short test drive, re-check the undertray area for any loose fasteners or rubbing.
💰 DIY vs Shop Cost
Shop Cost: $250-$500 (parts + labor)
DIY Cost: $40-$120 (parts only)
You Save: $210-$380 by doing it yourself!
Shop labor rates vary but typically run $100-$150/hour. This repair takes a shop approximately 1.0-2.0 hours.
🎯 Ready to get started?
HowToo makes it easy: same-day/2-day shipping on every part, plus all the tools and specialty tools you need! Check out the parts and tools sections below to add everything to your cart.
Guide for Serpentine Belt replace for these BMW vehicles
| Year Make Model | Sub Model | Engine | Body Style |
|---|---|---|---|
| 2019 BMW X1 | - | Inline 4 2.0L | - |
| 2018 BMW X1 | - | Inline 4 2.0L | - |
| 2017 BMW X1 | - | Inline 4 2.0L | - |
| 2016 BMW X1 | - | Inline 4 2.0L | - |