
















How to Replace the Serpentine Belt on a 2014-2024 INFINITI QX80 (Step-by-Step Guide) (Engine: V8 5.6L)
Tools, belt routing tips, tensioner/idler inspection, and torque specs for a smooth DIY install
How to Replace the Serpentine Belt on a 2014-2024 INFINITI QX80 (Step-by-Step Guide) (Engine: V8 5.6L)
Tools, belt routing tips, tensioner/idler inspection, and torque specs for a smooth DIY install for 2014, 2015, 2016, 2017, 2018, 2019, 2020, 2021, 2022, 2023, 2024


🔧 QX80 - Serpentine Belt Replacement
The serpentine belt drives key accessories like the alternator, A/C compressor, and power steering. If it’s cracked, glazed, squealing, or has chunks missing, replacing it prevents a sudden breakdown and overheating.
Difficulty Level: Intermediate | Estimated Time: 0.8-1.5 hours
Assumption: your QX80 uses the standard single accessory drive belt with an automatic spring tensioner.
⚠️ Safety & Precautions
- ⚠️ Work on a cold engine; the radiator and fan area can burn you.
- ⚠️ Keep hands/tools clear of the cooling fan and pulleys.
- ⚠️ Do not start the engine with fingers near the belt path.
- ⚠️ Battery disconnect is not required, but remove the key/fob from the vehicle and keep it away from the work area.
🔧 Required Tools
You'll need the following tools for this repair:
- Safety glasses
- Mechanic gloves
- Flashlight
- 10mm socket
- 3/8" drive ratchet
- 3/8" drive breaker bar
- 14mm socket
- Serpentine belt tool (specialty)
- Trim clip removal tool
- Torque wrench (10-100 ft-lbs)
🔩 Required Parts
HowToo sells all the parts you need for this repair:
- Serpentine belt - Qty: 1
- Belt tensioner assembly - Qty: 1 (recommended if noisy/weak)
- Idler pulley - Qty: 1 (recommended if noisy/rough)
📋 Before You Begin
- 🅿️ Park on level ground, shift to Park, and set the parking brake.
- Open the hood and let the engine cool completely.
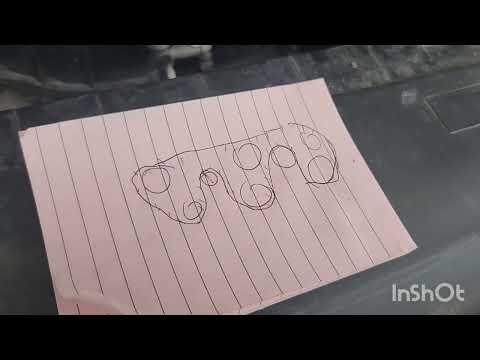
- Use your phone to take a clear picture of the belt routing (or sketch it). This saves a lot of frustration.
- If your QX80 has a plastic engine cover, plan to remove it for better access.
🔨 Step-by-Step Instructions
Follow these steps in order:
Step 1: Remove the engine cover (if equipped)
- Pull upward to release the cover grommets, or remove fasteners using a 10mm socket (varies by cover style).
- Set the cover aside where it won’t get stepped on.
Step 2: Locate the belt tensioner
- Find the automatic belt tensioner at the front of the engine (it’s a spring-loaded arm with a pulley).
- The “tensioner” is the part that keeps the belt tight automatically.
Step 3: Relieve belt tension
- Install a 14mm socket on the tensioner’s hex boss/bolt head (common on this engine) using a 3/8" drive breaker bar.
- Rotate the tensioner smoothly to relieve tension (you’ll feel spring force). Move slowly—spring tension is strong.
- If space is tight, use a serpentine belt tool (specialty) (a thin, long handle made for belt tensioners).
Step 4: Remove the old belt
- While holding the tensioner released, slide the belt off the easiest-to-reach smooth pulley (often the idler).
- Slowly let the tensioner return to its resting position—do not let it snap back.
- Remove the belt from the remaining pulleys and pull it out.
Step 5: Quick pulley/tensioner check (important)
- Spin each pulley by hand. It should spin smoothly and quietly.
- Wiggle each pulley—there should be no looseness.
- If you hear grinding, feel roughness, or see wobble, replace the noisy pulley or the tensioner.
Step 6: Route the new belt
- Compare the new belt length and rib count to the old belt.
- Route the belt around the pulleys following your photo/sketch.
- Make sure the belt ribs sit perfectly inside the ribbed pulleys (no ribs hanging off). Misalignment will shred the belt.
- Leave one easy-to-reach pulley for last (usually a smooth idler pulley).
Step 7: Apply tension and seat the belt
- Use the 14mm socket with the 3/8" drive breaker bar to rotate the tensioner again.
- Slip the belt onto the last pulley, then slowly release the tensioner.
- Visually check every pulley: the belt must be centered and fully seated.
Step 8: Reinstall the engine cover
- Reinstall any removed hardware using a 10mm socket.
- If any fasteners were removed for covers/brackets, Torque to 8 Nm (71 in-lbs) for typical 6mm cover bolts.
Step 9: If you replaced the tensioner or idler (optional)
- Remove the mounting bolt(s) using a 14mm socket and 3/8" drive ratchet.
- Install the new part and tighten the bolt(s) with a torque wrench (10-100 ft-lbs).
- Torque to 45 Nm (33 ft-lbs) for typical idler/tensioner mounting bolts on this setup.
✅ After Repair
- Start the engine and watch the belt for 20-30 seconds. It should run smooth with no hopping or wobble.
- Listen for chirping/squealing. If you hear it, shut the engine off and re-check belt seating on every pulley groove.
- Turn the steering wheel lock-to-lock briefly to load the belt and confirm no noise under load.
- Recheck belt alignment after a short test drive.
💰 DIY vs Shop Cost
Shop Cost: $180-$400 (parts + labor)
DIY Cost: $35-$90 (parts only)
You Save: $145-$310 by doing it yourself!
Shop labor rates vary but typically run $100-$150/hour. This repair takes a shop approximately 0.8-1.2 hours.
🎯 Ready to get started?
HowToo makes it easy: same-day/2-day shipping on every part, plus all the tools and specialty tools you need! Check out the parts and tools sections below to add everything to your cart.
Guide for Serpentine Belt replace for these INFINITI vehicles
| Year Make Model | Sub Model | Engine | Body Style |
|---|---|---|---|
| 2024 INFINITI QX80 | - | V8 5.6L | - |
| 2023 INFINITI QX80 | - | V8 5.6L | - |
| 2022 INFINITI QX80 | - | V8 5.6L | - |
| 2021 INFINITI QX80 | - | V8 5.6L | - |
| 2020 INFINITI QX80 | - | V8 5.6L | - |
| 2019 INFINITI QX80 | - | V8 5.6L | - |
| 2018 INFINITI QX80 | - | V8 5.6L | - |
| 2017 INFINITI QX80 | - | V8 5.6L | - |
| 2016 INFINITI QX80 | - | V8 5.6L | - |
| 2015 INFINITI QX80 | - | V8 5.6L | - |
| 2014 INFINITI QX80 | - | V8 5.6L | - |