
















How to Replace the Serpentine Belt on a 2008 Nissan Altima (2.5L/3.5L)
Step-by-step belt routing, tensioner release instructions, required tools/parts, and safety tips for 2007, 2008, 2009, 2010, 2011, 2012, 2013
How to Replace the Serpentine Belt on a 2008 Nissan Altima (2.5L/3.5L)
Step-by-step belt routing, tensioner release instructions, required tools/parts, and safety tips for 2007, 2008, 2009, 2010, 2011, 2012, 2013


🔧 Altima - Serpentine Belt Replacement
The serpentine belt drives accessories like the alternator and A/C. On your Altima, the belt is held tight by an automatic spring-loaded tensioner, so the job is mainly about safely releasing tension, swapping the belt, and confirming the routing is correct.
Difficulty Level: Intermediate | Estimated Time: 0.5-1.5 hours
⚠️ Safety & Precautions
- ⚠️ Work on a cool engine; keep hands clear of pulleys and fans.
- ⚠️ Support the car with jack stands; never rely on a floor jack alone.
- ⚠️ Do not start the engine while your hands are near the belt path.
- ⚠️ If you remove the right-front wheel, keep the car on level ground and use wheel chocks.
🔧 Required Tools
You'll need the following tools for this repair:
- Floor jack (rated 2-ton minimum)
- Jack stands (rated 2-ton minimum)
- Wheel chocks
- Lug nut socket 21mm
- Ratchet 3/8"
- Breaker bar 3/8" or 1/2"
- Serpentine belt tool (specialty)
- Socket 14mm
- Socket 15mm
- Socket 17mm
- Extension 6"
- Trim clip remover
- Flathead screwdriver
- Work light
- Gloves
- Safety glasses
🔩 Required Parts
HowToo sells all the parts you need for this repair:
- Serpentine belt - Qty: 1
- Fender liner / splash shield clips - Qty: 2-6
📋 Before You Begin
- Park on level ground, set the parking brake, and place wheel chocks behind the rear wheels.
- Open the hood and find the belt routing diagram (usually on the radiator support or underside of the hood). If it’s missing, take a clear photo of the current routing before removing the belt.
- Plan access: on the 2.5L, belt access is usually easiest from the right-front wheel well.
🔨 Step-by-Step Instructions
Follow these steps in order:
Step 1: Raise the right-front corner for access
- Use a 21mm lug nut socket and breaker bar to loosen the right-front lug nuts 1/2 turn (don’t remove them yet).
- Lift the right-front using a floor jack, then support it with jack stands.
- Remove the wheel using the 21mm lug nut socket.
Step 2: Remove the splash shield / fender liner section
- Use a trim clip remover and flathead screwdriver to remove the plastic clips/screws from the front of the right fender liner (the small access section near the crank pulley area).
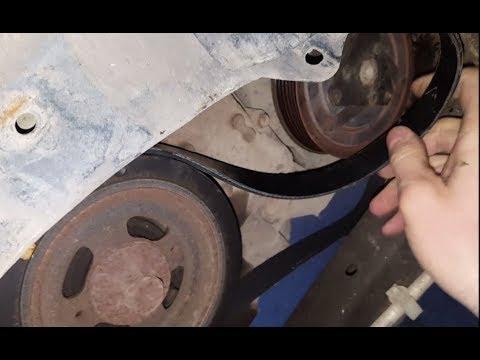
- Pull the liner back enough to clearly see the belt, pulleys, and tensioner. Use a work light for visibility.
Step 3: Confirm belt routing before removal
- Compare what you see to the under-hood routing diagram, or use your phone to take a picture.
- Photo first; it prevents routing mistakes.
Step 4: Release tension from the automatic tensioner
- The tensioner is a spring-loaded arm that keeps the belt tight automatically (you rotate it to slacken the belt).
- Place a serpentine belt tool (specialty) or breaker bar on the tensioner’s drive point.
- On many Altima 2.5 setups, the drive point is the bolt head on the tensioner pulley. Use the socket that fits your tensioner: 14mm socket or 15mm socket or 17mm socket with a ratchet 3/8" and extension 6".
- Rotate the tensioner smoothly to create slack, then slide the belt off the easiest-to-reach top pulley using your free hand.
- Slowly let the tensioner return to rest. Do not let it “snap” back.
Step 5: Remove the old belt
- Pull the belt out through the wheel well opening.
- Inspect each pulley by hand for wobble or roughness (alternator, idler, tensioner pulley, A/C). If any pulley feels gritty, noisy, or loose, stop and address that before installing a new belt.
Step 6: Install the new belt (route it correctly)
- Route the new belt around the pulleys using the under-hood diagram. Start at the crankshaft pulley (the large lower pulley) and work your way around.
- Keep the belt fully seated in every grooved pulley as you go (the ribs must sit in the grooves).
- Leave the easiest pulley for last (often a smooth idler or the alternator pulley depending on access).
Step 7: Apply tension and slip the belt onto the last pulley
- Use the serpentine belt tool (specialty) or breaker bar with the correct socket (14mm or 15mm or 17mm) to rotate the tensioner and create slack again.
- Slide the belt onto the final pulley, then slowly release the tensioner so it tensions the belt.
- Do a final visual check: the belt should be centered on smooth pulleys and perfectly seated in the grooves on ribbed pulleys.
Step 8: Reinstall splash shield and wheel
- Reposition the liner and reinstall clips using a trim clip remover and flathead screwdriver.
- Install the wheel and hand-thread lug nuts.
- Lower the car off the jack stands using the floor jack.
- Tighten lug nuts in a star pattern using a 21mm lug nut socket to Torque to 113 Nm (83 ft-lbs).
✅ After Repair
- Start the engine and watch the belt for 15–30 seconds. It should run smooth with no hopping, squealing, or wandering.
- Turn the A/C on and off and listen for noise changes. A brief chirp can mean the belt isn’t seated in a groove.
- Shut the engine off and re-check belt seating one more time with your work light.
💰 DIY vs Shop Cost
Shop Cost: $140-$280 (parts + labor)
DIY Cost: $20-$60 (parts only)
You Save: $120-$220 by doing it yourself!
Shop labor rates vary but typically run $100-$150/hour. This repair takes a shop approximately 0.5-1.0 hours.
🎯 Ready to get started?
HowToo makes it easy: same-day/2-day shipping on every part, plus all the tools and specialty tools you need! Check out the parts and tools sections below to add everything to your cart.