


How to Replace the Mass Air Flow (MAF) Sensor on a 2018 Toyota Prius
Step-by-step DIY instructions with required tools, parts list, safety tips, and torque specs for 2017, 2018, 2019, 2020, 2021, 2022
How to Replace the Mass Air Flow (MAF) Sensor on a 2018 Toyota Prius
Step-by-step DIY instructions with required tools, parts list, safety tips, and torque specs for 2017, 2018, 2019, 2020, 2021, 2022
🔧 Prius - Mass Air Flow (MAF) Sensor Replacement
Your Prius uses a MAF sensor to measure how much air is entering the engine so the computer can add the right amount of fuel. If it’s dirty or failed, you can get rough idle, poor MPG, or check-engine lights. Replacement is straightforward and usually takes just a few minutes.
Difficulty Level: Beginner | Estimated Time: 0.3-0.7 hours
⚠️ Safety & Precautions
- ⚠️ Turn the car fully OFF and keep the key fob at least 10 feet away.
- ⚠️ Let the engine cool so you don’t burn your hands.
- ⚠️ Do not touch the MAF sensing element; it’s extremely delicate.
- ⚠️ Battery disconnect is not required, but avoid unplugging/plugging with the car in READY.
🔧 Required Tools
You'll need the following tools for this repair:
- Safety glasses
- Nitrile gloves
- Phillips screwdriver #2
- 10mm socket
- 1/4" drive ratchet
- 6" extension for 1/4" ratchet
- Trim clip removal tool
- Torque wrench (inch-pound)
- Flashlight
🔩 Required Parts
HowToo sells all the parts you need for this repair:
- Mass air flow (MAF) sensor - Qty: 1
- MAF sensor O-ring/seal - Qty: 1
- MAF sensor-safe cleaner - Qty: 1
📋 Before You Begin
- Park on level ground and shift to Park.
- Power the car OFF (make sure the dash is dark).
- Open the hood and remove any loose items around the air box.
- Take a quick photo before unplugging anything.
🔨 Step-by-Step Instructions
Follow these steps in order:
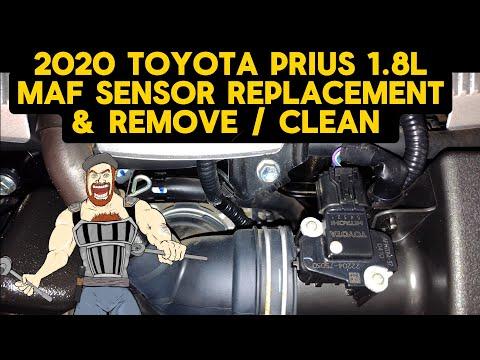
Step 1: Locate the MAF sensor
- Find the air filter box and the large intake tube that leads toward the engine.
- The MAF sensor is mounted in the intake tube/air box area and has an electrical connector plugged into it.
- Use a flashlight to clearly see the sensor and screws.
Step 2: Unplug the electrical connector
- Press the connector locking tab with your thumb; if it’s stubborn, gently help it with a trim clip removal tool.
- Pull the connector straight off (don’t yank the wires).
- If it won’t release, re-check the lock tab.
Step 3: Remove the MAF sensor fasteners
- If your sensor is held by bolts, remove them using a 10mm socket, 1/4" drive ratchet, and 6" extension.
- If your sensor is held by screws, remove them using a Phillips screwdriver #2.
- Set the fasteners aside where they won’t fall into the engine bay.
Step 4: Remove the MAF sensor
- Gently wiggle and pull the sensor straight out of its mounting hole.
- Remove and inspect the MAF sensor O-ring/seal. Replace it if it’s flattened, torn, or hard.
- Do not touch the sensing element inside the sensor opening.
Step 5: Install the new MAF sensor
- Lightly seat the new MAF sensor O-ring/seal (if separate) so it sits flat.
- Insert the new mass air flow (MAF) sensor straight into the opening—no forcing.
- Reinstall the fasteners using a 10mm socket or Phillips screwdriver #2 (whichever your Prius uses).
- If using a torque wrench, tighten small fasteners snugly: Torque to 2.0 Nm (18 in-lbs).
Step 6: Reconnect the connector
- Push the connector on until you feel/hear it click.
- Gently tug the connector to confirm it’s locked.
Step 7: Optional cleaning check (only if reusing the old sensor)
- If you were cleaning instead of replacing: spray the sensing area with MAF sensor-safe cleaner and let it air-dry completely.
- Do not use compressed air or wipe the sensor.
✅ After Repair
- Start your Prius normally and confirm it idles smoothly.
- If a check-engine light was on, it may clear after a few drive cycles; otherwise clear it with a scan tool.
- Test drive 10–15 minutes and verify there’s no hesitation or surging.
- Recheck the connector and fasteners if you hear a new hiss/whistle (possible air leak).
💰 DIY vs Shop Cost
Shop Cost: $180-$380 (parts + labor)
DIY Cost: $80-$220 (parts only)
You Save: $100-$200 by doing it yourself!
Shop labor rates vary but typically run $100-$150/hour. This repair takes a shop approximately 0.5-1.0 hours.
🎯 Ready to get started?
HowToo makes it easy: same-day/2-day shipping on every part, plus all the tools and specialty tools you need! Check out the parts and tools sections below to add everything to your cart.
