


How to Replace the MAF Sensor on a 2018 Chevrolet Colorado 2.5L
Step-by-step DIY MAF sensor replacement with tools, location, torque specs, and safety tips for your 2018 Chevy Colorado
How to Replace the MAF Sensor on a 2018 Chevrolet Colorado 2.5L
Step-by-step DIY MAF sensor replacement with tools, location, torque specs, and safety tips for your 2018 Chevy Colorado


Colorado - Mass Air Flow (MAF) Sensor Replacement 🌬️
Got it—you want to replace the MAF sensor on your 2018 Colorado 2.5L. This is a good first DIY job and very doable with basic tools.
Safety & Prep ⚠️
- 🧤 Safety first: Park on level ground, engine off, parking brake on, key out of ignition.
- 🔋 Battery: For safety and to avoid fault codes, disconnect the negative (-) battery cable before unplugging the sensor.
- ⏱️ Cool engine: Let the engine cool for at least 15–20 minutes if it was just running.
Tools & Parts Needed 🧰
- 🪛 Tools:
- 10 mm socket and ratchet – to disconnect the battery terminal.
- Small flathead screwdriver – to gently lift connector lock tabs if needed.
- T20 Torx driver or bit – most GM MAF sensors on this engine use Torx screws.
- Clean rag – to wipe around the area.
- 📦 Parts:
- New MAF sensor for 2018 Colorado 2.5L (sensor only, not the whole airbox).
- Optional: New MAF sensor screws if your new sensor includes them; otherwise reuse the originals.
- 🧴 Optional: MAF cleaner spray – a special electrical-safe spray for MAFs (never use carb/brake cleaner).
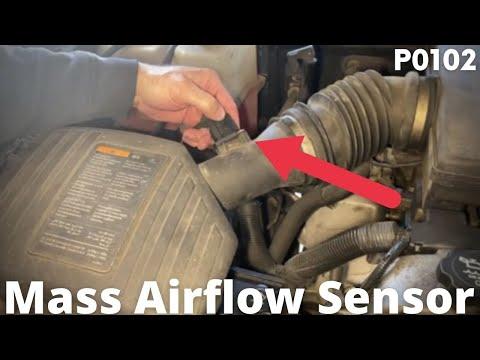
Where the MAF Sensor Is 📍
- 📌 On your Colorado, the MAF sensor is mounted in the air intake duct between the air filter box and the throttle body.
- 📌 It has a small rectangular plastic body with a 4–5 wire electrical connector plugged into it.
Step-by-Step Replacement 🔧
1. Disconnect the Battery
- 🔋 Use the 10 mm socket to loosen the nut on the negative (-) battery terminal.
- 🧤 Lift the cable off and tuck it aside so it cannot spring back to the terminal.
2. Access the MAF Sensor
- 👀 Open the hood and locate the air filter box (black plastic box with clips) on the driver side front area.
- ➡️ Follow the large black intake tube toward the engine; the MAF sensor is mounted in this tube or right at the airbox outlet.
3. Unplug the Electrical Connector
- 🔌 Find the connector lock (usually a red or grey tab or a push clip).
- 🪛 If there is a colored lock, slide it out or up gently with the flathead screwdriver.
- 👉 Press the main release tab and pull the connector straight off the sensor. Do not pull on the wires.
4. Remove the Old MAF Sensor
- 🪛 Use the T20 Torx driver to remove the 2 screws holding the MAF sensor to the intake tube/airbox.
- ✋ Gently pull the sensor straight out. It may have an O-ring; twist slightly if it feels stuck, but do not force it.
- 🧽 Wipe the mounting surface with a clean rag. Do not touch or wipe the tiny sensing wires inside the MAF.
5. Install the New MAF Sensor
- 📐 Make sure the new sensor is oriented the same way as the old one. There is usually an arrow on the body showing airflow direction (toward the engine).
- 📥 Insert the new sensor into the housing carefully so the O-ring seats evenly.
- 🪛 Install the screws by hand first to avoid cross-threading, then snug them with the T20 driver.
- ⚙️ Torque spec (typical GM MAF screws): about 2–3 N·m (18–27 in-lb) – just snug, not tight. Do not overtighten; the plastic can crack.
6. Reconnect the Electrical Connector
- 🔌 Push the connector straight onto the sensor until it clicks.
- 🔒 Slide or push the lock tab back into the locked position if equipped.
7. Reconnect the Battery
- 🔋 Reinstall the negative (-) battery cable on the terminal.
- 🔧 Tighten the 10 mm nut until snug; do not overtighten.
8. First Start & Check ✅
- 🧭 Turn the key to ON (engine off) for 10–15 seconds, then off. This lets modules wake up.
- 🚗 Start the engine. It may idle slightly rough for a few seconds while it relearns, then should smooth out.
- 👀 Check:
- No Check Engine Light after a short drive.
- No air leaks or hissing around the intake tube.
- Normal throttle response and power.
If You Had a Check Engine Light Before 💡
- 📲 If you have a basic scan tool, clear the stored codes after the replacement.
- 🚙 If you don’t, the light may clear on its own after a few drive cycles if the problem is fixed.
Tips & Common Mistakes 🧠
- 🧴 Do not touch the sensing element: The tiny wires inside the MAF are very delicate.
- 🧼 Air filter: If your air filter is very dirty, replace it too. A clogged filter can shorten MAF life.
- 🧪 Cleaning vs replacing: If the sensor is just dirty and not failed, sometimes MAF cleaner spray can help, but since you’re replacing it, no need to spray the new one.
If you tell me whether you’re seeing any specific trouble codes (like P0101, P0102, etc.), I can add a quick check list to confirm the new MAF fully solves the issue.
HowToo makes it easy: below this answer you’ll see the correct MAF sensor and any tools you might need. You can add them to your cart right from the parts section for fast shipping.
