















How to Replace the In-Tank Fuel Pump Module on a 2011-2016 Ford F-250 Super Duty (Engine: V8 6.2L)
Step-by-step tank drop instructions with required tools, parts list, safety tips, and priming/leak checks
How to Replace the In-Tank Fuel Pump Module on a 2011-2016 Ford F-250 Super Duty (Engine: V8 6.2L)
Step-by-step tank drop instructions with required tools, parts list, safety tips, and priming/leak checks for 2011, 2012, 2013, 2014, 2015, 2016


🔧 F-250 Super Duty - Fuel Pump Replacement
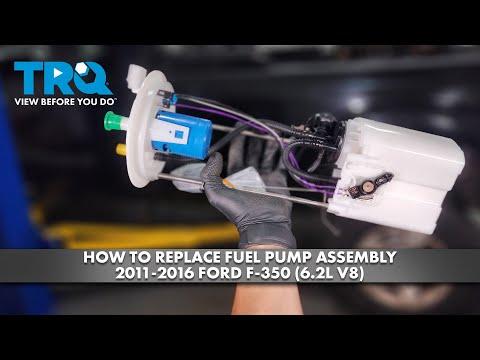
On your F-250, the fuel pump is part of an in-tank fuel pump module. The job is mostly about safely lowering the fuel tank, swapping the module with a new seal, then reinstalling everything without damaging fuel lines or wiring.
Difficulty Level: Advanced | Estimated Time: 3-6 hours
Assumption: Your truck uses the in-tank pump module setup (most 6.2L).
⚠️ Safety & Precautions
- ⚠️ Work outside or in a very well-ventilated area—fuel vapors ignite easily.
- ⚠️ No smoking, no open flames, and keep heat guns/work lights away from fuel.
- ⚠️ Relieve fuel pressure before disconnecting any fuel line to prevent spray.
- ⚠️ Support the fuel tank with a transmission jack before removing the straps.
- ⚠️ Disconnect the negative battery cable to reduce spark risk.
- ⚠️ If the tank is more than 1/4 full, it becomes much heavier—drain/siphon fuel if possible.
🔧 Required Tools
You'll need the following tools for this repair:
- Safety glasses
- Nitrile gloves
- Fire extinguisher (Class B)
- Floor jack (rated 3-ton minimum)
- Jack stands (rated 3-ton minimum)
- Wheel chocks
- Transmission jack (specialty)
- Socket set (8mm-21mm)
- Ratchet
- Long extensions (6" and 12")
- Torque wrench (10-200 ft-lbs range)
- Flathead screwdriver
- Pliers
- Fuel line quick-disconnect tool set (specialty)
- Brass punch (specialty)
- Small hammer
- Shop towels
- Drain pan
🔩 Required Parts
HowToo sells all the parts you need for this repair:
- Fuel pump module assembly (in-tank) - Qty: 1
- Fuel pump module tank seal/O-ring - Qty: 1
- Fuel pump module lock ring - Qty: 1 (recommended)
📋 Before You Begin
- Park on level ground, set the parking brake, and place wheel chocks at the front wheels.
- Run the fuel level down as low as possible (lighter tank = safer and easier).
- Disconnect the battery: use a 10mm socket to remove the negative (-) battery terminal and isolate it so it can’t spring back.
- Relieve fuel pressure: remove the fuel pump fuse/relay, then start the engine and let it stall; crank 2-3 more seconds. Reinstall the fuse/relay afterward.
- A quick-disconnect tool releases fuel line locks safely.
- A brass punch won’t spark like steel.
🔨 Step-by-Step Instructions
Follow these steps in order:
Step 1: Raise and support the truck
- Use a floor jack to lift the rear of the truck safely.
- Set the frame onto jack stands and confirm it is stable before going underneath.
Step 2: Support the fuel tank
- Position a transmission jack under the fuel tank.
- Use a piece of wood (on the jack saddle) if needed to spread the load.
Step 3: Disconnect the filler neck and vent hoses
- At the tank, loosen hose clamps using a flathead screwdriver.
- Twist and pull the hoses off gently (use pliers if needed). Expect a small amount of fuel drip.
- Plug hoses with shop towels to reduce fumes.
Step 4: Disconnect electrical connectors at the tank
- Locate the tank/pump wiring connector and unplug it by hand (use a flathead screwdriver gently if the tab is stubborn).
- Move the harness out of the way so it can’t get pinched during lowering.
Step 5: Disconnect the fuel supply/return/EVAP lines
- Place a drain pan under the connections.
- Use a fuel line quick-disconnect tool set (specialty) to release the fuel line(s).
- Pull lines straight off—do not pry sideways (that can crack the plastic fittings).
Step 6: Remove the tank straps
- With the tank still supported by the transmission jack, remove the strap bolts using a socket set (typically 13mm-18mm) and ratchet.
- Lower the straps and keep them oriented for reinstallation.
- Torque to Ford specification on reassembly (strap bolts are safety-critical; use factory service information for your exact value).
Step 7: Lower the tank enough to access the pump module
- Slowly lower the transmission jack a few inches at a time.
- Stop and check for anything still connected (hoses, EVAP line, wiring).
- Once clear, lower enough to comfortably reach the top of the tank.
Step 8: Clean the pump module area
- Use shop towels to wipe dirt off the top of the tank around the pump opening.
- Keeping dirt out of the tank helps protect the new pump and injectors.
Step 9: Remove the lock ring and pull the module
- Use a brass punch (specialty) and small hammer to tap the lock ring counterclockwise until it releases.
- Lift the module out slowly—tilt as needed to clear the float arm without bending it.
- Remove the old tank seal/O-ring.
Step 10: Install the new seal and new pump module
- Install the new tank seal/O-ring into the groove (make sure it sits flat, not twisted).
- Lower the new module in, keeping the float arm free and not jammed.
- Install the lock ring and tap it clockwise using the brass punch and small hammer until fully seated at its stops.
Step 11: Raise the tank and reconnect everything
- Raise the tank using the transmission jack until you can reconnect lines.
- Reconnect fuel/EVAP lines by pushing until they click/lock (gently pull back to confirm they are latched).
- Reconnect the electrical connector(s).
- Reconnect filler neck and vent hoses; tighten clamps with a flathead screwdriver.
Step 12: Reinstall tank straps and lower the truck
- Reinstall tank straps and start bolts by hand to avoid cross-threading.
- Tighten using a socket set and finish with a torque wrench: Torque to Ford specification.
- Remove jack stands and lower the truck using the floor jack.
✅ After Repair
- Reconnect the battery negative terminal using a 10mm socket (snug, do not overtighten).
- Prime the fuel system: key ON for 5 seconds, key OFF for 10 seconds; repeat 3-4 times before starting.
- Start the engine and let it idle. Check carefully for leaks at every fuel connection and around the tank seal.
- Test drive briefly, then recheck for leaks and fuel smell.
- If a check engine light appears, scan for codes (a loose EVAP line is a common cause).
💰 DIY vs Shop Cost
Shop Cost: $900-$1,800 (parts + labor)
DIY Cost: $250-$900 (parts only)
You Save: $650-$900 by doing it yourself!
Shop labor rates vary but typically run $100-$150/hour. This repair takes a shop approximately 3-6 hours.
🎯 Ready to get started?
HowToo makes it easy: same-day/2-day shipping on every part, plus all the tools and specialty tools you need! Check out the parts and tools sections below to add everything to your cart.
Guide for Fuel Pump Module Assembly replace for these Ford vehicles
| Year Make Model | Sub Model | Engine | Body Style |
|---|---|---|---|
| 2016 Ford F-250 Super Duty | - | V8 6.2L | - |
| 2015 Ford F-250 Super Duty | - | V8 6.2L | - |
| 2014 Ford F-250 Super Duty | - | V8 6.2L | - |
| 2013 Ford F-250 Super Duty | - | V8 6.2L | - |
| 2012 Ford F-250 Super Duty | - | V8 6.2L | - |
| 2011 Ford F-250 Super Duty | - | V8 6.2L | - |