


How to Replace the Fuel Pump on a 2018 Acura MDX (In-Tank Fuel Pump Module)
Step-by-step DIY instructions with required tools/parts, safety precautions, and leak-check tips
How to Replace the Fuel Pump on a 2018 Acura MDX (In-Tank Fuel Pump Module)
Step-by-step DIY instructions with required tools/parts, safety precautions, and leak-check tips


🔧 MDX - Fuel Pump Replacement
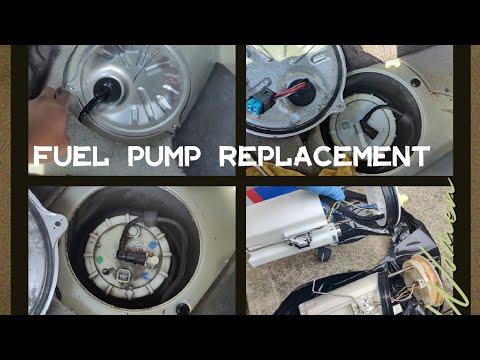
On your MDX, the fuel pump is an in-tank electric pump (often serviced as a complete “fuel pump module” with the level sensor and pressure regulator). Replacing it means safely relieving fuel pressure, opening the service access (if equipped), swapping the module, and confirming there are no leaks.
Difficulty Level: Advanced | Estimated Time: 2-5 hours
⚠️ Safety & Precautions
- ⚠️ Work outdoors or in a very well-ventilated area; fuel vapors are flammable.
- ⚠️ No smoking, no hot lights, no grinding/sparks anywhere nearby.
- ⚠️ Let the vehicle cool down before starting (hot exhaust + fuel vapor is a bad mix).
- ⚠️ Disconnect the negative battery cable before opening the tank/module.
- ⚠️ Keep a Class B fire extinguisher nearby.
- ⚠️ Clean around the pump opening so dirt can’t fall into the tank.
🔧 Required Tools
You'll need the following tools for this repair:
- Safety glasses
- Nitrile gloves
- Class B fire extinguisher
- 10mm socket
- 8mm socket
- 3/8" drive ratchet
- 6" extension
- Flat-blade trim tool
- Phillips screwdriver #2
- Needle-nose pliers
- Fuel line quick-disconnect tool set (specialty)
- Fuel pump lock ring wrench (specialty)
- Brass punch (non-sparking)
- Small hammer
- Torque wrench (inch-pound)
- Torque wrench (foot-pound)
- Shop towels
- Drain pan
- Floor jack (rated 3-ton minimum)
- Jack stands (rated 3-ton minimum)
- Wheel chocks
🔩 Required Parts
HowToo sells all the parts you need for this repair:
- Fuel pump module assembly - Qty: 1
- Fuel pump module seal/O-ring - Qty: 1
- Fuel line O-rings (if supplied/required) - Qty: 1
📋 Before You Begin
- 🧭 Park on level ground, set the parking brake, and chock the wheels using wheel chocks.
- Check fuel level: doing this job with under 1/4 tank is easier and safer.
- Quick questions (reply and I’ll tailor the exact path):
- Is there a service access cover inside the cabin/cargo area over the fuel pump, or will you need to drop the fuel tank?
- Did you buy the complete fuel pump module, or only the pump motor?
- Have shop towels ready; a small amount of fuel spill is normal.
🔨 Step-by-Step Instructions
Follow these steps in order:
Step 1: Relieve fuel pressure
- Open the hood.
- Disconnect the negative battery cable using a 10mm socket.
- Relieve fuel pressure using an approved method for your MDX (this prevents a high-pressure spray when lines are opened). Keep towels around any connection.
Step 2: Decide which access method you have
- Look for a fuel pump service cover inside the vehicle (usually a metal cover held by small bolts/screws).
- If you find an access cover, follow Steps 3–10 (In-cabin access).
- If there is no access cover, follow Steps 11–18 (Fuel tank removal).
Step 3: Open the service access (In-cabin access)
- Remove the necessary interior trim/carpet using a flat-blade trim tool.
- Remove the access cover fasteners using an 8mm socket or Phillips screwdriver #2 (whichever your cover uses).
- Lift the cover off and set it aside.
Step 4: Clean the area around the pump module
- Wipe and vacuum loose dirt around the module using shop towels.
- This prevents contamination from falling into the fuel tank.
Step 5: Disconnect electrical connector(s)
- Unplug the fuel pump/module electrical connector(s) by hand (use needle-nose pliers only if needed to release a stubborn tab).
Step 6: Disconnect the fuel line(s)
- Place a drain pan and shop towels under the connection.
- Release the quick-connect fitting using a fuel line quick-disconnect tool set (specialty) if required by your connector style.
- Cap/cover the line end with a clean towel to reduce vapor and keep dirt out.
Step 7: Remove the lock ring / retaining ring
- Mark the ring/module orientation with a small reference mark so the new unit goes in the same way.
- Remove the lock ring using a fuel pump lock ring wrench (specialty).
- If it’s too tight, use a brass punch (non-sparking) and small hammer to tap the ring loose carefully, a little at a time around the ring.
Step 8: Remove the fuel pump module
- Lift the module straight up slowly, guiding the float arm (fuel level sender) out without bending it.
- Let fuel drain off the module into the tank; use shop towels to catch drips.
- Remove the old seal/O-ring from the tank opening.
Step 9: Install the new seal and module
- Install the new fuel pump module seal/O-ring into the tank groove (make sure it sits flat and is not twisted).
- Lower the new module into the tank, matching your orientation marks.
Step 10: Reinstall lock ring, reconnect lines, and close up
- Install and tighten the lock ring using the fuel pump lock ring wrench (specialty).
- Torque to the Acura specification for your MDX using a torque wrench (foot-pound). (If you tell me whether you have the access-cover setup or tank-drop setup, I can give the exact spec set for your configuration.)
- Reconnect the fuel line(s) by hand until fully seated; gently tug to confirm it’s locked.
- Reconnect the electrical connector(s) by hand.
- Reinstall the access cover using an 8mm socket or Phillips screwdriver #2 and torque to Acura specification using a torque wrench (inch-pound) if bolts are specified as torque-critical.
- Reinstall interior trim using a flat-blade trim tool.
Step 11: Raise the vehicle safely (Fuel tank removal path)
- Chock the front wheels using wheel chocks.
- Lift the rear using a floor jack (rated 3-ton minimum).
- Support with jack stands (rated 3-ton minimum) under proper lift points.
Step 12: Support the fuel tank
- Position the floor jack (rated 3-ton minimum) under the fuel tank with a stable contact point.
Step 13: Disconnect tank lines and connectors
- Disconnect the electrical connectors by hand (use needle-nose pliers only if needed).
- Disconnect fuel/EVAP hoses carefully using needle-nose pliers (for clamps) and a fuel line quick-disconnect tool set (specialty) as needed.
Step 14: Remove tank straps and lower the tank
- Remove tank strap bolts using a 10mm socket or 14mm socket (hardware varies by location).
- Torque to the Acura specification for your MDX during reassembly using a torque wrench (foot-pound).
- Lower the tank slowly with the floor jack (rated 3-ton minimum), stopping as needed to disconnect any remaining hoses.
Step 15: Remove the pump module from the tank (on the ground)
- Clean the top of the tank using shop towels.
- Remove lock ring with fuel pump lock ring wrench (specialty) (or brass punch (non-sparking) and small hammer carefully).
- Remove module and seal as in Steps 8–9.
Step 16: Reinstall tank
- Raise the tank with the floor jack (rated 3-ton minimum).
- Reconnect lines and connectors by hand; use needle-nose pliers for clamps.
- Install tank straps and bolts using a 10mm socket/14mm socket.
- Torque to the Acura specification for your MDX using a torque wrench (foot-pound).
Step 17: Lower the vehicle
- Lower the vehicle off jack stands (rated 3-ton minimum) using the floor jack (rated 3-ton minimum).
Step 18: Reconnect the battery
- Reconnect the negative battery cable using a 10mm socket.
✅ After Repair
- 🔍 Key ON (engine OFF) for 5 seconds, then OFF; repeat 3–4 times to prime the system.
- Start the engine and let it idle while you inspect for leaks at the pump top and line connections.
- If you smell strong fuel or see wetness, shut it off immediately and re-check the seal and quick-connect lock.
- Test drive 5–10 minutes, then re-check for any fuel smell/leaks again.
💰 DIY vs Shop Cost
Shop Cost: $900-$1,800 (parts + labor)
DIY Cost: $250-$900 (parts only)
You Save: $650-$900 by doing it yourself!
Shop labor rates vary but typically run $100-$150/hour. This repair takes a shop approximately 2-5 hours.
🎯 Ready to get started?
HowToo makes it easy: same-day/2-day shipping on every part, plus all the tools and specialty tools you need! Check out the parts and tools sections below to add everything to your cart.
