









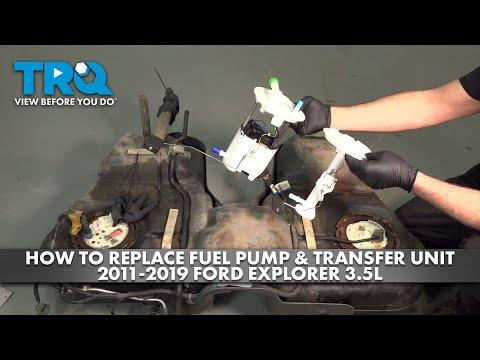





How to Replace the Fuel Pump on a 2013-2019 Ford Explorer (Engine: V6 3.5L)
Step-by-step instructions, tools, parts, torque specs, and safety tips
How to Replace the Fuel Pump on a 2013-2019 Ford Explorer (Engine: V6 3.5L)
Step-by-step instructions, tools, parts, torque specs, and safety tips for 2013, 2014, 2015


🔧 Fuel Pump - Replacement
Assumption: This covers the in-tank fuel pump module replacement on your Explorer. On this vehicle, the fuel pump is inside the fuel tank, so the tank must be lowered for service.
The fuel system is under pressure and gasoline is flammable, so safety matters a lot here. This job is doable at home, but it is messy and physically demanding because the fuel tank is large and must be supported while lowered.
Difficulty Level: Advanced | Estimated Time: 4-6 hours
⚠️ Safety & Precautions
- Work outside or in a very well-ventilated area. Keep all sparks, flames, and heaters away.
- Disconnect the negative battery cable before starting.
- Relieve fuel system pressure before opening any fuel line.
- Support the fuel tank with a transmission jack or wide floor jack. A full tank is very heavy.
- Use eye protection and fuel-resistant gloves. Fuel can spray when lines are disconnected.
- Do not smoke or use drop lights that can get hot.
🔧 Required Tools
You'll need the following tools for this repair:
- 10mm socket
- 13mm socket
- 15mm socket
- Ratchet
- Socket extension set
- Flat-blade screwdriver
- Fuel line disconnect tool set
- Trim panel removal tool
- Floor jack
- Jack stands
- Transmission jack or wide support jack
- Torque wrench
- Drain pan
- Fuel-safe siphon pump
- Safety glasses
- Nitrile gloves
🔩 Required Parts
HowToo sells all the parts you need for this repair:
- Fuel pump module - Qty: 1
- Fuel tank seal / O-ring - Qty: 1
- Fuel filter - Qty: 1
- Fuel tank strap bolts - Qty: 2
- Fuel line retaining clips - Qty: As needed
📋 Before You Begin
- Park on level ground and set the parking brake.
- Run the fuel level as low as possible before starting. A nearly empty tank is much easier to remove.
- Disconnect the negative battery cable with a 10mm socket.
- Relieve fuel pressure at the fuel rail using the service procedure before disconnecting lines.
- If your Explorer has keyless entry, keep the key away from the vehicle after battery disconnect.
🔨 Step-by-Step Instructions
Follow these steps in order:
Step 1: Relieve fuel pressure and disconnect battery
- Use a 10mm socket to disconnect the negative battery cable.
- Relieve fuel pressure at the fuel system service point before disconnecting any fuel lines.
- Work slowly and keep rags nearby.
Step 2: Remove fuel filler access items and lower shield parts
- Use a trim panel removal tool and ratchet with the correct sockets to remove any underbody shields blocking the tank.
- Remove any exhaust or heat shield sections that prevent tank removal.
Step 3: Support the fuel tank
- Position a transmission jack or wide support jack under the fuel tank.
- Raise it just enough to hold the tank securely.
- Do not crush the plastic tank.
Step 4: Disconnect fuel lines and electrical connectors
- Use the fuel line disconnect tool set to disconnect the fuel supply line.
- Unplug the electrical connector at the fuel pump module and any tank-related wiring.
- Inspect clips carefully and replace any broken ones.
Step 5: Remove tank straps
- Use a 15mm socket and ratchet to remove the fuel tank strap bolts.
- Lower the tank slowly with the jack while checking for anything still attached.
- Remove the tank from under the vehicle.
- Torque on reassembly: Fuel tank strap bolts to 27 Nm (20 ft-lbs).
Step 6: Replace the fuel pump module
- Clean the top of the tank before opening it.
- Use a flat-blade screwdriver or the proper retaining ring tool if equipped to remove the lock ring.
- Lift the old fuel pump module out carefully.
- Install the new fuel tank seal / O-ring and the new fuel pump module in the same position.
- Install the lock ring and make sure it seats fully.
Step 7: Reinstall the tank
- Raise the tank back into position with the transmission jack or wide support jack.
- Reconnect fuel lines and electrical connectors.
- Install the tank straps using the 15mm socket.
- Torque on reassembly: Fuel tank strap bolts to 27 Nm (20 ft-lbs).
Step 8: Reassemble underbody parts
- Use the ratchet and correct sockets to reinstall shields, brackets, and any removed exhaust support hardware.
- Double-check that no wiring or lines are pinched.
Step 9: Prime and check for leaks
- Reconnect the negative battery cable with a 10mm socket.
- Turn the key to ON for a few seconds, then OFF. Repeat 2-3 times to prime the system.
- Start the engine and inspect all fuel line connections and the tank top for leaks.
- Fix any leak before driving.
✅ After Repair
- Let the engine idle and confirm it starts normally.
- Check for fuel smell under the vehicle and around the tank.
- Verify fuel gauge operation after a short drive.
- If the check engine light is on, scan for fuel pressure or evaporative system codes.
💰 DIY vs Shop Cost
Shop Cost: $900-$1,600 (parts + labor)
DIY Cost: $250-$600 (parts only)
You Save: $650-$1,000 by doing it yourself!
Shop labor rates vary but typically run $100-$150/hour. This repair takes a shop approximately 4-6 hours.
🎯 Ready to get started?
HowToo makes it easy: same-day/2-day shipping on every part, plus all the tools and specialty tools you need! Check out the parts and tools sections below to add everything to your cart.
Guide for Fuel Pump and Sender Assembly replace for these Ford vehicles
| Year Make Model | Sub Model | Engine | Body Style |
|---|---|---|---|
| 2019 Ford Explorer | - | V6 3.5L | - |
| 2019 Ford Explorer | - | Inline 4 2.3L | - |
| 2018 Ford Explorer | - | V6 3.5L | - |
| 2018 Ford Explorer | - | Inline 4 2.3L | - |
| 2017 Ford Explorer | - | V6 3.5L | - |
| 2017 Ford Explorer | - | Inline 4 2.3L | - |
| 2016 Ford Explorer | - | V6 3.5L | - |
| 2016 Ford Explorer | - | Inline 4 2.3L | - |
| 2015 Ford Explorer | - | Inline 4 2.0L | - |
| 2015 Ford Explorer | - | V6 3.5L | - |
| 2014 Ford Explorer | - | Inline 4 2.0L | - |
| 2014 Ford Explorer | - | V6 3.5L | - |
| 2013 Ford Explorer | - | Inline 4 2.0L | - |
| 2013 Ford Explorer | - | V6 3.5L | - |