









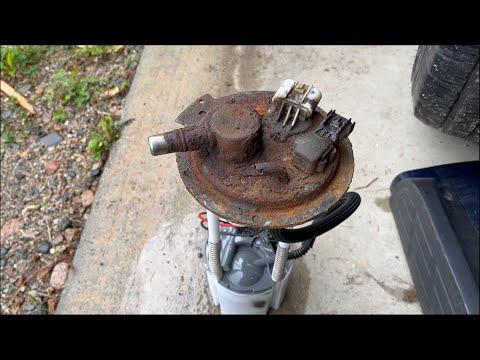





How to Replace the Fuel Pump on a 2009-2013 GMC Sierra 1500 (Engine: V8 5.3L | Body: Standard Cab Pickup)
Step-by-step in-tank fuel pump module replacement with tools, parts, torque specs, and safety tips
How to Replace the Fuel Pump on a 2009-2013 GMC Sierra 1500 (Engine: V8 5.3L | Body: Standard Cab Pickup)
Step-by-step in-tank fuel pump module replacement with tools, parts, torque specs, and safety tips for 2009, 2010, 2011, 2012, 2013


🔧 Fuel Pump - Replacement
Your Sierra uses an in-tank fuel pump module, so the repair means relieving fuel pressure, lowering the fuel tank, and swapping the pump assembly. This is a messy, flammable repair, so take your time and work safely. A clean workspace and a nearly empty tank make the job much easier.
Difficulty Level: Advanced | Estimated Time: 4-6 hours
⚠️ Safety & Precautions
- Work outside or in a very well-ventilated area. Fuel vapors are dangerous.
- No smoking, sparks, open flames, heat guns, or drop lights near the fuel system.
- Relieve fuel pressure before disconnecting any fuel lines.
- Disconnect the negative battery cable before starting. Reconnect only after all fuel lines are secured.
- Use approved fuel-safe drain containers if the tank must be emptied.
- Support the fuel tank with a transmission jack or floor jack before removing straps.
- Keep a class B fire extinguisher nearby.
🔧 Required Tools
You'll need the following tools for this repair:
- 3/8-inch drive ratchet
- 10mm socket
- 13mm socket
- 15mm socket
- Fuel line disconnect tool set (specialty)
- Flat-blade screwdriver
- Pliers
- Torque wrench
- Floor jack (rated 3-ton minimum)
- Jack stands (rated for truck weight)
- Transmission jack or wide jack saddle
- Drain pan
- Shop towels
- Safety glasses
- Nitrile gloves
🔩 Required Parts
HowToo sells all the parts you need for this repair:
- Fuel pump module assembly - Qty: 1
- Fuel tank module seal/gasket - Qty: 1
- Fuel pump locking ring - Qty: 1
- Fuel filter - Qty: 1
- Fuel tank strap bolts - Qty: 2
- Fuel line O-rings/clips - Qty: As needed
- Fuel tank - Qty: 1
- Fuel injector-safe cleaner - Qty: 1 can
📋 Before You Begin
- Run the tank as low as safely possible before starting. A nearly empty tank is much lighter and easier to lower.
- Park on level ground and set the parking brake.
- Disconnect the negative battery cable using a 10mm socket.
- Relieve fuel system pressure at the fuel rail service port if equipped, or by following the key-off pressure bleed procedure for this truck.
- Support the truck securely on jack stands before working underneath it.
🔨 Step-by-Step Instructions
Follow these steps in order:
Step 1: Relieve fuel pressure and disconnect the battery
- Use a 10mm socket to disconnect the negative battery cable.
- Relieve fuel pressure before opening any fuel line.
- Wrap shop towels around fittings.
Step 2: Raise and support the truck
- Use a floor jack to raise the rear of the truck, then support it with jack stands.
- Make sure the truck is stable before crawling underneath.
Step 3: Remove the fuel tank shield and disconnect hoses
- Use a 13mm socket or 15mm socket to remove any skid plate or shield hardware, if equipped.
- Disconnect the filler neck hose, vent hoses, and evap lines with pliers and a flat-blade screwdriver as needed.
- Use the fuel line disconnect tool set (specialty) to separate the fuel supply and return lines.
- Label hoses before removal.
Step 4: Support the fuel tank
- Place a transmission jack or wide jack saddle under the tank.
- Raise it slightly so the tank is supported but not lifted.
Step 5: Remove the tank straps
- Use a 15mm socket to remove the tank strap bolts.
- Lower the straps carefully and keep them positioned for reinstallation.
- Torque on installation: Torque strap bolts to 25 Nm (18 ft-lbs).
Step 6: Lower and remove the fuel tank
- Slowly lower the tank with the jack while watching for any still-connected hoses or wires.
- Disconnect the electrical connector to the pump module once it is accessible.
- Lower the tank fully and slide it out from under the truck.
Step 7: Replace the fuel pump module
- Clean the top of the tank with shop towels before opening it.
- Use a flat-blade screwdriver and brass drift or locking ring tool to remove the locking ring, if equipped.
- Lift out the old fuel pump module carefully.
- Install the new fuel tank module seal/gasket and the new pump module.
- Install the locking ring and seat it fully.
- Keep dirt out of the tank.
Step 8: Reinstall the fuel tank
- Raise the tank back into position with the transmission jack or wide jack saddle.
- Reconnect the electrical connector and all fuel/EVAP lines.
- Install the tank straps and tighten with a 15mm socket.
- Torque tank strap bolts to 25 Nm (18 ft-lbs).
Step 9: Reconnect hoses, shield, and battery
- Reconnect the filler neck, vent hoses, and fuel lines using the fuel line disconnect tool set (specialty) where needed.
- Reinstall any shield or skid plate with a 13mm socket or 15mm socket.
- Reconnect the negative battery cable with a 10mm socket.
Step 10: Prime and check for leaks
- Turn the key to ON for 2-3 seconds, then OFF. Repeat 3-4 times to prime the system.
- Start the engine and inspect all fuel connections for leaks.
- Torque any access cover fasteners to snug fit if applicable; do not overtighten plastic parts.
✅ After Repair
- Let the engine idle for a few minutes and confirm smooth operation.
- Check under the truck for fuel seepage after the first drive.
- If the engine cranks longer than normal, cycle the key ON/OFF again to finish priming.
- If a check engine light is present, scan for fuel pressure or evaporative system codes.
💰 DIY vs Shop Cost
Shop Cost: $900-$1,500 (parts + labor)
DIY Cost: $250-$550 (parts only)
You Save: $650-$950 by doing it yourself!
Shop labor rates vary but typically run $100-$150/hour. This repair takes a shop approximately 4-6 hours.
🎯 Ready to get started?
HowToo makes it easy: same-day/2-day shipping on every part, plus all the tools and specialty tools you need! Check out the parts and tools sections below to add everything to your cart.
Guide for Fuel Pump Module Assembly replace for these GMC vehicles
| Year Make Model | Sub Model | Engine | Body Style |
|---|---|---|---|
| 2013 GMC Sierra 1500 | - | V6 4.3L | Standard Cab Pickup |
| 2012 GMC Sierra 1500 | - | V6 4.3L | Standard Cab Pickup |
| 2011 GMC Sierra 1500 | - | V6 4.3L | Standard Cab Pickup |
| 2010 GMC Sierra 1500 | - | V6 4.3L | Standard Cab Pickup |
| 2009 GMC Sierra 1500 | - | V6 4.3L | Standard Cab Pickup |