









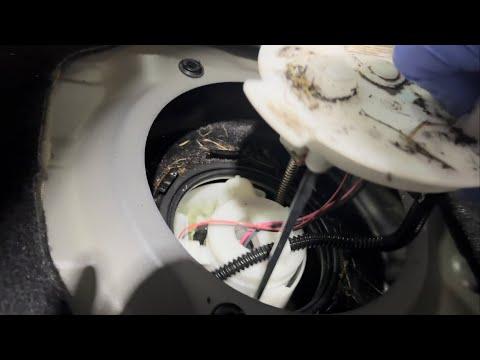






How to Replace the Fuel Pump Module on a 2019-2022 Honda Insight (In-Tank Pump) (Engine: Inline 4 1.5L)
Step-by-step DIY instructions with required tools/parts, safety precautions, priming, and leak checks
How to Replace the Fuel Pump Module on a 2019-2022 Honda Insight (In-Tank Pump) (Engine: Inline 4 1.5L)
Step-by-step DIY instructions with required tools/parts, safety precautions, priming, and leak checks for 2019, 2020, 2021, 2022


🔧 Insight - Fuel Pump Replacement
On your Insight, the fuel pump sits inside the fuel tank as part of an in-tank module (pump + strainer/filter + level sender). Replacing it means working around fuel vapors and opening the tank access from inside the car, so cleanliness and safety are critical.
Difficulty Level: Advanced | Estimated Time: 2-4 hours
⚠️ Safety & Precautions
- ⚠️ Work outside or in a well-ventilated area; fuel vapors are flammable.
- ⚠️ No smoking, no flames, no hot work lights; keep a Class B fire extinguisher nearby.
- ⚠️ Relieve fuel pressure before disconnecting any fuel line to prevent spray.
- ⚠️ Disconnect the 12V battery negative cable before opening the fuel system.
- ⚠️ Keep dirt out of the tank; even small debris can damage the new pump.
🔧 Required Tools
You'll need the following tools for this repair:
- Safety glasses
- Nitrile gloves
- Class B fire extinguisher
- 10mm socket
- 12mm socket
- 3/8" ratchet
- 3" extension
- Trim clip removal tool
- Phillips screwdriver #2
- Small flat pick
- Fuel line quick-disconnect tool set
- Honda fuel pump lock ring wrench (specialty)
- Brass punch
- Small hammer
- Shop towels
- Catch pan
- Torque wrench (5–60 N·m range)
- Non-contact work light
🔩 Required Parts
HowToo sells all the parts you need for this repair:
- Fuel pump module assembly - Qty: 1
- Fuel pump module tank seal O-ring - Qty: 1
- Fuel pump strainer (if not included with module) - Qty: 1
- New fuel line O-rings/clips (if required by the connector style) - Qty: 1
📋 Before You Begin
- Park your Insight on level ground and open the driver window (so you can get back in if the battery is disconnected).
- Lower the fuel level if possible (under 1/2 tank is easier; less spill risk).
- Disconnect the 12V battery negative cable using a 10mm socket.
- Plan to relieve fuel pressure before opening any line (steps below).
🔨 Step-by-Step Instructions
Follow these steps in order:
Step 1: Relieve fuel pressure
- Re-connect the battery temporarily if needed (use 10mm socket) so you can run the engine for this step.
- Locate the fuel pump power source (fuse/relay) per the under-hood fuse box diagram, then remove it using a trim clip removal tool (or your fingers if accessible).
- Start the engine and let it run until it stalls.
- Crank for 3–5 seconds one more time to bleed off remaining pressure.
- Turn ignition OFF, then disconnect the 12V battery negative again using a 10mm socket.
- Tip: Put the fuse/relay in a labeled bag.
Step 2: Access the fuel pump service cover
- Remove the rear seat bottom cushion (method varies slightly by build): use a trim clip removal tool to pop the front retainers, then lift the cushion out.
- Locate the round/oval service cover above the tank and remove the fasteners using a Phillips screwdriver #2 or 10mm socket (depending on fastener type).
- Lift the cover and set it aside with the fasteners.
Step 3: Clean the area thoroughly
- Use shop towels to wipe all dust around the pump module flange.
- Do not allow debris to fall into the tank opening once the module is removed.
Step 4: Disconnect the electrical connector
- Press the tab and unplug the pump/module connector by hand.
- If it’s stuck, use a small flat pick gently on the lock tab (don’t break it).
Step 5: Disconnect the fuel line(s)
- Place a catch pan and shop towels under the connection.
- Release the quick-connect fitting using the correct fuel line quick-disconnect tool set.
- Expect a small amount of fuel to drip; catch and wipe immediately.
Step 6: Remove the lock ring
- The lock ring holds the module into the tank. A Honda fuel pump lock ring wrench (specialty) is the correct tool to turn it without damage.
- Install the lock ring wrench and loosen the ring.
- If you must use an alternate method, use a brass punch and small hammer carefully on the ring tabs (brass reduces spark risk). Strike lightly and evenly.
Step 7: Remove the fuel pump module
- Lift the module straight up slowly, angling as needed to clear the float arm.
- Let fuel drain from the module into the tank opening area briefly, then move it to a catch pan.
- Remove the old tank seal O-ring from the tank opening using a small flat pick.
Step 8: Install the new seal and module
- Install the new tank seal O-ring into the tank groove (clean and fully seated).
- Lower the new module into place, aligning the marks/tabs on the module with the tank opening.
- Reinstall the lock ring and tighten using the Honda fuel pump lock ring wrench (specialty) until it aligns to the factory stop/marks.
- Torque to Honda specification (service manual) for the lock ring if your procedure provides a numeric spec.
Step 9: Reconnect fuel line(s) and electrical
- Reconnect the fuel line until you hear/feel it click. Tug gently to confirm it’s locked.
- Reconnect the electrical connector until it clicks.
Step 10: Reinstall the service cover and rear seat
- Reinstall the service cover fasteners using a Phillips screwdriver #2 or 10mm socket.
- Torque to Honda specification (service manual) if your fasteners have a listed spec.
- Reinstall the rear seat bottom cushion and press it down to latch.
Step 11: Prime the system and check for leaks
- Reinstall the fuel pump fuse/relay by hand.
- Reconnect the 12V battery negative using a 10mm socket.
- Turn ignition ON (do not start) for 5 seconds, then OFF. Repeat 2–3 times to prime.
- Check the fuel line connection and module top for any wetness or fuel smell.
- Start the engine and re-check for leaks for 1–2 minutes.
✅ After Repair
- If the engine cranks long, cycle key ON/OFF a few more times to prime.
- Confirm no fuel smell inside the cabin after a short drive.
- If you have a check engine light after the repair, you may need a scan to confirm no EVAP/fuel pressure codes are stored.
💰 DIY vs Shop Cost
Shop Cost: $900-$1,600 (parts + labor)
DIY Cost: $350-$900 (parts only)
You Save: $550-$700 by doing it yourself!
Shop labor rates vary but typically run $100-$150/hour. This repair takes a shop approximately 2-4 hours.
🎯 Ready to get started?
HowToo makes it easy: same-day/2-day shipping on every part, plus all the tools and specialty tools you need! Check out the parts and tools sections below to add everything to your cart.
Guide for Fuel Pump Module Assembly replace for these Honda vehicles
| Year Make Model | Sub Model | Engine | Body Style |
|---|---|---|---|
| 2022 Honda Insight | - | Inline 4 1.5L | - |
| 2021 Honda Insight | - | Inline 4 1.5L | - |
| 2020 Honda Insight | - | Inline 4 1.5L | - |
| 2019 Honda Insight | - | Inline 4 1.5L | - |