









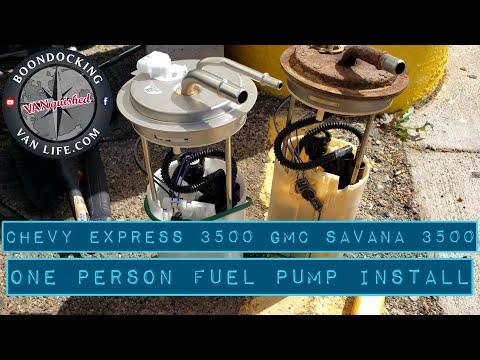







How to Replace the Fuel Pump Module on a 2010-2016 GMC Savana 2500 (In-Tank) (Engine: V8 6.6L)
Step-by-step tank-drop procedure with required tools, parts list, safety tips, and key torque specs
How to Replace the Fuel Pump Module on a 2010-2016 GMC Savana 2500 (In-Tank) (Engine: V8 6.6L)
Step-by-step tank-drop procedure with required tools, parts list, safety tips, and key torque specs for 2010, 2011, 2012, 2013, 2014, 2015, 2016


🔧 Savana - Fuel Pump Module Replacement
The fuel pump on your Savana is part of an in-tank fuel pump module (pump + level sensor + strainer). Replacing it usually requires lowering the fuel tank so you can remove the lock ring and swap the module without damaging fuel lines or wiring.
Difficulty Level: Advanced | Estimated Time: 3-6 hours
Assumption: Your Savana uses an in-tank fuel pump module accessed by lowering the fuel tank; torque specs can vary by hardware—verify exact values in a service manual if available.
⚠️ Safety & Precautions
- ⚠️ Work outside or in a very well-ventilated area; fuel vapors ignite easily.
- ⚠️ No smoking, no sparks, no hot lights; keep a fire extinguisher rated for fuel fires nearby.
- ⚠️ Depressurize the fuel system before disconnecting any fuel line.
- ⚠️ Support the tank with a transmission jack; a fuel tank can shift suddenly.
- ⚠️ Disconnect the negative battery cable to prevent accidental sparks.
- ⚠️ If the tank is more than 1/4 full, siphon or drain to reduce weight.
🔧 Required Tools
You'll need the following tools for this repair:
- Safety glasses
- Nitrile gloves
- Wheel chocks
- Floor jack (rated 3-ton minimum)
- Jack stands (rated 3-ton minimum)
- Transmission jack (specialty)
- Metric socket set (8mm-21mm)
- 3/8" drive ratchet
- 1/2" drive breaker bar
- Torque wrench (10-150 ft-lbs)
- Flat-blade screwdriver
- Fuel line quick-disconnect tool set (specialty)
- Hose clamp pliers
- Pry bar
- Brass drift punch (specialty)
- Dead-blow hammer
- Drain pan
- Shop towels
- Permanent marker
🔩 Required Parts
HowToo sells all the parts you need for this repair:
- Fuel pump module assembly - Qty: 1
- Fuel pump module seal O-ring - Qty: 1
- Fuel pump strainer - Qty: 1
- Fuel tank strap bolts - Qty: 2 (recommended if rusty)
📋 Before You Begin
- Park on level ground, set the parking brake, and place wheel chocks behind the rear wheels.
- Disconnect the battery: use a 10mm socket to remove the negative battery cable and isolate it.
- Relieve fuel pressure (simple method): remove the fuel pump relay/fuse, then start the engine and let it run until it stalls; crank 3 seconds more.
- If possible, drive until the tank is near empty to make lowering the tank safer.
🔨 Step-by-Step Instructions
Follow these steps in order:
Step 1: Safely raise and support the van
- Use a floor jack (rated 3-ton minimum) to lift the rear, then set it down on jack stands (rated 3-ton minimum).
- Keep the floor jack lightly supporting as a backup.
Step 2: Support the fuel tank
- Position a transmission jack (specialty) under the center of the tank.
- Place a flat piece of wood (if you have it) between the jack pad and tank to spread the load. Prevents tank dents
Step 3: Disconnect the filler neck and vent hoses
- Use a flat-blade screwdriver or hose clamp pliers to loosen/remove the clamps at the tank connections.
- Twist hoses gently to break them loose; do not rip them off.
- Use a permanent marker to mark hose positions if more than one hose is similar.
Step 4: Unplug the fuel pump electrical connector
- Locate the harness near the tank/front of the tank area.
- Release the lock tab by hand or with a flat-blade screwdriver, then unplug the connector.
- If it fights you, don’t force it; check for a secondary lock.
Step 5: Disconnect the fuel lines
- Place a drain pan under the connections and wrap with shop towels.
- Use a fuel line quick-disconnect tool set (specialty) to release the quick-connect fittings (the tool slides into the fitting to release the internal spring).
- Cap or wrap the open lines with shop towels to keep dirt out.
Step 6: Remove the fuel tank straps
- With the tank fully supported by the transmission jack (specialty), use a breaker bar and metric socket to remove the strap bolts.
- Lower the straps away using a pry bar if needed (rust can stick them).
- When reinstalling later: Torque strap bolts to 50 N·m (37 ft-lbs).
Step 7: Lower the tank just enough to access the pump module
- Slowly lower the transmission jack (specialty) a few inches.
- Stop and check for anything still attached (wires/hoses/lines). Disconnect as needed using the same tools above.
- Once clear, lower the tank enough to comfortably reach the top of the module.
Step 8: Clean the area around the pump module
- Use shop towels to wipe dirt off the top of the tank.
- Cleanliness prevents repeat failures; dirt in the tank can damage the new pump.
Step 9: Remove the lock ring
- Use a brass drift punch (specialty) and dead-blow hammer to tap the lock ring counterclockwise until it releases.
- Do not use steel chisels; brass reduces spark risk.
Step 10: Remove the old fuel pump module
- Lift the module straight up carefully; angle it as needed to clear the float arm.
- Let fuel drain from the module into the drain pan.
- Remove and discard the old seal using a flat-blade screwdriver carefully (don’t gouge the tank sealing surface).
Step 11: Install the new seal and new module
- Install the new Fuel pump module seal O-ring into the tank groove by hand.
- Lightly wet the seal with clean fuel (from the old module) using shop towels; do not use grease.
- Lower the new module into the tank, guiding the float arm and aligning the index marks.
Step 12: Reinstall and seat the lock ring
- Install the ring and tap it clockwise using the brass drift punch (specialty) and dead-blow hammer until fully seated against its stops.
- Fully seated ring prevents leaks; check the ring is even all around.
Step 13: Raise the tank and reconnect everything
- Use the transmission jack (specialty) to raise the tank into position.
- Reconnect fuel lines using the fuel line quick-disconnect tool set (specialty) only if needed; otherwise push until they click.
- Reconnect the electrical connector by hand until it locks.
- Reconnect filler and vent hoses using hose clamp pliers or flat-blade screwdriver for clamps.
Step 14: Reinstall tank straps
- Position straps and start bolts by hand to avoid cross-threading.
- Tighten with a ratchet, then final tighten with a torque wrench (10-150 ft-lbs).
- Torque strap bolts to 50 N·m (37 ft-lbs).
Step 15: Restore power and prime the fuel system
- Reconnect the negative battery cable using a 10mm socket.
- Reinstall the fuel pump relay/fuse by hand.
- Prime: turn key to ON (do not crank) for 5 seconds, OFF for 5 seconds; repeat 3-4 times.
✅ After Repair
- Start the engine and let it idle while you check for leaks at the pump seal area, fuel line connections, and filler hoses.
- Verify the fuel gauge reads reasonably; a wrong reading can indicate a float arm issue.
- Test drive 5-10 minutes, then recheck for seepage/drips.
- If you have a check engine light after the repair, recheck electrical connector seating and EVAP/filler hose connections.
💰 DIY vs Shop Cost
Shop Cost: $900-$1,600 (parts + labor)
DIY Cost: $250-$650 (parts only)
You Save: $650-$950 by doing it yourself!
Shop labor rates vary but typically run $100-$150/hour. This repair takes a shop approximately 3-5 hours.
🎯 Ready to get started?
HowToo makes it easy: same-day/2-day shipping on every part, plus all the tools and specialty tools you need! Check out the parts and tools sections below to add everything to your cart.
Guide for Fuel Pump Module Assembly replace for these GMC vehicles
| Year Make Model | Sub Model | Engine | Body Style |
|---|---|---|---|
| 2016 GMC Savana 2500 | - | V8 4.8L | - |
| 2016 GMC Savana 2500 | - | V8 6.0L | - |
| 2015 GMC Savana 2500 | - | V8 4.8L | - |
| 2015 GMC Savana 2500 | - | V8 6.0L | - |
| 2014 GMC Savana 2500 | - | V8 4.8L | - |
| 2014 GMC Savana 2500 | - | V8 6.0L | - |
| 2013 GMC Savana 2500 | - | V8 4.8L | - |
| 2013 GMC Savana 2500 | - | V8 6.0L | - |
| 2012 GMC Savana 2500 | - | V8 4.8L | - |
| 2012 GMC Savana 2500 | - | V8 6.0L | - |
| 2011 GMC Savana 2500 | - | V8 4.8L | - |
| 2011 GMC Savana 2500 | - | V8 6.0L | - |
| 2010 GMC Savana 2500 | - | V8 4.8L | - |
| 2010 GMC Savana 2500 | - | V8 6.0L | - |