









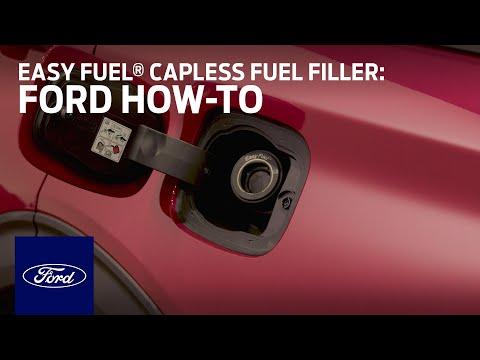






How to Replace the Fuel Cap (Easy Fuel Capless Insert) on a 2016 Ford Explorer
Step-by-step DIY guide with tools, parts list, safety tips, and fitment notes for capless vs screw-on
How to Replace the Fuel Cap (Easy Fuel Capless Insert) on a 2016 Ford Explorer
Step-by-step DIY guide with tools, parts list, safety tips, and fitment notes for capless vs screw-on


🔧 Explorer - Fuel Cap Replacement
Most Explorers use Ford’s capless “Easy Fuel” system, so there may not be a screw-on gas cap to replace. Below are two paths: (A) if yours has a traditional screw-on cap, and (B) the common capless filler “cap” (the spring-loaded insert behind the fuel door) replacement.
Difficulty Level: Beginner | Estimated Time: 0.2-0.6 hours
⚠️ Safety & Precautions
- ⛽ Work outside or in a well-ventilated area; fuel vapors are flammable.
- 🚭 No smoking, sparks, or open flames near the fuel door.
- 🧤 Wear gloves and safety glasses; fuel can irritate skin/eyes.
- 🔑 Key off; don’t do this while the engine is running.
- 🔋 Battery disconnect is not required for this job.
🔧 Required Tools
You'll need the following tools for this repair:
- Nitrile gloves
- Safety glasses
- Trim removal tool (plastic)
- Torx T20 driver
- Torx T25 driver
- 7mm socket
- 1/4" ratchet
- Small pick tool
- Flashlight
- Clean shop towels
🔩 Required Parts
HowToo sells all the parts you need for this repair:
- Fuel cap (screw-on style, if equipped) - Qty: 1
- Capless fuel filler housing/insert (Easy Fuel style, if equipped) - Qty: 1
📋 Before You Begin
- Park on level ground and turn the ignition off.
- Open the fuel door and use a flashlight to check what you have: a screw-on cap, or a spring-loaded capless opening.
- Wipe dirt around the fuel opening using clean shop towels so debris doesn’t fall inside.
🔨 Step-by-Step Instructions
Follow these steps in order:
Step 1: Identify which system you have
- If you see a plastic cap that twists off: follow Path A.
- If you see a metal/plastic spring-loaded flap and no cap: follow Path B (capless Easy Fuel).
Step 2 (Path A): Remove the old screw-on fuel cap
- Turn the cap counterclockwise by hand until it comes off.
- If it’s tethered, use a small pick tool to gently pop the tether loop off the holder if needed. Go slow—plastic can snap.
Step 3 (Path A): Install the new screw-on fuel cap
- Thread the new cap on by hand (clockwise).
- Tighten until it clicks (if it’s a click-style cap). Tight is enough—don’t force it.
Step 4 (Path B): Remove the capless fuel filler housing/insert
- Open the fuel door fully.
- Use a flashlight and look for the small fasteners holding the capless insert/housing at the fuel door pocket.
- Remove the fasteners using a Torx T20 driver or Torx T25 driver (varies by insert design).
- If there’s an additional small screw/bolt, remove it with a 7mm socket and 1/4" ratchet.
- Carefully work the housing out using a trim removal tool (plastic). (A trim tool is a plastic pry tool that helps remove parts without scratching paint.)
- Keep the opening clean; use clean shop towels to catch any dirt.
Step 5 (Path B): Install the new capless fuel filler housing/insert
- Compare the new part to the old one to confirm the shape and mounting points match.
- Slide the new housing/insert into place by hand until it sits flush.
- Reinstall the fasteners using the same Torx driver you removed them with, and the 7mm socket if applicable.
- Torque: If no torque spec is provided with your part/kit, tighten snug and stop as soon as it seats. Overtightening can crack plastic.
Step 6: Quick function check
- Close and open the fuel door to confirm nothing binds.
- For capless systems: gently press the spring flap with a clean shop towel (don’t use a screwdriver) to confirm it moves freely and returns closed.
- Wipe any fingerprints or fuel residue with clean shop towels.
✅ After Repair
- Start your Explorer and confirm there’s no fuel smell around the fuel door area.
- If you had a check-engine light related to EVAP (fuel vapor system), it may take a few drive cycles to clear after the sealing issue is fixed.
- At your next fill-up, verify the nozzle inserts smoothly and the fuel door area stays dry.
💰 DIY vs Shop Cost
Shop Cost: $90-$220 (parts + labor)
DIY Cost: $15-$90 (parts only)
You Save: $75-$130 by doing it yourself!
Shop labor rates vary but typically run $100-$150/hour. This repair takes a shop approximately 0.3-0.6 hours.
🎯 Ready to get started?
HowToo makes it easy: same-day/2-day shipping on every part, plus all the tools and specialty tools you need! Check out the parts and tools sections below to add everything to your cart.
Guide for Fuel Tank Cap replace for these Ford vehicles
| Year Make Model | Sub Model | Engine | Body Style |
|---|