









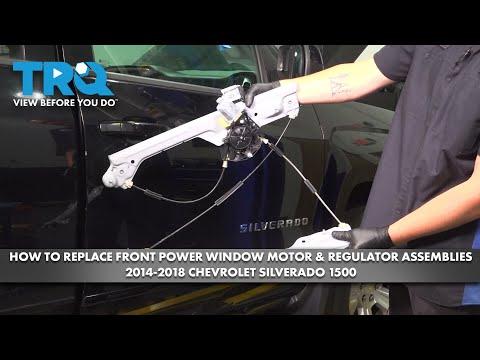





How to Replace the Front Window Regulator on a 2018 Chevrolet Silverado 1500
Step-by-step repair guide with tools, parts, torque specs, safety tips, and testing for 2014, 2015, 2016, 2017, 2018
How to Replace the Front Window Regulator on a 2018 Chevrolet Silverado 1500
Step-by-step repair guide with tools, parts, torque specs, safety tips, and testing for 2014, 2015, 2016, 2017, 2018


🔧 Front Window Regulator - Replacement
The front window regulator is the cable-and-track assembly that moves the glass up and down. On your Silverado, the regulator is inside the front door, so the door trim panel and moisture barrier have to come off first. If the window is slow, crooked, stuck, or making grinding noises, replacing the regulator usually fixes it.
Difficulty Level: Intermediate | Estimated Time: 2-3 hours per side
⚠️ Safety & Precautions
- Disconnect the negative battery cable before starting. Power window motors can move unexpectedly.
- The door panel contains electrical connectors and may have side airbag wiring. Handle the panel carefully.
- Support the window glass with tape before removing the regulator. A loose glass can fall and break.
- Wear safety glasses and gloves. Metal edges inside the door are sharp.
- If the window is stuck in the down position, keep hands clear of the regulator tracks while testing power.
🔧 Required Tools
You'll need the following tools for this repair:
- 10mm socket
- 7mm socket
- Torx T20 screwdriver
- Torx T30 screwdriver
- Ratchet
- 1/4-inch extension
- Trim panel removal tool
- Panel clip pliers
- Needle-nose pliers
- Pick tool
- Painter’s tape
- Torque wrench
- Safety glasses
- Mechanic gloves
- Floor jack (rated 3-ton minimum)
- Jack stands (rated for vehicle weight)
🔩 Required Parts
HowToo sells all the parts you need for this repair:
- Front window regulator assembly - Qty: 1 per side
- Front window motor - Qty: 1 per side if damaged
- Door panel clip set - Qty: 1
- Butyl sealing tape or door vapor barrier adhesive - Qty: 1
📋 Before You Begin
- Park on level ground and set the parking brake.
- Lower the window slightly if it still moves. This makes glass removal easier.
- Disconnect the negative battery cable before removing the door panel.
- Have tape ready to hold the glass in the raised position.
🔨 Step-by-Step Instructions
Follow these steps in order:
Step 1: Disconnect power
- Use a 10mm socket to disconnect the negative battery cable.
- Wait at least 2 minutes before working in the door.
Step 2: Remove the door trim panel
- Use a trim panel removal tool to pry off the switch panel and trim covers.
- Use a 7mm socket to remove the door panel screws.
- Use a trim panel removal tool to pop the door clips free around the perimeter.
- Lift the panel upward to release it from the window ledge.
- Disconnect the electrical connectors. A connector is the plug that carries power and signals.
- Set the panel on a clean blanket.
Step 3: Remove the moisture barrier
- Use a pick tool and trim panel removal tool to carefully peel back the vapor barrier.
- Do not tear it. You will reuse it during reassembly.
Step 4: Secure the window glass
- Use painter’s tape to hold the glass fully up against the door frame.
- Apply tape from the outside of the glass to the top of the door frame.
- Use several strips for support.
Step 5: Remove the glass from the regulator
- Use a Torx T30 screwdriver or 10mm socket to remove the glass-to-regulator fasteners, depending on the door hardware.
- Carefully slide the glass out of the regulator track if needed.
- Keep the glass taped in place while you work.
Step 6: Remove the regulator and motor assembly
- Use a Torx T20 screwdriver and 10mm socket to remove the regulator mounting bolts.
- Disconnect the window motor electrical connector.
- Guide the regulator out through the large service opening in the door.
- If the motor is being reused, transfer it to the new regulator if needed.
Step 7: Install the new regulator
- Feed the new regulator into the door opening.
- Align it with the mounting holes and hand-start all bolts first.
- Use a 10mm socket to snug the fasteners.
- Torque to 8 Nm (71 in-lbs) unless your new regulator instructions specify otherwise.
- Reconnect the motor connector.
Step 8: Reinstall the glass
- Lower the glass carefully into the new regulator track.
- Reinstall the glass fasteners using a Torx T30 screwdriver or 10mm socket.
- Torque to 8 Nm (71 in-lbs).
- Remove the tape only after the glass is secured.
Step 9: Test the window before reassembly
- Reconnect the negative battery cable using a 10mm socket.
- Turn the key on and operate the window switch.
- Check that the glass moves smoothly and stays aligned in the tracks.
- If the glass binds, stop and realign the regulator before closing the door.
Step 10: Reinstall the door panel
- Use a pick tool to press the vapor barrier back into place.
- Reconnect all electrical connectors.
- Hang the door panel on the window ledge first, then press the clips into place.
- Reinstall the screws with a 7mm socket.
- Snap the trim covers back on.
✅ After Repair
- Cycle the window fully up and down several times.
- Check for glass tilt, binding, or clicking noises.
- Make sure the door panel sits flush and all switches work.
- If the one-touch feature does not work, hold the switch fully up for a few seconds, then fully down for a few seconds to relearn it.
💰 DIY vs Shop Cost
Shop Cost: $350-$650 per side (parts + labor)
DIY Cost: $90-$220 per side (parts only)
You Save: $260-$430 by doing it yourself!
Shop labor rates vary but typically run $100-$150/hour. This repair takes a shop approximately 2-3 hours per side.
🎯 Ready to get started?
HowToo makes it easy: same-day/2-day shipping on every part, plus all the tools and specialty tools you need! Check out the parts and tools sections below to add everything to your cart.