















How to Replace the Front Wheel Bearing Hub on a 2014-2019 GMC Sierra 1500
Step-by-step instructions with tools, parts, torque specs, and safety tips
How to Replace the Front Wheel Bearing Hub on a 2014-2019 GMC Sierra 1500
Step-by-step instructions with tools, parts, torque specs, and safety tips for 2014, 2015, 2016, 2017, 2018, 2019


🔧 Wheel Bearing Hub Assembly - Front Replacement
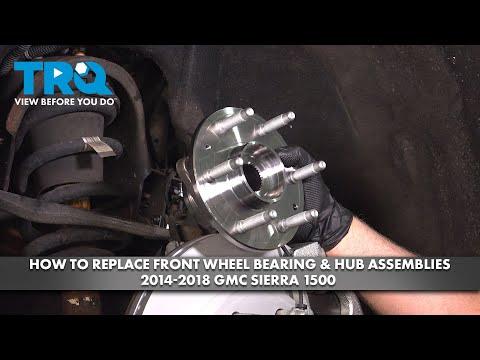
On your Sierra, the front wheel bearing is part of the hub assembly. The usual repair is to replace the whole hub, not just the bearing itself. This restores smooth wheel rotation and fixes rumbling, grinding, or wheel play.
Difficulty Level: Intermediate | Estimated Time: 2-3 hours per side
Assumption: front wheel bearing hub replacement on one side.
⚠️ Safety & Precautions
- Support the truck securely on jack stands before removing the wheel.
- Do not work under a vehicle supported only by a jack.
- Brake components may be hot if the truck was driven recently.
- Use care with the CV axle and brake hose so nothing is stretched or damaged.
- Battery disconnect is not required for this repair.
🔧 Required Tools
You'll need the following tools for this repair:
- Floor jack (rated 3-ton minimum)
- Jack stands (rated for truck weight)
- Wheel chocks
- Lug wrench or 22mm socket
- 1/2-inch drive ratchet
- 1/2-inch drive breaker bar
- Torque wrench
- 18mm socket
- 21mm socket
- 24mm socket
- 30mm socket
- 15mm socket
- 18mm wrench
- Flat blade screwdriver
- Hammer
- Ball joint separator (specialty)
- Caliper hanger hook
- Safety glasses
- Mechanic gloves
🔩 Required Parts
HowToo sells all the parts you need for this repair:
- Front wheel hub and bearing assembly - Qty: 1
- Hub mounting bolts - Qty: 3
- Axle nut - Qty: 1
- Brake cleaner - Qty: 1 can
- Anti-seize compound - Qty: 1
📋 Before You Begin
- Park on level ground and set the parking brake.
- Chock the rear wheels.
- Loosen the lug nuts before lifting the truck.
- If the hub is rusted in place, plan for extra time.
- Penetrating oil helps on rusty parts.
🔨 Step-by-Step Instructions
Follow these steps in order:
Step 1: Loosen the wheel
- Use a lug wrench or 22mm socket to loosen the lug nuts on the wheel you are servicing.
- Do not remove them yet.
Step 2: Raise and support the truck
- Use a floor jack to lift the front of the truck at the correct lift point.
- Place jack stands under the frame and lower the truck onto them.
- Remove the wheel.
Step 3: Remove the brake caliper and bracket
- Use a 15mm socket to remove the caliper guide pin bolts.
- Lift the caliper off and hang it with a caliper hanger hook.
- Use an 18mm socket to remove the caliper bracket bolts.
- Remove the brake rotor.
- Do not let the caliper hang by the hose.
Step 4: Remove the axle nut
- Use a 30mm socket and breaker bar to remove the axle nut.
- If the axle spins, have an assistant press the brake pedal.
Step 5: Disconnect the steering linkage
- Use a 21mm socket to remove the outer tie rod nut.
- Use a ball joint separator (specialty) to separate the tie rod from the knuckle.
- Strike the knuckle, not the stud.
Step 6: Free the hub from the knuckle
- Use a 18mm socket to remove the hub mounting bolts from the back of the knuckle.
- Remove all three bolts.
- If the hub is stuck, tap it out from the back with a hammer.
- Remove the hub assembly.
Step 7: Install the new hub assembly
- Clean the mounting surface with brake cleaner.
- Install the new hub assembly into the knuckle.
- Use a 18mm socket to install the new hub bolts.
- Torque to 115 Nm (85 ft-lbs).
- Install a new axle nut finger-tight for now.
Step 8: Reassemble the brake and steering parts
- Reinstall the rotor.
- Reinstall the caliper bracket using an 18mm socket.
- Torque to 200 Nm (148 ft-lbs).
- Reinstall the caliper using a 15mm socket.
- Torque to 31 Nm (23 ft-lbs).
- Reconnect the tie rod end using a 21mm socket.
- Torque to 75 Nm (55 ft-lbs).
Step 9: Torque the axle nut and wheel
- Use a 30mm socket and torque wrench to tighten the axle nut.
- Torque to 300 Nm (221 ft-lbs).
- Install the wheel and hand-tighten the lug nuts.
- Lower the truck and use a torque wrench to tighten the lug nuts in a star pattern.
- Torque to 190 Nm (140 ft-lbs).
✅ After Repair
- Start the truck and listen for grinding or humming.
- Test the brakes at low speed before driving normally.
- Check that the steering wheel is centered.
- Recheck lug nut torque after a short test drive.
💰 DIY vs Shop Cost
Shop Cost: $450-$900 (parts + labor)
DIY Cost: $120-$250 (parts only)
You Save: $330-$650 by doing it yourself!
Shop labor rates vary but typically run $100-$150/hour. This repair takes a shop approximately 2-3 hours.
🎯 Ready to get started?
HowToo makes it easy: same-day/2-day shipping on every part, plus all the tools and specialty tools you need! Check out the parts and tools sections below to add everything to your cart.
Guide for Anti-Seize Compound replace for these GMC vehicles
| Year Make Model | Sub Model | Engine | Body Style |
|---|---|---|---|
| 2019 GMC Sierra 1500 | - | - | - |
| 2018 GMC Sierra 1500 | - | - | - |
| 2017 GMC Sierra 1500 | - | - | - |
| 2016 GMC Sierra 1500 | - | - | - |
| 2015 GMC Sierra 1500 | - | - | - |
| 2014 GMC Sierra 1500 | - | - | - |