









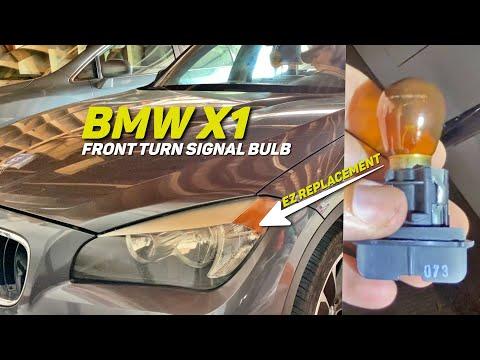







How to Replace the Front Turn Signal Bulb on a 2012-2022 BMW X1 (Halogen or LED)
Step-by-step wheel well access guide with required tools, parts list, and wheel bolt torque specs
How to Replace the Front Turn Signal Bulb on a 2012-2022 BMW X1 (Halogen or LED)
Step-by-step wheel well access guide with required tools, parts list, and wheel bolt torque specs for 2012, 2013, 2014, 2015, 2016, 2017, 2018, 2019, 2020, 2021, 2022


🔧 X1 - Front Turn Signal Bulb Replacement
On your X1, the front turn signal is either a replaceable bulb (common on halogen headlamps) or an LED module that isn’t serviced as a “bulb” (common on LED headlamps). The access method is usually through the front wheel well liner, so you can do this without removing the bumper in most cases.
Assumption: I’m covering both halogen-bulb and LED-module setups since X1 headlamps vary by option.
Difficulty Level: Beginner | Estimated Time: 0.5-1.5 hours
⚠️ Safety & Precautions
- 🛑 Work on level ground and use jack stands—never rely on a jack alone.
- ⚠️ Let the headlamp area cool before touching it; bulbs and housings can get hot.
- ⚡ Turn ignition OFF and remove the key/fob from the vehicle area to prevent lights cycling.
- 🧤 Wear gloves; skin oil can shorten halogen bulb life.
🔧 Required Tools
You'll need the following tools for this repair:
- Floor jack (rated 3-ton minimum)
- Jack stands (rated 3-ton minimum)
- Wheel chocks
- 17mm socket
- 3/8" drive ratchet
- 3" extension
- Torque wrench (10-200 Nm range)
- Torx T20 screwdriver
- Torx T25 screwdriver
- 8mm socket
- Trim clip removal tool
- Small flathead screwdriver
- Work light
- Nitrile gloves
- Safety glasses
🔩 Required Parts
HowToo sells all the parts you need for this repair:
- Front turn signal bulb - Qty: 1 (or Qty: 2 if replacing both sides)
- Front turn signal LED module - Qty: 1 (only if equipped; not a bulb)
- Wheel well liner clips/screws assortment - Qty: 1 (optional; clips often break)
📋 Before You Begin
- Park on level ground, turn the steering wheel fully away from the side you’re working on (gives more room).
- Set the parking brake and place wheel chocks behind the rear wheels.
- Turn ignition OFF and keep the key/fob at least 10 feet away.
- Tip: Replacing both sides keeps brightness/color matched.
🔨 Step-by-Step Instructions
Follow these steps in order:
Step 1: Verify which side and function
- Turn the hazard lights on briefly, then OFF.
- Walk around and confirm which front turn signal is out (left or right).
Step 2: Lift and secure the front corner
- Use a 17mm socket and ratchet to loosen the wheel bolts 1/2 turn while the tire is on the ground.
- Lift the front corner using the floor jack at the proper jacking point.
- Set the vehicle onto jack stands.
- Remove the wheel bolts using the 17mm socket and remove the wheel.
- When reinstalling later: Torque to 140 Nm (103 ft-lbs).
Step 3: Pull back the front wheel well liner
- Use a Torx T20 screwdriver / Torx T25 screwdriver and 8mm socket (varies by fastener) to remove the front-section liner screws.
- Use a trim clip removal tool to pop out any plastic clips (this tool is a forked pry tool that lifts clips without snapping them).
- Carefully peel the liner back just enough to reach the back of the headlamp.
- Tip: Don’t crease the liner; it can stay warped.
Step 4: Locate the turn signal socket/module
- Use a work light to see the rear of the headlamp.
- Find the turn signal access point:
- Halogen setup: a round bulb twist-lock socket (it turns to unlock).
- LED setup: a small rectangular LED module with an electrical connector (no bulb glass).
Step 5A: Replace the turn signal bulb (halogen headlamp type)
- Twist the bulb socket counterclockwise by hand; if tight, use a small flathead screwdriver gently on the socket tabs.
- Pull the socket straight out.
- Remove the bulb from the socket (usually pulls straight out).
- Install the new bulb using nitrile gloves (prevents oil on the glass).
- Reinstall the socket and twist clockwise until it locks fully.
Step 5B: Replace the turn signal LED module (LED headlamp type)
- Press the connector lock tab and unplug the connector by hand.
- Remove the LED module fasteners using a Torx T20 screwdriver or Torx T25 screwdriver (varies).
- Remove the module and install the new module in the same position.
- Reconnect the electrical connector until it clicks.
- Tip: Make sure the seal sits flat to prevent moisture.
Step 6: Reassemble the wheel well liner
- Reposition the liner correctly around the bumper/headlamp edge.
- Reinstall screws using the Torx T20 screwdriver / Torx T25 screwdriver and 8mm socket.
- Reinstall any clips using the trim clip removal tool to align them, then press in by hand.
Step 7: Reinstall the wheel
- Install wheel bolts by hand first (prevents cross-threading).
- Snug the bolts using the 17mm socket and ratchet.
- Lower the vehicle off the jack stands using the floor jack.
- Final tighten with a torque wrench: Torque to 140 Nm (103 ft-lbs).
✅ After Repair
- Turn the hazards on and confirm the repaired side flashes normally.
- Check the other front turn signal; if it’s dim or mismatched, consider replacing it too.
- If you still get a warning message after LED module replacement, cycle ignition OFF/ON and recheck operation.
- Confirm the wheel well liner is secure and not rubbing the tire during a short test drive.
💰 DIY vs Shop Cost
Shop Cost: $120-$300 (parts + labor)
DIY Cost: $10-$40 (bulb) or $80-$220 (LED module)
You Save: $80-$200 by doing it yourself!
Shop labor rates vary but typically run $100-$150/hour. This repair takes a shop approximately 0.5-1.0 hours.
🎯 Ready to get started?
HowToo makes it easy: same-day/2-day shipping on every part, plus all the tools and specialty tools you need! Check out the parts and tools sections below to add everything to your cart.
Guide for Turn Signal Light Bulb replace for these BMW vehicles
| Year Make Model | Sub Model | Engine | Body Style |
|---|---|---|---|
| 2022 BMW X1 | - | - | - |
| 2021 BMW X1 | - | - | - |
| 2020 BMW X1 | - | - | - |
| 2019 BMW X1 | - | - | - |
| 2018 BMW X1 | - | - | - |
| 2017 BMW X1 | - | - | - |
| 2016 BMW X1 | - | - | - |
| 2015 BMW X1 | - | - | - |
| 2014 BMW X1 | - | - | - |
| 2013 BMW X1 | - | - | - |
| 2012 BMW X1 | - | - | - |