


How to Replace the Front Lower Ball Joint/Control Arm on a 2016 Jeep Cherokee
Step-by-step lower control arm install with tools, parts list, torque specs, safety tips, and alignment notes
How to Replace the Front Lower Ball Joint/Control Arm on a 2016 Jeep Cherokee
Step-by-step lower control arm install with tools, parts list, torque specs, safety tips, and alignment notes


🔧 Cherokee - Front Lower Ball Joint Replacement
On your Cherokee, the front lower ball joint is typically serviced as part of the front lower control arm assembly (the ball joint is built into the arm). Replacing the control arm restores the ball joint and the control arm bushings, which helps fix clunks, looseness, and uneven tire wear.
Difficulty Level: Advanced | Estimated Time: 2.5-4.5 hours (both sides)
Assumption: Front lower ball joints are non-serviceable separately, so you’re replacing the lower control arm(s).
⚠️ Safety & Precautions
- 🛑 Support the Cherokee with jack stands on the body pinch welds/subframe—never rely on a floor jack.
- 🧤 Wear safety glasses; separating a ball joint can release suddenly.
- 🔥 Work on a cool suspension/knuckle; brakes and hubs can be hot after driving.
- 🧭 Plan on a professional alignment after this repair.
- 🔋 Battery disconnect is not required for this job.
🔧 Required Tools
You'll need the following tools for this repair:
- Floor jack (rated 3-ton minimum)
- Jack stands (rated 3-ton minimum)
- Wheel chocks
- Safety glasses
- Mechanic gloves
- Breaker bar 1/2"
- Torque wrench 3/8"
- Torque wrench 1/2"
- Socket set metric 8mm-24mm
- Wrench set metric 8mm-24mm
- 21mm socket
- 18mm socket
- 15mm socket
- Pry bar 18"
- Ball joint separator tool (specialty)
- Hammer 2 lb
- Penetrating oil
- Paint marker
🔩 Required Parts
HowToo sells all the parts you need for this repair:
- Front lower control arm with ball joint - Replace in pairs - Qty: 2
- Front lower ball joint nut - Qty: 2
- Front lower control arm mounting bolts and nuts - Qty: 1 kit
- Anti-seize compound - Qty: 1
📋 Before You Begin
- Park on level ground, steering wheel straight, and set the parking brake.
- Chock the rear wheels with wheel chocks.
- Loosen the front wheel lug nuts 1/2 turn with a 21mm socket and breaker bar before lifting.
- Spray the ball joint nut and control arm bolts with penetrating oil and wait 5–10 minutes.
- Know your tools: a ball joint separator is a clamp-style tool that presses the joint apart without hammering the threads.
🔨 Step-by-Step Instructions
Follow these steps in order:
Step 1: Lift and secure the front
- Use a floor jack to lift the front at the subframe jacking point.
- Place jack stands under the left and right support points and lower the Cherokee onto them.
- Remove both front wheels using a 21mm socket.
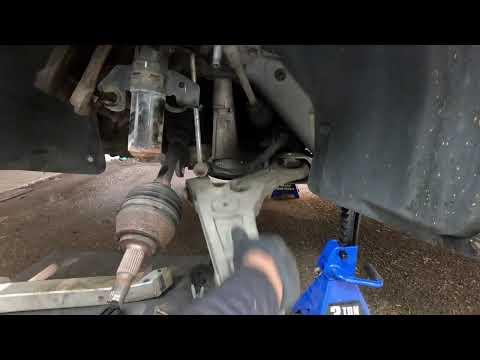
Step 2: Support the steering knuckle
- Place the floor jack lightly under the lower control arm/knuckle area to keep the knuckle from dropping when the ball joint separates.
- Tip: Light pressure helps parts separate smoothly.
Step 3: Disconnect the sway bar link from the strut or control arm
- Remove the sway bar end link nut using an 18mm socket and wrench.
- If the stud spins, hold it with the appropriate wrench while loosening the nut.
Step 4: Remove the lower ball joint nut
- Remove the lower ball joint nut at the steering knuckle using an 18mm socket and breaker bar.
- If equipped with a cotter pin, remove it first using pliers (use the wrench set list if your kit includes pliers; otherwise use a needle-nose pliers if available).
Step 5: Separate the ball joint from the steering knuckle
- Install the ball joint separator tool (specialty) between the knuckle and the ball joint stud.
- Tighten the separator using the appropriate wrench set metric 8mm-24mm until the taper “pops” free.
- Use a hammer 2 lb only if needed, striking the knuckle boss (not the stud threads).
- Tip: Don’t hammer the stud; it mushrooms.
Step 6: Remove the lower control arm mounting bolts
- Mark the control arm bolt positions with a paint marker for reference.
- Remove the rear and front control arm bolts using an 18mm socket and breaker bar while holding the nut with an 18mm wrench.
- Use a pry bar 18" to guide the arm out of the subframe pockets.
Step 7: Install the new lower control arm
- Position the new arm into the subframe and start the mounting bolts by hand using an 18mm socket.
- Guide the ball joint stud into the steering knuckle.
- Install the new ball joint nut by hand, then snug it using an 18mm socket.
Step 8: Torque fasteners (important: torque bushings at ride height)
- Reinstall the wheel temporarily with 2 lug nuts hand-tight to help stabilize the hub (use a 21mm socket).
- Use the floor jack under the lower control arm to raise the suspension until the vehicle is close to normal ride height.
- Torque the lower control arm mounting bolts using a torque wrench 1/2": Torque to 150 Nm (111 ft-lbs).
- Torque the lower ball joint nut using a torque wrench 1/2": Torque to 95 Nm (70 ft-lbs).
- Torque the sway bar end link nut using a torque wrench 3/8": Torque to 75 Nm (55 ft-lbs).
- Tip: Wrong bushing torque height causes early failure.
Step 9: Reinstall wheels and lower the vehicle
- Install both wheels and hand-tighten the lug nuts using a 21mm socket.
- Lower the Cherokee off the jack stands using the floor jack.
- Torque the lug nuts in a star pattern using a torque wrench 1/2": Torque to 135 Nm (100 ft-lbs).
✅ After Repair
- Turn the steering wheel lock-to-lock and listen for clicks/clunks.
- Road test at low speed first; verify straight tracking and no vibration.
- Get a 4-wheel alignment as soon as possible (recommended same day).
- Recheck lug nut torque after 50–100 miles using a torque wrench 1/2".
💰 DIY vs Shop Cost
Shop Cost: $650-$1,250 (parts + labor)
DIY Cost: $220-$520 (parts only)
You Save: $430-$730 by doing it yourself!
Shop labor rates vary but typically run $100-$150/hour. This repair takes a shop approximately 2.5-4.0 hours.
🎯 Ready to get started?
HowToo makes it easy: same-day/2-day shipping on every part, plus all the tools and specialty tools you need! Check out the parts and tools sections below to add everything to your cart.