













How to Replace the Front Door Lock Actuator on a 2017-2021 Ford F-250 Super Duty
Step-by-step door panel removal and latch/actuator install with tools, parts list, and torque specs
How to Replace the Front Door Lock Actuator on a 2017-2021 Ford F-250 Super Duty
Step-by-step door panel removal and latch/actuator install with tools, parts list, and torque specs for 2017, 2018, 2019, 2020, 2021


🔧 F-250 Super Duty - Front Door Lock Actuator Replacement
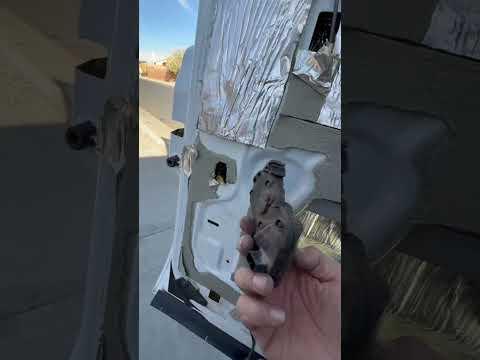
On your F-250, the “door lock actuator” is typically integrated into the door latch assembly. Replacing it means removing the interior door panel, peeling back the moisture barrier, disconnecting the linkage/cables, and swapping the latch/actuator unit.
Difficulty Level: Intermediate | Estimated Time: 1.5-3.0 hours (first time)
⚠️ Safety & Precautions
- Work with the window fully up to protect the glass and your hands.
- Disconnect the negative battery cable to reduce risk of electrical shorts and warning lights.
- Don’t tear the moisture barrier (plastic sheet). It prevents water leaks and wind noise.
- Support the door panel during removal so it doesn’t hang by the wiring.
🔧 Required Tools
You'll need the following tools for this repair:
- 10mm socket
- 7mm socket
- 8mm socket
- 1/4" drive ratchet
- 6" socket extension (1/4" drive)
- Torx T20 bit
- Torx T27 bit
- Torx T30 bit
- Trim clip remover (specialty)
- Small flathead screwdriver
- Needle-nose pliers
- Pick tool
- Painter’s tape
- Torque wrench (in-lb/Nm capable)
- Shop rags
- Nitrile gloves
- Safety glasses
🔩 Required Parts
HowToo sells all the parts you need for this repair:
- Front door latch/lock actuator assembly - Qty: 1
- Door trim panel retaining clips - Qty: 6-12
- Butyl tape (moisture barrier adhesive) - Qty: 1
📋 Before You Begin
- Park on level ground, shift to Park, and keep the window fully up.
- Turn the ignition off and remove the key.
- Use a 10mm socket to disconnect the negative battery cable and wait 2 minutes.
- Decide which door: driver or passenger. The steps are the same, just mirrored.
🔨 Step-by-Step Instructions
Follow these steps in order:
Step 1: Remove the door pull/handle trim and fasteners
- Use a trim clip remover (specialty) to gently pry off the trim pieces around the interior handle and the door pull. A trim clip remover is a forked plastic/metal tool that pops clips without breaking them.
- Remove any exposed screws using a 7mm socket or Torx T20 bit (fasteners vary by panel location).
- Place painter’s tape on painted edges to prevent scratches while you work.
Step 2: Remove the window/lock switch panel
- Use a trim clip remover (specialty) to pry up the switch panel from the armrest.
- Disconnect the electrical connectors by releasing the locks with a small flathead screwdriver.
- Tip: Don’t pull wires—pull the connector body.
Step 3: Remove the interior door panel
- Starting at the bottom edge, use the trim clip remover (specialty) to pop the panel clips free around the perimeter.
- Lift the door panel straight up and off the window channel.
- Disconnect remaining connectors (courtesy light/speaker) using the small flathead screwdriver.
- Unhook the inside handle cable/rod using needle-nose pliers if needed (note how it routes before removal).
Step 4: Peel back the moisture barrier (plastic sheet)
- Carefully peel back the barrier enough to access the latch area, using a pick tool to separate sticky butyl without tearing the plastic.
- Use shop rags to keep the adhesive clean (dirt reduces sealing).
Step 5: Disconnect the latch electrical connector
- Locate the latch/actuator connector near the rear edge of the door (latch area).
- Release the connector lock with a pick tool or small flathead screwdriver, then unplug it.
Step 6: Detach linkage/cables from the latch
- Disconnect the inside handle cable from the latch (usually a cable end sitting in a lever, with a clip retaining the cable housing).
- Disconnect the outside handle rod/cable (varies by door; use needle-nose pliers to rotate the plastic retainer and lift the rod out).
- Tip: Take a photo before unhooking anything.
Step 7: Remove the latch/actuator assembly from the door
- At the rear edge of the door, remove the latch mounting fasteners using a Torx T30 bit.
- Pull the latch assembly out through the large access opening in the door.
- If a bracket blocks removal, remove it using an 8mm socket and 1/4" drive ratchet.
Step 8: Install the new latch/actuator assembly
- Transfer any clips or foam pieces from the old unit to the new one.
- Position the new latch into the door and start the bolts by hand.
- Tighten latch fasteners using a Torx T30 bit and torque wrench: Torque to 9 Nm (80 in-lbs).
- Reconnect the inside and outside handle linkage/cables (verify clips are fully seated).
- Reconnect the latch electrical connector until it clicks.
Step 9: Re-seal the moisture barrier
- Press the barrier back into the butyl adhesive all the way around.
- If the butyl no longer sticks well, apply butyl tape and press firmly to seal.
Step 10: Reinstall the door panel and switches
- Reconnect all electrical connectors (speaker, lights, switch panel).
- Hang the panel on the top edge (window channel) and press downward to seat.
- Press around the perimeter to snap in the clips.
- Reinstall screws using a 7mm socket or Torx T20 bit (match what came out).
- Reinstall trim covers using hand pressure.
Step 11: Reconnect the battery
- Reconnect the negative battery cable using a 10mm socket.
✅ After Repair
- Test from inside: lock/unlock switch, then open/close the door to confirm the latch releases smoothly.
- Test from outside: key/fob lock/unlock, then pull the exterior handle to verify it opens normally.
- Confirm the door ajar light works correctly and the lock knob/button moves normally.
- If the door won’t open or won’t lock, recheck that each linkage clip is fully latched.
💰 DIY vs Shop Cost
Shop Cost: $350-$700 (parts + labor)
DIY Cost: $90-$250 (parts only)
You Save: $260-$450 by doing it yourself!
Shop labor rates vary but typically run $100-$150/hour. This repair takes a shop approximately 1.5-2.5 hours.
🎯 Ready to get started?
HowToo makes it easy: same-day/2-day shipping on every part, plus all the tools and specialty tools you need! Check out the parts and tools sections below to add everything to your cart.
Guide for Door Lock Actuator Motor replace for these Ford vehicles
| Year Make Model | Sub Model | Engine | Body Style |
|---|---|---|---|
| 2021 Ford F-250 Super Duty | - | - | - |
| 2020 Ford F-250 Super Duty | - | - | - |
| 2019 Ford F-250 Super Duty | - | - | - |
| 2018 Ford F-250 Super Duty | - | - | - |
| 2017 Ford F-250 Super Duty | - | - | - |