


How to Replace the Front Door Lock Actuator (Latch Assembly) on a 2018 Chrysler Pacifica
Step-by-step door panel removal, latch/actuator swap, required tools/parts, safety tips, and final lock function checks
How to Replace the Front Door Lock Actuator (Latch Assembly) on a 2018 Chrysler Pacifica
Step-by-step door panel removal, latch/actuator swap, required tools/parts, safety tips, and final lock function checks


🔧 Pacifica - Front Door Lock Actuator Replacement
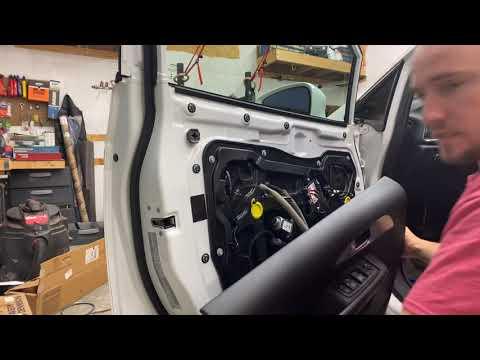
On your Pacifica Hybrid, the “door lock actuator” is typically integrated into the door latch assembly inside the door. Replacement involves removing the interior door trim panel, disconnecting the latch/actuator electrical connector, and swapping the latch/actuator unit.
Difficulty Level: Intermediate | Estimated Time: 1.5-3.0 hours
Quick questions (so I give the correct latch/actuator procedure + torque specs):
- 🔹 Is it the driver front door or passenger front door?
- 🔹 Are you replacing the entire door latch/actuator assembly (most common), or trying to replace only the actuator motor?
⚠️ Safety & Precautions
- 🔹 The front door has a side airbag in/near the door panel area—avoid powering the vehicle with connectors unplugged.
- 🔹 Keep the key fob at least 15 ft away so modules don’t wake up while connectors are unplugged.
- 🔹 If you’ll unplug any yellow airbag-related connector: disconnect the 12V battery negative terminal first and wait 2 minutes.
- 🔹 This job does not require opening the hybrid high-voltage system.
🔧 Required Tools
You'll need the following tools for this repair:
- Trim removal tool set
- Phillips #2 screwdriver
- Flat-blade screwdriver (small)
- 1/4" drive ratchet
- 7mm socket
- 8mm socket
- 10mm socket
- Torx T20 bit
- Torx T30 bit
- Pick tool (small)
- Needle-nose pliers
- Torque wrench (in-lb and ft-lb capable)
- Work light
- Painter’s tape
- Mechanic gloves
- Safety glasses
🔩 Required Parts
HowToo sells all the parts you need for this repair:
- Front door latch with integrated lock actuator - Qty: 1
- Door trim panel clips - Qty: 4-10
- Butyl door vapor barrier sealant - Qty: 1
📋 Before You Begin
- 🔹 Park on level ground, shift to P, and turn the vehicle fully OFF.
- 🔹 Open the front door you’re working on and lower the window about 1/3 of the way.
- 🔹 Keep the key fob far away to prevent wake-ups.
- 🔹 If you plan to unplug any yellow connector: disconnect the 12mm wrench is not needed; use a 10mm socket to disconnect the 12V negative terminal, then wait 2 minutes.
🔨 Step-by-Step Instructions
Follow these steps in order:
Step 1: I need two details to give the exact steps + torque specs
- Reply with: Driver front or Passenger front.
- Reply with: Replacing complete latch/actuator assembly or actuator motor only.
- Most Pacifica repairs replace the whole latch.
Step 2: What I’ll provide immediately after you answer
- The correct door-trim screw/clip locations for that side.
- The correct linkage/cable release method (inside handle + outside handle rods/cables).
- Exact fastener torque specs for the latch and trim hardware.
- Post-install function checks (lock/unlock, keyless entry, child lock, inside/outside handle).
✅ After Repair
- 🔹 Verify the door locks/unlocks from: key fob, interior switch, and exterior handle (keyless if equipped).
- 🔹 Confirm the door opens from inside and outside and the lock knob moves smoothly.
- 🔹 Make sure the window/lock switch panel works and no connectors are left unplugged.
💰 DIY vs Shop Cost
Shop Cost: $350-$750 (parts + labor)
DIY Cost: $90-$280 (parts only)
You Save: $260-$470 by doing it yourself!
Shop labor rates vary but typically run $100-$150/hour. This repair takes a shop approximately 1.5-3.0 hours.
🎯 Ready to get started?
HowToo makes it easy: same-day/2-day shipping on every part, plus all the tools and specialty tools you need! Check out the parts and tools sections below to add everything to your cart.
