















How to Replace the Engine Air Filter on a 2012 GMC Sierra 1500
Step-by-step instructions with tools, parts, safety tips, and torque specs for 1999, 2000, 2001, 2002, 2003, 2004, 2005, 2006, 2007, 2008, 2009, 2010, 2011, 2012, 2013, 2014, 2015, 2016, 2017, 2018
How to Replace the Engine Air Filter on a 2012 GMC Sierra 1500
Step-by-step instructions with tools, parts, safety tips, and torque specs for 1999, 2000, 2001, 2002, 2003, 2004, 2005, 2006, 2007, 2008, 2009, 2010, 2011, 2012, 2013, 2014, 2015, 2016, 2017, 2018


🔧 Engine Air Filter - Replacement
Your Sierra uses a sealed air box in the engine bay. Replacing the engine air filter is a quick maintenance job that restores airflow and helps keep dust out of the engine.
Difficulty Level: Beginner | Estimated Time: 0.2-0.5 hours
⚠️ Safety & Precautions
- Make sure the engine is off and cool before opening the air box.
- Keep loose dirt away from the open air box so debris does not enter the engine.
- No battery disconnect is required for this job.
- Do not run the engine with the air box open.
🔧 Required Tools
You'll need the following tools for this repair:
- Flat-blade screwdriver
- 7mm socket
- Ratchet
- Trim clip removal tool (specialty)
- Safety glasses
- Gloves
🔩 Required Parts
HowToo sells all the parts you need for this repair:
- Engine air filter - Qty: 1
📋 Before You Begin
- Park on level ground and set the parking brake.
- Turn the ignition off and remove the key.
- Open the hood and let the engine cool if it was recently running.
🔨 Step-by-Step Instructions
Follow these steps in order:
Step 1: Open the air filter housing
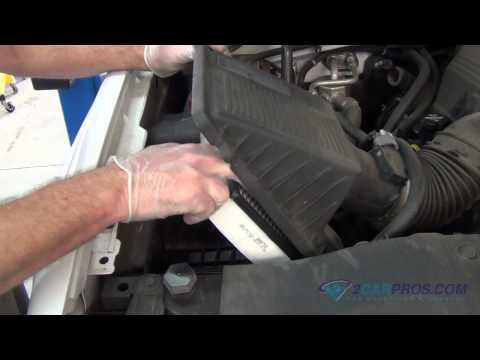
- Locate the air filter box on the driver-side front area of the engine bay.
- Use a flat-blade screwdriver or 7mm socket to loosen the air box cover screws or retainers, depending on your setup.
- If your cover uses clips, use a trim clip removal tool (specialty) to release them gently.
Step 2: Remove the old filter
- Lift the air box lid carefully.
- Pull the old filter straight out by hand.
- Note the filter’s position before removal.
Step 3: Clean the housing
- Wipe out loose dirt from the air box with a clean shop rag.
- Do not let debris fall into the intake tube.
- Inspect the rubber seal around the housing for cracks or damage.
Step 4: Install the new filter
- Place the new filter into the housing in the same orientation as the old one.
- Make sure the filter seats fully and evenly all the way around.
- A crooked filter can let dirt bypass the seal.
Step 5: Reinstall the air box cover
- Lower the cover back into place.
- Reinstall the screws or clips using the 7mm socket or flat-blade screwdriver.
- Tighten only until snug. Torque to 3-5 Nm (27-44 in-lbs) if using fasteners.
✅ After Repair
- Start the engine and listen for any air leaks or unusual whistling.
- Make sure the air box lid is fully seated and secured.
- Check again after a short drive to confirm nothing shifted.
💰 DIY vs Shop Cost
Shop Cost: $60-$120 (parts + labor)
DIY Cost: $15-$35 (parts only)
You Save: $45-$85 by doing it yourself!
Shop labor rates vary but typically run $100-$150/hour. This repair takes a shop approximately 0.2-0.5 hours.
🎯 Ready to get started?
HowToo makes it easy: same-day/2-day shipping on every part, plus all the tools and specialty tools you need! Check out the parts and tools sections below to add everything to your cart.