









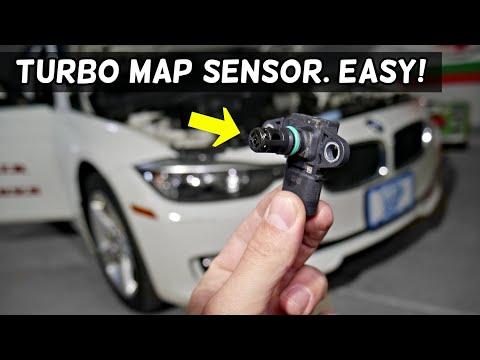






How to Replace the Charge Pipe TMAP (MAF-Like) Sensor on a 2016 BMW 340i B58
Step-by-step instructions with tools, parts, safety tips, and 5 Nm (44 in-lbs) torque spec for 2016, 2017
How to Replace the Charge Pipe TMAP (MAF-Like) Sensor on a 2016 BMW 340i B58
Step-by-step instructions with tools, parts, safety tips, and 5 Nm (44 in-lbs) torque spec for 2016, 2017


🔧 340i - Intake Air Sensor (No MAF) Replacement
Your 340i’s B58 engine does not use a traditional Mass Air Flow (MAF) sensor in the intake tube like many older cars. Instead, it uses pressure/temperature sensors (commonly called a TMAP) to measure intake air conditions for fueling and boost control.
This guide shows how to replace the most common “MAF-like” sensor on your 340i: the charge pipe TMAP sensor (and an optional note for the intake manifold MAP sensor).
Difficulty Level: Beginner | Estimated Time: 0.5-1.0 hours
⚠️ Safety & Precautions
- ⚠️ Let the engine cool fully; hot turbo/charge pipes can burn you.
- ⚠️ Keep tools and screws out of the intake tract; dropped hardware can cause engine damage.
- ⚠️ If you disconnect the battery: use a 10mm socket and disconnect the negative terminal only.
- ⚠️ Don’t pull on wiring; always release the connector lock first.
🔧 Required Tools
You'll need the following tools for this repair:
- 1/4" ratchet
- 1/4" torque wrench (2–20 Nm range)
- Torx T20 bit
- 8mm socket
- 10mm socket
- Trim clip removal tool
- Small flathead screwdriver
- Flashlight
- Nitrile gloves
- Safety glasses
🔩 Required Parts
HowToo sells all the parts you need for this repair:
- Charge pipe TMAP sensor (boost pressure/intake air temp sensor) - Qty: 1
- TMAP sensor O-ring seal - Qty: 1
- Electrical contact cleaner - Qty: 1
📋 Before You Begin
- Park on level ground, engine off, and set the parking brake.
- Open the hood and remove any loose items (rags/tools) from the engine bay.
- Tip: Take a quick photo of the connector routing.
- Optional: Disconnect the battery negative terminal using a 10mm socket (safer for first-timers).
🔨 Step-by-Step Instructions
Follow these steps in order:
Step 1: Remove the engine cover and access the charge pipe
- Pull up to remove the engine cover (it’s held by rubber grommets). Use your hands; no tools needed.
- If a small duct or trim panel blocks access, remove fasteners using an 8mm socket and/or trim clip removal tool.
- Use a flashlight to locate the charge pipe (the pressurized air pipe running from the intercooler area toward the throttle body).
Step 2: Locate the TMAP sensor on the charge pipe
- Look for a small sensor held into the charge pipe with one screw and a 3–4 wire connector.
- The sensor tip goes into the airflow path; it seals with an O-ring (a rubber ring that prevents boost leaks).
Step 3: Unplug the electrical connector
- Use a small flathead screwdriver to gently help lift the connector lock if needed.
- Press the release and pull the connector straight off (do not yank the wires).
- If there’s dirt/oil, spray a small amount of electrical contact cleaner into the connector and let it air-dry.
Step 4: Remove the sensor retaining screw
- Use a Torx T20 bit with a 1/4" ratchet to remove the single screw.
- Set the screw aside where it can’t fall into the engine bay.
Step 5: Remove the old sensor
- Twist the sensor gently and pull it straight out.
- Remove the old O-ring if it stayed behind on the sensor or in the pipe.
- Wipe the sealing area with a clean rag (no lint) so the new O-ring seals well.
Step 6: Install the new sensor and O-ring
- Install a new O-ring on the new sensor.
- Tip: Lightly oil the O-ring for easier install.
- Push the sensor straight into the charge pipe until fully seated.
- Install the screw by hand first (prevents cross-threading).
- Tighten using a Torx T20 bit and a 1/4" torque wrench: Torque to 5 Nm (44 in-lbs).
Step 7: Reconnect the connector and reassemble
- Push the connector on until it clicks/locks.
- Reinstall any ducts/panels using an 8mm socket and clips you removed.
- Reinstall the engine cover by aligning it and pressing down firmly.
- If you disconnected the battery, reconnect the negative terminal using a 10mm socket.
Step 8 (Optional): Intake manifold MAP sensor note
- If your issue/code points to “manifold pressure sensor,” the steps are similar: unplug connector, remove the single Torx screw, replace sensor + O-ring, and Torque to 5 Nm (44 in-lbs).
- This sensor is mounted on/near the intake manifold, not the charge pipe.
✅ After Repair
- Start the engine and let it idle for 1–2 minutes. Listen for hissing (a boost leak sound) around the sensor area.
- Check that the connector is fully seated and the wiring isn’t rubbing anything hot or moving.
- If you had a check engine light, clear codes with a scan tool and road test.
- Do a short drive and confirm normal power and smooth acceleration (no surging).
💰 DIY vs Shop Cost
Shop Cost: $180-$400 (parts + labor)
DIY Cost: $40-$140 (parts only)
You Save: $140-$260 by doing it yourself!
Shop labor rates vary but typically run $100-$150/hour. This repair takes a shop approximately 0.5-1.0 hours.
🎯 Ready to get started?
HowToo makes it easy: same-day/2-day shipping on every part, plus all the tools and specialty tools you need! Check out the parts and tools sections below to add everything to your cart.