


How to Replace the Cabin Air Filter on a 2015 Ford Escape (Glovebox Access)
Step-by-step DIY instructions with tools, filter fitment tips, and post-install airflow checks
How to Replace the Cabin Air Filter on a 2015 Ford Escape (Glovebox Access)
Step-by-step DIY instructions with tools, filter fitment tips, and post-install airflow checks


🔧 Escape - Cabin Air Filter Replacement
Your cabin air filter cleans the air that comes through the HVAC vents. Replacing it helps reduce musty smells, improves airflow, and keeps dust/pollen out of the cabin.
Difficulty Level: Beginner | Estimated Time: 0.25-0.5 hours
⚠️ Safety & Precautions
- 🧤 Turn the ignition off and remove the key/fob from the vehicle.
- 🛑 Don’t force plastic glovebox tabs; they can snap if bent too far.
- 🌬️ Avoid breathing dust from the old filter; wear a mask if it’s very dirty.
- 🔋 Battery disconnect is not required for this job.
🔧 Required Tools
You'll need the following tools for this repair:
- Nitrile gloves
- Safety glasses
- Flashlight
- Shop vacuum
🔩 Required Parts
HowToo sells all the parts you need for this repair:
- Cabin air filter - Qty: 1
📋 Before You Begin
- Park your Escape on level ground and set the parking brake.
- Move the front passenger seat back to give yourself room.
- Empty the glovebox so nothing falls out.
🔨 Step-by-Step Instructions
Follow these steps in order:
Step 1: Open and clear the glovebox
- Open the glovebox fully by hand.
- Remove any contents so you can lower it without spills.
Step 2: Lower the glovebox to access the filter door
- Use your hands to gently push the glovebox sides inward to clear the stop tabs.
- Let the glovebox swing downward slowly.
- If your Escape has a small “damper arm” on the right side, use your hands to unclip it carefully (the damper arm is a small link that slows the glovebox as it opens).
Step 3: Remove the cabin filter access cover
- Use a flashlight to look behind the lowered glovebox for the rectangular filter cover.
- Use your hands to press the cover tabs and pull the cover off.
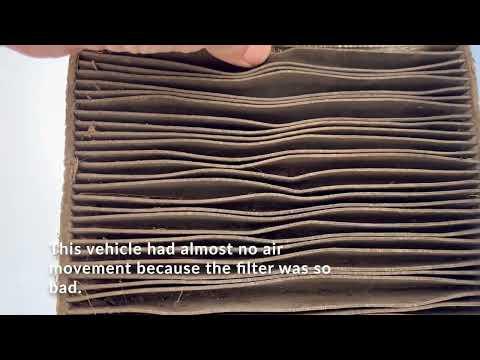
Step 4: Remove the old cabin air filter
- Pull the filter straight out by hand.
- Tip: Keep it level to avoid spills.
- If leaves/debris are present, use a shop vacuum to clean the filter slot gently.
Step 5: Install the new cabin air filter
- Put on nitrile gloves to keep the new filter clean.
- Install the new filter in the same direction as the old one.
- Look for an airflow arrow on the filter frame and match it to the direction of airflow (if present).
- Make sure the filter seats fully and isn’t folded or pinched.
Step 6: Reinstall the cover and glovebox
- Reinstall the filter cover by hand until the tabs click into place.
- Reconnect the glovebox damper arm (if equipped) by hand until it snaps back on.
- Lift the glovebox and use your hands to push the sides inward again so the stop tabs pass their slots, then close it normally.
✅ After Repair
- Start your Escape and run the fan on medium/high for 30 seconds.
- Switch between fresh air and recirculate to confirm airflow feels normal.
- If you hear a flap/rattle behind the glovebox, recheck that the filter cover is fully clipped in.
💰 DIY vs Shop Cost
Shop Cost: $80-$170 (parts + labor)
DIY Cost: $15-$45 (parts only)
You Save: $65-$125 by doing it yourself!
Shop labor rates vary but typically run $100-$150/hour. This repair takes a shop approximately 0.3-0.6 hours.
🎯 Ready to get started?
HowToo makes it easy: same-day/2-day shipping on every part, plus all the tools and specialty tools you need! Check out the parts and tools sections below to add everything to your cart.
