









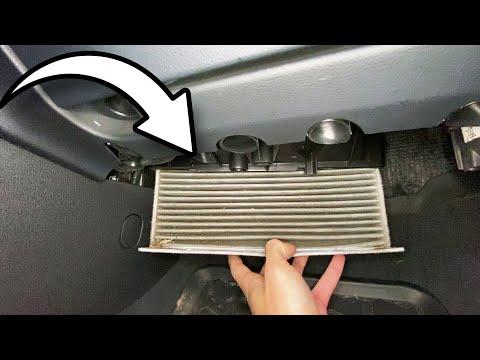






How to Replace the Cabin Air Filter on a 2015-2019 Audi Q3 (Glove Box Removal) (Engine: Inline 4 2.0L)
Step-by-step DIY guide with tools, filter orientation tips, and glove box screw torque specs
How to Replace the Cabin Air Filter on a 2015-2019 Audi Q3 (Glove Box Removal) (Engine: Inline 4 2.0L)
Step-by-step DIY guide with tools, filter orientation tips, and glove box screw torque specs for 2015, 2016, 2017, 2018, 2019


🔧 Q3 - Cabin Air Filter Replacement
Replacing your cabin air filter keeps dust, pollen, and odors out of the air you breathe and helps your A/C and heat airflow stay strong. On your Q3, the cabin filter sits behind the glove box, so the job is mostly careful trim and glove box removal.
Difficulty Level: Intermediate | Estimated Time: 0.5-1.0 hours
⚠️ Safety & Precautions
- ⚠️ Turn the ignition OFF and remove the key before working near the passenger-side dash.
- ⚠️ Support the glove box as you remove screws so it doesn’t drop and crack.
- ⚠️ Do not force plastic tabs; they can snap if cold. Warm the cabin first.
- ⚠️ Battery disconnect is not required for this job.
🔧 Required Tools
You'll need the following tools for this repair:
- Torx T20 screwdriver
- Torx T25 screwdriver
- Trim removal tool (plastic) (specialty)
- Small flashlight
- Nitrile gloves
- Safety glasses
- Small pick tool (specialty)
🔩 Required Parts
HowToo sells all the parts you need for this repair:
- Cabin air filter - Qty: 1
📋 Before You Begin
- Park on level ground, shift to Park, and set the parking brake.
- Move the passenger seat back to give yourself room at the glove box.
- Have a small container ready to hold screws so none get lost.
🔨 Step-by-Step Instructions
Follow these steps in order:
Step 1: Clear the glove box area
- Open the glove box and remove everything inside.
- Use a small flashlight to locate the screws along the upper/inner edge.
Step 2: Remove the passenger-side end cap (side trim)
- Open the passenger door.
- Use a trim removal tool (plastic) (specialty) to gently pry off the side cover at the end of the dashboard (the piece you can only see with the door open).
- Pry near clips, not the middle.
Step 3: Remove the glove box screws
- Use a Torx T20 screwdriver and/or Torx T25 screwdriver to remove the screws around the glove box (typically along the top edge, lower edge, and the side area you just uncovered).
- Keep light upward support on the glove box with one hand while removing the last screws.
Step 4: Disconnect the glove box damper and any connectors
- On the right side of the glove box, locate the damper arm (a small piece that makes the glove box open slowly).
- Use a small pick tool (specialty) to gently pop the damper off its pin if needed. (A pick tool is a small hooked tool used to lift clips without breaking them.)
- If your glove box has a light connector, unplug it by pressing the tab and pulling straight out.
Step 5: Lower and remove the glove box
- Carefully pull the glove box straight back and down.
- Set it aside where it won’t get scratched.
Step 6: Open the cabin filter housing
- Behind where the glove box was, locate the cabin filter cover (a rectangular plastic cover on the HVAC box).
- Use a small flashlight to see the cover tabs.
- Release the tabs by hand; if tight, use the trim removal tool (plastic) (specialty) gently to help. Do not pry hard.
Step 7: Remove the old cabin filter
- Pull the filter straight out.
- Note the airflow direction arrow printed on the filter frame (you’ll match this on the new filter).
- Wear nitrile gloves—old filters can be dusty.
Step 8: Install the new cabin filter
- Slide the new cabin air filter into the housing in the same orientation as the old one.
- Make sure it seats fully and isn’t folded or pinched.
Step 9: Reinstall the cabin filter cover
- Press the cover on until all tabs click into place.
- Gently tug to confirm it’s locked.
Step 10: Reinstall the glove box
- Position the glove box back into place.
- Reconnect any electrical connector you unplugged (like the glove box light).
- Reconnect the damper arm to its pin.
- Start all screws by hand first, then tighten with a Torx T20 screwdriver or Torx T25 screwdriver.
- Torque to 2 Nm (18 in-lbs) for glove box screws. Snug only—don’t strip plastic.
Step 11: Reinstall the passenger-side end cap
- Line up the clips and press the cover back on by hand until it clicks.
✅ After Repair
- Start the engine and set the HVAC fan to medium-high.
- Check that airflow is strong and there are no whistling noises (a whistle can mean the filter cover isn’t fully clipped).
- Open/close the glove box to confirm it moves smoothly and the damper works.
💰 DIY vs Shop Cost
Shop Cost: $120-$220 (parts + labor)
DIY Cost: $20-$45 (parts only)
You Save: $100-$175 by doing it yourself!
Shop labor rates vary but typically run $100-$150/hour. This repair takes a shop approximately 0.5-1.0 hours.
🎯 Ready to get started?
HowToo makes it easy: same-day/2-day shipping on every part, plus all the tools and specialty tools you need! Check out the parts and tools sections below to add everything to your cart.
Guide for Cabin Air Filter replace for these Audi vehicles
| Year Make Model | Sub Model | Engine | Body Style |
|---|---|---|---|
| 2019 Audi Q3 | - | Inline 4 2.0L | - |
| 2018 Audi Q3 | - | Inline 4 2.0L | - |
| 2017 Audi Q3 | - | Inline 4 2.0L | - |
| 2016 Audi Q3 | - | Inline 4 2.0L | - |
| 2015 Audi Q3 | - | Inline 4 2.0L | - |