















How to Replace the Cabin Air Filter on a 2007 Chevrolet Silverado 1500 (Check or Retrofit)
Step-by-step glove box access guide with tools, parts, and retrofit instructions if no factory filter door exists for 2007, 2008, 2009, 2010, 2011, 2012, 2013
How to Replace the Cabin Air Filter on a 2007 Chevrolet Silverado 1500 (Check or Retrofit)
Step-by-step glove box access guide with tools, parts, and retrofit instructions if no factory filter door exists for 2007, 2008, 2009, 2010, 2011, 2012, 2013


🔧 Silverado 1500 - Cabin Air Filter Replacement
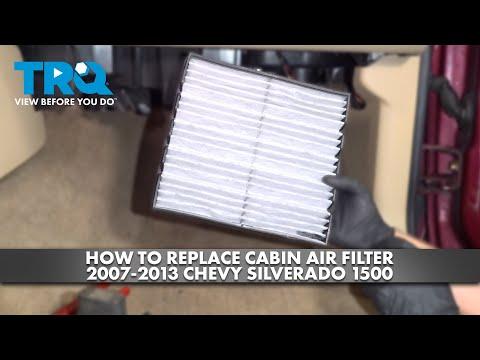
On many Silverado 1500 models around this year, there may not be a factory serviceable cabin air filter—even though the HVAC housing looks like it could accept one. The first job is to check for an access door/slot behind the glove box; if it’s there, the filter swap is quick.
Difficulty Level: Beginner | Estimated Time: 0.25-0.5 hours (if equipped) / 1-2 hours (retrofit)
⚠️ Safety & Precautions
- ⚠️ Turn the ignition OFF and remove the key before working under the dash.
- ⚠️ Avoid forcing plastic panels; they crack easily in cold weather.
- ⚠️ If you use a cutting tool for a retrofit, wear eye protection and keep hands clear of the blade.
- ⚠️ Battery disconnect is not required for a basic check/filter swap.
🔧 Required Tools
You'll need the following tools for this repair:
- Safety glasses
- Nitrile gloves
- Flashlight
- Trim removal tool (plastic pry tool)
- 7mm socket
- 1/4" drive ratchet
- 6" extension for 1/4" ratchet
- Phillips screwdriver #2
- Small flathead screwdriver
- Utility knife (sharp blade)
- Shop vacuum
🔩 Required Parts
HowToo sells all the parts you need for this repair:
- Cabin air filter - Qty: 1
- Cabin air filter retrofit kit (cover + filter) - Qty: 1
📋 Before You Begin
- Park on level ground, set the parking brake, and turn the ignition OFF.
- Slide the passenger seat back for more working room.
- Have a flashlight ready so you can clearly see behind the glove box.
🔨 Step-by-Step Instructions
Follow these steps in order:
Step 1: Open and clear the glove box
- Open the glove box and remove any items so nothing falls out.
- Use a flashlight to look along the back and right side of the glove box area.
Step 2: Drop the glove box down
- On the right side, disconnect the glove box damper arm (the small strap/arm that slows the glove box). Use a small flathead screwdriver to gently pop it free if needed.
- Squeeze the glove box sides inward with your hands to clear the stops, then let it swing down.
- Slow and steady prevents broken tabs.
Step 3: Check if your A/C housing has a filter access slot
- Use a flashlight and look behind the glove box for a narrow rectangular access door/slot in the HVAC case (usually a long, thin opening).
- If you see a removable cover/door: follow Steps 4–6.
- If you do NOT see a cover/slot: skip to Step 7 (retrofit path).
Step 4: Remove the cabin filter cover (if equipped)
- If a small cover is held by screws, remove them using a 7mm socket, 1/4" ratchet, and extension.
- If it’s a clipped cover, gently release the tabs using a trim removal tool (plastic pry tool) (a plastic pry tool helps avoid marring panels).
Step 5: Remove the old cabin air filter
- Slide the filter straight out by hand.
- Use a shop vacuum to clean loose leaves/dust from the filter slot area.
Step 6: Install the new cabin air filter
- Install the new filter in the same direction as the old one.
- Look for the airflow arrow on the filter frame and match it to the airflow direction marking on the housing (if marked).
- Reinstall the cover using the 7mm socket and 1/4" ratchet (snug only; these are small screws).
Step 7: Retrofit path (if there is no factory access door)
- Some Silverado 1500 HVAC housings do not come with a service door from the factory. A retrofit kit adds a cover and filter, but it may require cutting a pre-marked section of the HVAC case.
- Use a flashlight to locate the flat, rectangular “blank” area on the HVAC case where the filter would go.
- Carefully cut only the marked plastic section using a utility knife (take small passes; don’t stab deep).
- Use a shop vacuum to remove all plastic shavings.
- Install the retrofit cover and filter per the kit orientation (install by hand; no forcing).
Step 8: Reinstall the glove box
- Lift the glove box back up, squeeze the sides inward, and seat it past the stops.
- Reconnect the damper arm by hand (use the small flathead screwdriver only if needed to guide it).
✅ After Repair
- Start the engine and run the blower on medium for 30 seconds.
- Confirm airflow is strong and there are no new rattles behind the glove box.
- If there’s a musty smell, run A/C for a few minutes; the new filter may take a short drive to “freshen” the ducting.
💰 DIY vs Shop Cost
Shop Cost: $80-$180 (inspection + filter/installation)
DIY Cost: $15-$45 (parts only, if equipped) / $40-$120 (retrofit kit)
You Save: $50-$140 by doing it yourself!
Shop labor rates vary but typically run $100-$150/hour. This repair takes a shop approximately 0.3-1.0 hours (retrofit can be longer).
🎯 Ready to get started?
HowToo makes it easy: same-day/2-day shipping on every part, plus all the tools and specialty tools you need! Check out the parts and tools sections below to add everything to your cart.