









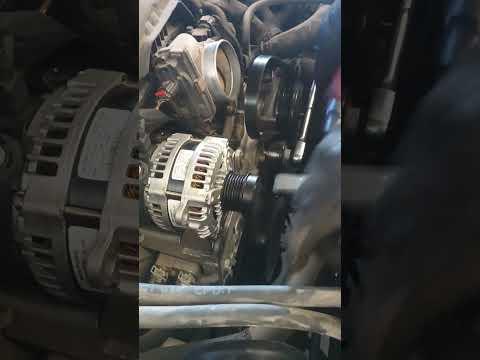





How to Replace the Alternator on a 2018 Chevrolet Silverado 1500
Step-by-step instructions with tools, parts, safety tips, and torque specs for 2014, 2015, 2016, 2017, 2018
How to Replace the Alternator on a 2018 Chevrolet Silverado 1500
Step-by-step instructions with tools, parts, safety tips, and torque specs for 2014, 2015, 2016, 2017, 2018


🔧 Silverado 1500 - Alternator Replacement
The alternator charges the battery and powers the electrical system while the engine runs. On your Silverado 1500, replacement is mostly a belt-and-bracket job, with battery disconnect required before removing electrical connections.
Difficulty Level: Intermediate | Estimated Time: 2-3 hours
⚠️ Safety & Precautions
- Disconnect the negative battery cable before touching alternator wiring.
- The belt system has spring tension. Keep fingers clear when releasing tension.
- Do not short the alternator output terminal to ground.
- Let the engine cool before working near the exhaust and belt drive area.
- Use jack stands if you raise the truck for access from below.
🔧 Required Tools
You'll need the following tools for this repair:
- 10mm socket
- 13mm socket
- 15mm socket
- Ratchet
- Long-handled breaker bar
- Torque wrench
- Trim clip tool
- Flat-blade screwdriver
- Floor jack (rated 3-ton minimum)
- Jack stands
- Safety glasses
- Mechanic gloves
- Flashlight
🔩 Required Parts
HowToo sells all the parts you need for this repair:
- Alternator - Qty: 1
- Accessory drive belt - Qty: 1
- Alternator mounting bolts - Qty: 1 set
📋 Before You Begin
- Park on level ground and set the parking brake.
- Key off, remove the key fob, and wait at least 5 minutes before disconnecting power.
- Disconnect the negative battery cable first using a 10mm socket.
- If the belt is glazed, cracked, or noisy, replace it now while access is open.
🔨 Step-by-Step Instructions
Follow these steps in order:
Step 1: Disconnect battery power
- Use a 10mm socket to remove the negative battery cable.
- Move the cable aside so it cannot spring back and touch the terminal.
Step 2: Remove intake ducting for access
- Use a flat-blade screwdriver and 10mm socket to loosen and remove the air intake tube or resonator section that blocks access to the alternator.
- Unclip any harness retainers with a trim clip tool.
Step 3: Release the serpentine belt
- Use a long-handled breaker bar on the belt tensioner and rotate it to unload tension.
- Slip the belt off the alternator pulley with your hand.
- Take a quick belt routing photo first.
Step 4: Disconnect the alternator wiring
- Use a 10mm socket to remove the main battery output cable nut from the alternator.
- Unplug the electrical connector by pressing the lock tab and pulling it straight off.
- Keep the terminal insulated so it cannot touch metal.
Step 5: Remove the alternator
- Use a 15mm socket to remove the alternator mounting bolts.
- Support the alternator with one hand as you remove the last bolt.
- Lift the alternator out from the top or lower side, depending on clearance.
Step 6: Install the new alternator
- Position the replacement alternator in place and start the mounting bolts by hand.
- Use a 15mm socket to snug the bolts evenly.
- Torque to 50 Nm (37 ft-lbs).
Step 7: Reconnect wiring
- Reconnect the electrical connector until it clicks.
- Install the main output cable and tighten it with a 10mm socket.
- Torque to 15 Nm (11 ft-lbs).
Step 8: Reinstall the belt
- Use the long-handled breaker bar to rotate the tensioner again.
- Route the belt exactly as removed and verify every rib sits in the pulley grooves.
- Release the tensioner slowly.
Step 9: Reassemble intake parts
- Reinstall the intake tube and any clips or fasteners using the flat-blade screwdriver and 10mm socket.
- Make sure all clamps are tight and the duct is fully seated.
Step 10: Restore battery power
- Reconnect the negative battery cable with a 10mm socket.
- Tighten securely, but do not overtighten.
✅ After Repair
- Start the engine and listen for belt squeal or grinding noise.
- Check that the battery warning light goes out.
- Verify charging voltage is normal if you have a multimeter. A healthy system should typically show about 13.5-14.8 volts running.
- Look for belt tracking issues and make sure the belt stays centered on every pulley.
💰 DIY vs Shop Cost
Shop Cost: $650-$1,100 (parts + labor)
DIY Cost: $220-$500 (parts only)
You Save: $430-$600 by doing it yourself!
Shop labor rates vary but typically run $100-$150/hour. This repair takes a shop approximately 2-3 hours.
🎯 Ready to get started?
HowToo makes it easy: same-day/2-day shipping on every part, plus all the tools and specialty tools you need! Check out the parts and tools sections below to add everything to your cart.