


How to Replace the Alternator on a 2018 Chevrolet Colorado 2.5L
Step-by-step DIY alternator replacement with tools, parts list, torque specs, and safety tips for your 2018 Chevy Colorado 2.5L RWD
How to Replace the Alternator on a 2018 Chevrolet Colorado 2.5L
Step-by-step DIY alternator replacement with tools, parts list, torque specs, and safety tips for your 2018 Chevy Colorado 2.5L RWD


Colorado - Alternator Replacement 🔧
Below is a beginner-friendly guide to replace the alternator on your 2018 Colorado 2.5L (manual, RWD).
Safety First ⚠️
- 🧯 Work on a cool engine – let the truck sit at least 30–45 minutes after driving.
- 🔋 Disconnect the negative battery cable – this prevents sparks and protects electronics.
- 🧤 Wear safety glasses and gloves – there are sharp edges and tight spaces.
- 🛑 Never work under a vehicle supported only by a jack – use jack stands if you lift it.
Colorado - Alternator Specs & Notes 📎
- ⚙️ Engine: 2.5L I4 (LCV)
- ⚙️ Alternator mounting: Front of engine, driven by serpentine belt.
- 🔩 Key torque specs (approx. OEM values):
- Alternator mounting bolts: 37 lb-ft (50 N·m)
- Battery negative terminal clamp: 44 in-lb (5 N·m)
- Alternator B+ (main power) nut: 80 in-lb (9 N·m)
Tools & Supplies Needed 🧰
- 🛠️ Socket set (metric):
- 10 mm (battery terminal, covers)
- 13 mm (B+ cable nut, some brackets)
- 15 mm (belt tensioner, alternator bolts)
- 🛠️ Ratchets:
- 3/8" drive ratchet (main work)
- Optional: 1/2" drive ratchet or breaker bar for stubborn bolts
- 🛠️ Serpentine belt tool or long-handled 3/8" or 1/2" ratchet – a long handle gives leverage to move the belt tensioner.
- 🛠️ Extensions – 3" and 6" for reaching bolts.
- 🛠️ Torque wrench – tool that lets you tighten bolts to a specific torque.
- 🛠️ Flat trim tool or flat screwdriver – to gently release plastic clips if needed.
- 🧴 Dielectric grease (optional) – helps protect electrical connections from corrosion.
- 🧽 Shop rags – to keep area clean and catch small drips.
Parts You’ll Need 📦
- 🔌 Alternator – correct unit for 2018 Colorado 2.5L (with manual, RWD).
- 🪢 Serpentine belt (recommended) – if your current belt shows cracks, glazing (shiny), or fraying.
- 🔋 Battery terminal cleaning brush (optional) – to clean corrosion.
Colorado - Battery Disconnect 🔋
- 🔧 Step 1 – Open hood
- Pull the hood release inside the cab, then lift the hood and set the prop rod.
- 🔧 Step 2 – Disconnect negative battery cable
- Locate the battery on the driver side of the engine bay.
- Use a 10 mm socket to loosen the negative (-) terminal clamp.
- Lift the cable off and tuck it aside so it cannot spring back to the post.
- Do not let your wrench touch both terminals or body metal at the same time.
Colorado - Accessing the Alternator 🔍
The alternator is on the front of the engine, driven by the serpentine belt. On the 2.5L, you can access it from the top and front.
- 🧰 Step 3 – Remove any covers/ducts in the way
- If your truck has a plastic engine cover, pull it up gently; it usually pops off rubber grommets.
- If there is an air intake duct blocking access, loosen the clamps (usually 7–8 mm or flat screwdriver) and move it aside.
Colorado - Relieving Belt Tension & Removing Belt 🪢
The serpentine belt tensioner is a spring-loaded pulley that keeps the belt tight. You rotate it to release tension.
- 🛠️ Step 4 – Locate the belt tensioner
- Look at the front of the engine for a pulley on an arm with a square hole or bolt head for a wrench.
- Check the belt routing diagram sticker under the hood; if missing, take a clear photo of the belt routing before removal.
- 🛠️ Step 5 – Release belt tension
- Place your long-handled ratchet or serpentine belt tool on the tensioner (usually a 15 mm bolt head).
- Rotate the tensioner in the direction that loosens the belt (usually clockwise on this engine).
- While holding the tensioner, slide the belt off the alternator pulley.
- Slowly let the tensioner return to its rest position.
- 🛠️ Step 6 – Move belt out of the way
- You don’t have to fully remove the belt if you can move it off the alternator and nearby pulleys.
- If you are replacing the belt, fully remove it now, noting the routing.
Colorado - Disconnecting Alternator Wiring 🔌
There are usually two connections: a large power cable (B+) and a smaller plug (field/connector).
- 🔧 Step 7 – Disconnect the alternator electrical connector
- Locate the small plastic connector on the back of the alternator.
- Press the locking tab and gently pull the connector straight off.
- If stuck, use a small flat tool to lift the tab slightly, but do not pry hard on the plastic.
- 🔧 Step 8 – Remove the B+ power cable
- Find the thick cable attached with a nut on a stud at the back of the alternator.
- Use a 13 mm socket to remove the nut.
- Lift the cable eyelet off and set it aside; keep track of any insulator or boot.
- Cover the cable end with a rag so it doesn’t touch metal, even though the battery is disconnected.
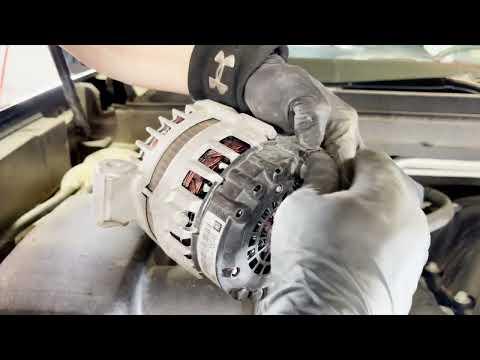
Colorado - Removing the Alternator 🧱
- 🛠️ Step 9 – Remove alternator mounting bolts
- Locate the upper and lower mounting bolts (usually 2–3 bolts, 15 mm heads).
- Use a ratchet and appropriate extensions to remove them.
- Support the alternator with your hand as you remove the last bolt so it doesn’t drop.
- 🛠️ Step 10 – Remove the alternator from the engine bay
- Wiggle the alternator free from its bracket; it may be snug in the locating sleeves.
- If needed, gently tap the alternator ears with a rubber mallet to break it loose.
- Lift it out carefully, watching for nearby hoses and wires.
Colorado - Preparing the New Alternator 🧼
- 🧰 Step 11 – Compare old and new units
- Check that the mounting ears, pulley, connectors, and clocking (orientation) match.
- Make sure the pulley grooves match your belt type.
- 🧴 Step 12 – Clean mounting surfaces
- Wipe the alternator bracket surfaces with a clean rag.
- Clean surfaces help the alternator sit flat and ground properly.
Colorado - Installing the New Alternator 🔩
- 🔧 Step 13 – Position the new alternator
- Set the alternator into the bracket, lining up the bolt holes.
- Start all mounting bolts by hand to avoid cross-threading.
- 🔧 Step 14 – Tighten mounting bolts
- Snug the bolts with your ratchet first.
- Then use a torque wrench to tighten each mounting bolt to about 37 lb-ft (50 N·m).
- 🔌 Step 15 – Reconnect B+ power cable
- Place the thick cable eyelet back on the alternator stud.
- Install the nut and tighten to about 80 in-lb (9 N·m) – snug but not over-tight.
- Reinstall any rubber boot or cover over the stud.
- 🔌 Step 16 – Reconnect the electrical connector
- Push the small connector onto the alternator until it clicks.
- Give it a gentle tug to confirm it’s locked.
Colorado - Reinstalling the Belt 🪢
- 🛠️ Step 17 – Route the belt
- Route the belt according to the under-hood diagram or your photo.
- Make sure the belt sits fully in the grooves on each pulley.
- 🛠️ Step 18 – Apply tension
- Use your ratchet or belt tool to rotate the tensioner again.
- Slip the belt over the alternator pulley last.
- Slowly release the tensioner so it tightens the belt.
- Double-check that the belt is centered on all pulleys and not twisted.
Colorado - Reassembly & Battery Reconnect 🔋
- 🧰 Step 19 – Reinstall covers/ducts
- Reinstall any air intake duct and tighten clamps.
- Push the engine cover back onto its mounting grommets if removed.
- 🔧 Step 20 – Reconnect negative battery cable
- Place the negative cable back on the battery post.
- Tighten the clamp with a 10 mm socket to about 44 in-lb (5 N·m) – snug, not crushing.
Colorado - First Start & Checks ✅
- 🚗 Step 21 – Start the engine
- Listen for any unusual noises (squealing belt, grinding, rattles).
- 💡 Step 22 – Check charging system
- Confirm the battery/charging warning light on the dash turns off after starting.
- If you have a multimeter (voltage tester), measure battery voltage:
- Engine off: around 12.4–12.7 V.
- Engine running: around 13.5–14.8 V (shows alternator is charging).
- 👀 Step 23 – Final visual check
- Look at the belt while the engine runs – it should track smoothly with no wobble.
- Check for any loose tools or parts left in the engine bay.
Tips & Common Beginner Mistakes 💡
- 🧠 Tip: Take photos at each stage so you can refer back if something looks confusing.
- 🧠 Don’t overtighten: Over-tightening the B+ nut or battery terminals can strip threads or crack parts.
- 🧠 Check the belt: If the old alternator failed due to bearing noise or seizure, the belt may be damaged; replacing it now is smart.
HowToo makes it easy: below this answer you’ll see recommended alternators, serpentine belts, and the tools (including a serpentine belt tool and torque wrench) that fit your Colorado. You can add them to your cart right from the tools and parts section for fast shipping.
If you’d like, tell me if you have a multimeter and I can walk you through a quick test to confirm the new alternator is charging perfectly. 🔍
