









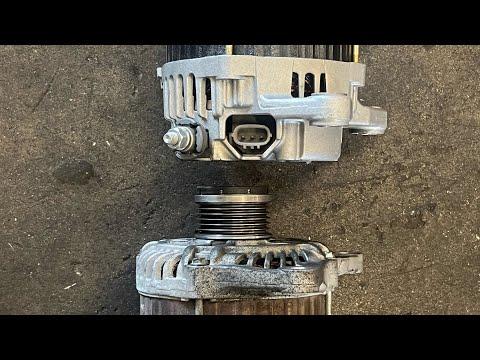







How to Replace the Alternator on a 2016 Nissan Altima (Step-by-Step DIY Guide)
Tools, parts, safety tips, belt routing help, and key torque specs for a reliable charging system repair
How to Replace the Alternator on a 2016 Nissan Altima (Step-by-Step DIY Guide)
Tools, parts, safety tips, belt routing help, and key torque specs for a reliable charging system repair


🔧 Altima - Alternator Replacement
Your Altima’s alternator charges the battery and powers the electrical system while the engine runs. Replacement involves disconnecting the battery, removing the serpentine belt (the single belt that drives multiple accessories), unbolting the alternator, and installing the new unit.
Difficulty Level: Intermediate | Estimated Time: 1.5-3.0 hours
⚠️ Safety & Precautions
- 🛑 Disconnect the negative battery cable first to prevent a short at the alternator power wire.
- 🔥 Let the engine cool; you’ll work near hot exhaust/engine parts.
- 🧰 Support the car with jack stands if you remove the right-front wheel; never rely on a jack alone.
- ⚡ Do not allow tools to touch the alternator’s main power stud and metal at the same time.
🔧 Required Tools
You'll need the following tools for this repair:
- Safety glasses
- Mechanic gloves
- Wheel chocks
- Floor jack (rated 2-ton minimum)
- Jack stands (rated 2-ton minimum)
- 10mm socket
- 12mm socket
- 14mm socket
- 17mm socket
- 3/8" ratchet
- 3/8" torque wrench (10–100 ft-lbs range)
- 6" socket extension
- 12" socket extension
- 14mm box-end wrench
- Flat trim clip tool
- Phillips screwdriver
- Small flat screwdriver
- Digital multimeter
🔩 Required Parts
HowToo sells all the parts you need for this repair:
- Alternator - Qty: 1
- Serpentine drive belt - Qty: 1
📋 Before You Begin
- Park on level ground, set the parking brake, and place wheel chocks behind the rear wheels.
- Open the hood and confirm you have the radio code/presets saved (battery will be disconnected).
- Disconnect the battery: use a 10mm socket to remove the negative (-) cable first, then secure it so it can’t spring back.
- Tip: Take a quick photo of the belt routing.
🔨 Step-by-Step Instructions
Follow these steps in order:
Step 1: Raise the right-front for access (recommended)
- Use floor jack at the right-front jacking point and support with jack stands.
- Use 17mm socket and 3/8" ratchet to remove the right-front wheel lug nuts, then remove the wheel.
Step 2: Remove the right-front splash shield/liner access
- Use a flat trim clip tool and Phillips screwdriver to remove the plastic clips/screws holding the front portion of the right-front fender liner/splash shield.
- Pull the liner back enough to access the belt area.
Step 3: Relieve belt tension and remove the serpentine belt
- The belt tensioner is a spring-loaded pulley that keeps the belt tight automatically.
- Use a 14mm box-end wrench on the tensioner arm bolt and rotate the tensioner to relieve tension.
- Slip the belt off the alternator pulley, then release the tensioner slowly.
- Remove the belt from the other pulleys if you’re replacing it.
Step 4: Unplug the alternator electrical connections
- From above, locate the alternator on the front side of the engine.
- Remove the alternator connector: use a small flat screwdriver to gently lift the lock tab if needed, then unplug.
- Remove the alternator main power wire (the B+ terminal, meaning the heavy cable carrying battery positive): pull the rubber boot back, then use a 12mm socket to remove the nut and lift the cable off.
Step 5: Remove the alternator mounting bolts
- Support the alternator with one hand as you loosen bolts.
- Use a 14mm socket, 3/8" ratchet, and extensions as needed to remove the alternator mounting bolts.
- Work the alternator out of the bracket and remove it from the engine bay.
Step 6: Install the new alternator
- Set the new alternator in place and start the mounting bolts by hand to avoid cross-threading.
- Use a 14mm socket to snug the bolts, then torque to 44 N·m (33 ft-lbs).
Step 7: Reconnect wiring to the alternator
- Install the main power cable onto the B+ stud and use a 12mm socket with a torque wrench to torque to 9.8 N·m (87 in-lbs), then reinstall the rubber boot.
- Plug in the alternator connector until it clicks.
Step 8: Reinstall the serpentine belt
- Route the belt correctly around all pulleys (use your photo as a guide).
- Use a 14mm box-end wrench to rotate the tensioner, slip the belt over the alternator pulley, then slowly release the tensioner.
- Visually confirm the belt ribs are centered in every pulley groove.
Step 9: Reinstall liner and wheel
- Reposition the splash shield/fender liner and reinstall clips/screws using the flat trim clip tool and Phillips screwdriver.
- Reinstall the wheel and hand-thread lug nuts.
- Lower the car, then use a 17mm socket and torque wrench to torque to 113 N·m (83 ft-lbs).
Step 10: Reconnect the battery
- Use a 10mm socket to reconnect the negative (-) battery cable and tighten securely.
✅ After Repair
- Start the engine and confirm the battery/charging warning light is off.
- Use a digital multimeter at the battery terminals: you should typically see about 13.5–14.7 volts with the engine running.
- Listen for belt squeal and recheck belt alignment if you hear any noise.
- Take a short test drive, then recheck for any loose connectors or oil/grease on the belt.
💰 DIY vs Shop Cost
Shop Cost: $500-$950 (parts + labor)
DIY Cost: $180-$450 (parts only)
You Save: $320-$500 by doing it yourself!
Shop labor rates vary but typically run $100-$150/hour. This repair takes a shop approximately 1.5-3.0 hours.
🎯 Ready to get started?
HowToo makes it easy: same-day/2-day shipping on every part, plus all the tools and specialty tools you need! Check out the parts and tools sections below to add everything to your cart.