









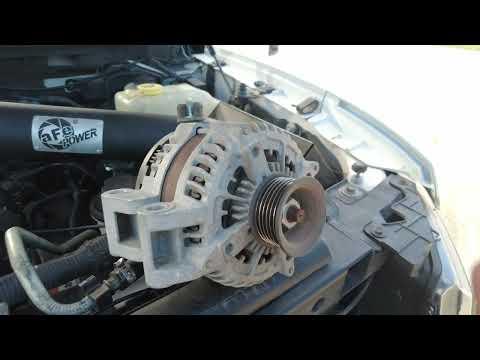






How to Replace the Alternator on a 2011 Ford F-150 (Step-by-Step DIY Guide)
Tools, parts list, safety tips, serpentine belt removal, wiring steps, and torque spec guidance for 2010, 2011, 2012, 2013, 2014
How to Replace the Alternator on a 2011 Ford F-150 (Step-by-Step DIY Guide)
Tools, parts list, safety tips, serpentine belt removal, wiring steps, and torque spec guidance for 2010, 2011, 2012, 2013, 2014


🔧 F-150 - Alternator Replacement
Replacing the alternator on your F-150 involves removing the serpentine belt from the alternator pulley, disconnecting the alternator wiring, unbolting the alternator, then installing the new one and re-tensioning the belt. The key is doing it safely (battery disconnected) and tightening the electrical and mounting fasteners to the correct OEM torque.
Difficulty Level: Intermediate | Estimated Time: 1.5-3.0 hours
Quick questions (so I can give the exact torque specs):
- 🔎 What amperage is printed on your alternator label (common: 155A / 175A / 200A)?
- 📷 Can you upload a clear photo of the alternator mounting area (so I can confirm the exact bracket/bolt layout)?
⚠️ Safety & Precautions
- ⚠️ Disconnect the negative battery cable before touching the alternator wiring (the main alternator cable is always “hot” otherwise).
- ⚠️ Keep fingers/clothes clear of the belt path and pulleys.
- ⚠️ Let the engine cool before working near the radiator and front accessories.
- ⚠️ If you raise the truck, support it with jack stands—never rely on a jack alone.
🔧 Required Tools
You'll need the following tools for this repair:
- Safety glasses
- Mechanic gloves
- Battery terminal wrench 10mm
- Socket set 8mm, 10mm, 13mm, 15mm
- Ratchet 3/8"
- Breaker bar 1/2"
- Serpentine belt tool 1/2" drive (specialty)
- Torque wrench 10–150 Nm range
- Trim clip removal tool
- Flathead screwdriver
- Work light
- Floor jack (rated 3-ton minimum)
- Jack stands (rated 3-ton minimum)
- Wheel chocks
🔩 Required Parts
HowToo sells all the parts you need for this repair:
- Alternator (correct amperage for your F-150) - Qty: 1
- Serpentine belt - Qty: 1 (recommended if belt is cracked/glazed)
- Battery terminal anti-corrosion grease - Qty: 1
📋 Before You Begin
- Park on level ground, shift to Park, and set the parking brake.
- Chock the wheels using wheel chocks.
- Open the hood and remove any loose jewelry (rings/bracelets).
- Disconnect the battery: use a 10mm battery terminal wrench to remove the negative (-) cable and isolate it so it can’t spring back.
- Take a photo of the belt routing first.
🔨 Step-by-Step Instructions
Follow these steps in order:
Step 1: Access the front accessory drive
- If needed for access, raise the front slightly using a floor jack (rated 3-ton minimum) and support with jack stands (rated 3-ton minimum).
- Remove any air inlet ducting/covering that blocks access using an 8mm socket or flathead screwdriver (varies by intake clamp style).
Step 2: Release serpentine belt tension
- Install a serpentine belt tool 1/2" drive (specialty) or breaker bar 1/2" into the belt tensioner.
- Rotate the tensioner to relieve belt tension, then slide the belt off the alternator pulley.
- Slowly let the tensioner return—don’t let it snap back.
- Leave the belt routed on other pulleys if possible.
Step 3: Disconnect alternator electrical connections
- Unplug the alternator regulator connector by releasing the lock tab with a flathead screwdriver (gently).
- Remove the protective boot on the main output stud (B+).
- Remove the B+ retaining nut using a 10mm socket (some units use a different size).
- Move the cable aside so it cannot snag when the alternator comes out.
Step 4: Remove the alternator mounting bolts
- Remove the alternator mounting bolts using a 13mm socket and/or 15mm socket (bolt head sizes can vary by alternator/bracket).
- Support the alternator with one hand while removing the last bolt.
- Lift the alternator out of the engine bay.
Step 5: Install the new alternator
- Set the new alternator into position and hand-start all mounting bolts to avoid cross-threading.
- Tighten mounting bolts evenly using a ratchet 3/8".
- STOP HERE for torque specs: I’ll provide the exact OEM torque values once you answer the 2 questions above (amperage + photo). I don’t want you to guess on the mounting bolt torque or B+ stud nut torque.
Step 6: Reconnect alternator wiring
- Install the main B+ cable and nut using a 10mm socket.
- Reinstall the protective boot over the B+ terminal.
- Reconnect the regulator plug until it clicks.
Step 7: Reinstall the serpentine belt
- Route the belt according to the under-hood routing diagram (or your photo).
- Use the serpentine belt tool 1/2" drive (specialty) or breaker bar 1/2" to rotate the tensioner and slip the belt fully onto the alternator pulley.
- Visually confirm the belt is seated in every pulley groove.
Step 8: Reconnect battery
- Reconnect the negative battery cable using a 10mm battery terminal wrench.
- Apply a thin layer of battery terminal anti-corrosion grease to help prevent corrosion.
✅ After Repair
- Start the engine and confirm the battery/charging warning light stays off.
- Listen for belt squeal or chirping; shut down and re-check belt seating if heard.
- If you have a multimeter, check charging voltage at the battery: typically around 13.5–14.8V with the engine running (varies with load/temperature).
- Recheck the B+ terminal boot is fully covering the stud.
💰 DIY vs Shop Cost
Shop Cost: $450-$950 (parts + labor)
DIY Cost: $180-$550 (parts only)
You Save: $270-$400 by doing it yourself!
Shop labor rates vary but typically run $100-$150/hour. This repair takes a shop approximately 1.5-3.0 hours.
🎯 Ready to get started?
HowToo makes it easy: same-day/2-day shipping on every part, plus all the tools and specialty tools you need! Check out the parts and tools sections below to add everything to your cart.