














How to Replace the Alternator on a 2007-2014 GMC Sierra 1500 (Engine: V8 5.3L)
Step-by-step instructions with tools, parts, torque specs, and safety tips
How to Replace the Alternator on a 2007-2014 GMC Sierra 1500 (Engine: V8 5.3L)
Step-by-step instructions with tools, parts, torque specs, and safety tips for 2007, 2008, 2009, 2010, 2011, 2012, 2013, 2014


🔧 Alternator - Replacement
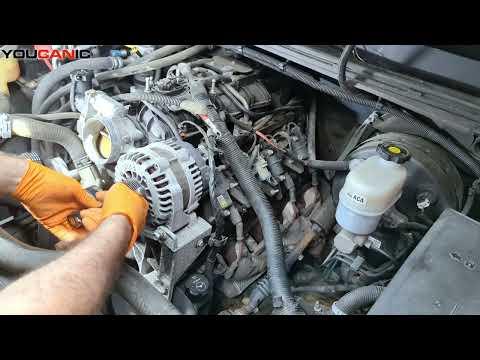
The alternator charges the battery and powers the electrical system while the engine runs. If it is noisy, overcharging, or not charging at all, replacement is the fix. On your Sierra, access is tight, so plan on moving the serpentine belt and working around the front accessory drive.
Difficulty Level: Intermediate | Estimated Time: 1.5-2.5 hours
⚠️ Safety & Precautions
- Disconnect the negative battery cable before starting. The charging system is live even with the key off.
- Keep hands clear of the belt path. A slipping belt can pinch fingers.
- Let the engine cool before working near the exhaust side of the engine bay.
- Support the vehicle only if you need extra access underneath. Use jack stands if lifted.
- If your battery is weak, charge it before and after the repair. A bad battery can mimic alternator failure.
🔧 Required Tools
You'll need the following tools for this repair:
- 10mm wrench
- 13mm socket
- 15mm socket
- Ratchet
- Breaker bar
- Belt tensioner tool (specialty)
- Extensions
- Trim clip tool
- Gloves
- Safety glasses
- Jack stands
- Floor jack (rated 3-ton minimum)
🔩 Required Parts
HowToo sells all the parts you need for this repair:
- Alternator - Qty: 1
- Alternator bracket bolts - Qty: 1 set
📋 Before You Begin
- Park on level ground and set the parking brake.
- Turn the ignition off and remove the key.
- Disconnect the negative battery cable first.
- If the battery is mounted under a cover or tray obstruction, remove it for access.
🔨 Step-by-Step Instructions
Follow these steps in order:
Step 1: Disconnect the battery
- Use a 10mm wrench to loosen the negative battery terminal.
- Remove the cable and tuck it aside so it cannot spring back to the post.
- Keep the cable isolated.
Step 2: Remove any intake or cover pieces blocking access
- If the air intake duct or engine cover blocks the alternator, remove it with the correct hand tools for its clamps or fasteners.
- Set all clips and screws aside in order.
Step 3: Release belt tension
- Use a belt tensioner tool (specialty) or a 15mm socket on the tensioner arm, depending on the style fitted.
- Rotate the tensioner to unload the serpentine belt.
- Slip the belt off the alternator pulley and slowly release the tensioner.
- Take a photo of the belt route first.
Step 4: Remove the alternator electrical connections
- Use a 10mm wrench or 13mm socket to remove the main output cable nut.
- Remove the protective cover from the B+ terminal if equipped.
- Disconnect the plug-in electrical connector by pressing the lock tab and pulling straight out.
- Move the wiring aside so it cannot snag.
Step 5: Remove the alternator mounting bolts
- Use a 15mm socket, ratchet, and extensions to remove the alternator mounting bolts.
- Support the alternator with one hand as the last bolt comes out.
- Remove the alternator from the engine bay.
- Wiggle it out carefully.
Step 6: Install the new alternator
- Position the new alternator in place and start all mounting bolts by hand.
- Use a 15mm socket to tighten the bolts evenly.
- Torque to 50 Nm (37 ft-lbs).
Step 7: Reconnect the electrical connections
- Reconnect the electrical plug until it clicks.
- Install the main output cable and nut using a 10mm wrench or 13mm socket.
- Torque to 15 Nm (11 ft-lbs).
Step 8: Reinstall the serpentine belt
- Use the belt tensioner tool (specialty) or 15mm socket to rotate the tensioner again.
- Route the belt back over the alternator pulley and all other pulleys.
- Confirm the belt sits fully in every groove before releasing the tensioner.
- Check every pulley groove.
Step 9: Reinstall removed parts and reconnect the battery
- Reinstall any intake ducting or covers you removed.
- Reconnect the negative battery cable with a 10mm wrench.
- Tighten the terminal securely, but do not crush the clamp.
✅ After Repair
- Start the engine and listen for belt squeal or bearing noise.
- Check that the battery warning light goes out.
- Measure charging voltage if you have a multimeter. Normal running voltage is usually around 13.5-14.8 volts.
- Inspect the belt to make sure it tracks straight.
- If the battery was very low, recharge it fully after the repair.
💰 DIY vs Shop Cost
Shop Cost: $450-$850 (parts + labor)
DIY Cost: $180-$380 (parts only)
You Save: $270-$470 by doing it yourself!
Shop labor rates vary but typically run $100-$150/hour. This repair takes a shop approximately 1.5-2.5 hours.
🎯 Ready to get started?
HowToo makes it easy: same-day/2-day shipping on every part, plus all the tools and specialty tools you need! Check out the parts and tools sections below to add everything to your cart.
Guide for Alternator replace for these GMC vehicles
| Year Make Model | Sub Model | Engine | Body Style |
|---|---|---|---|
| 2014 GMC Sierra 1500 | - | V8 6.2L | - |
| 2014 GMC Sierra 1500 | - | V8 5.3L | - |
| 2014 GMC Sierra 1500 | - | V6 4.3L | - |
| 2013 GMC Sierra 1500 | - | V8 6.2L | - |
| 2013 GMC Sierra 1500 | - | V8 4.8L | - |
| 2013 GMC Sierra 1500 | - | V8 5.3L | - |
| 2013 GMC Sierra 1500 | - | V8 6.0L | - |
| 2013 GMC Sierra 1500 | - | V6 4.3L | - |
| 2012 GMC Sierra 1500 | - | V8 6.2L | - |
| 2012 GMC Sierra 1500 | - | V8 4.8L | - |
| 2012 GMC Sierra 1500 | - | V8 5.3L | - |
| 2012 GMC Sierra 1500 | - | V8 6.0L | - |
| 2012 GMC Sierra 1500 | - | V6 4.3L | - |
| 2011 GMC Sierra 1500 | - | V8 6.2L | - |
| 2011 GMC Sierra 1500 | - | V8 4.8L | - |
| 2011 GMC Sierra 1500 | - | V8 5.3L | - |
| 2011 GMC Sierra 1500 | - | V8 6.0L | - |
| 2011 GMC Sierra 1500 | - | V6 4.3L | - |
| 2010 GMC Sierra 1500 | - | V8 6.2L | - |
| 2010 GMC Sierra 1500 | - | V8 4.8L | - |
| 2010 GMC Sierra 1500 | - | V8 5.3L | - |
| 2010 GMC Sierra 1500 | - | V8 6.0L | - |
| 2010 GMC Sierra 1500 | - | V6 4.3L | - |
| 2009 GMC Sierra 1500 | - | V8 6.2L | - |
| 2009 GMC Sierra 1500 | - | V8 4.8L | - |
| 2009 GMC Sierra 1500 | - | V8 5.3L | - |
| 2009 GMC Sierra 1500 | - | V8 6.0L | - |
| 2009 GMC Sierra 1500 | - | V6 4.3L | - |
| 2008 GMC Sierra 1500 | - | V8 6.2L | - |
| 2008 GMC Sierra 1500 | - | V8 4.8L | - |
| 2008 GMC Sierra 1500 | - | V8 5.3L | - |
| 2008 GMC Sierra 1500 | - | V8 6.0L | - |
| 2008 GMC Sierra 1500 | - | V6 4.3L | - |
| 2007 GMC Sierra 1500 | - | V8 6.2L | - |
| 2007 GMC Sierra 1500 | - | V8 4.8L | - |
| 2007 GMC Sierra 1500 | - | V8 5.3L | - |
| 2007 GMC Sierra 1500 | - | V8 6.0L | - |
| 2007 GMC Sierra 1500 | - | V6 4.3L | - |