












How to Replace the A/C Compressor on a 2015 Ford F-150
Step-by-step instructions with tools, parts, safety tips, and recharge steps
How to Replace the A/C Compressor on a 2015 Ford F-150
Step-by-step instructions with tools, parts, safety tips, and recharge steps


🔧 A/C Compressor - Replacement
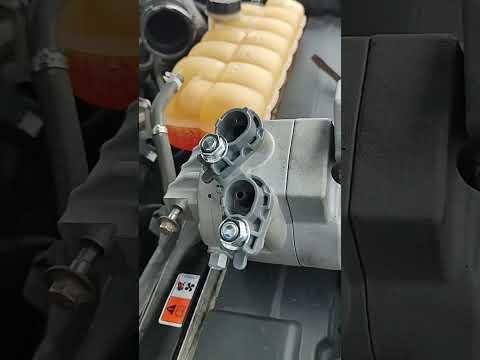
The A/C compressor on your F-150 sits low on the front of the engine and is driven by the serpentine belt. Replacement requires recovering the refrigerant, removing the belt and compressor, then evacuating and recharging the system after installation.
Difficulty Level: Intermediate | Estimated Time: 3-5 hours
⚠️ Safety & Precautions
- Refrigerant must be recovered with approved A/C recovery equipment before any lines are opened.
- Wear safety glasses and gloves. Refrigerant can cause severe frostbite.
- Do not loosen A/C lines until the system is fully evacuated.
- Keep the belt routing diagram handy before removing the serpentine belt.
- Disconnect the negative battery cable before working near the compressor clutch connector.
- Use a scan tool or service procedure to verify refrigerant charge after repair.
🔧 Required Tools
You'll need the following tools for this repair:
- Ratchet set
- Metric socket set
- 10mm socket
- 13mm socket
- 15mm socket
- Serpentine belt tool
- Torque wrench
- Trim panel tool
- Pick tool
- Drain pan
- A/C manifold gauge set
- A/C vacuum pump
- Refrigerant recovery machine (specialty)
- Safety glasses
- Nitrile gloves
- Floor jack (rated 3-ton minimum)
- Jack stands
🔩 Required Parts
HowToo sells all the parts you need for this repair:
- A/C compressor - Qty: 1
- A/C compressor clutch connector seal or pigtail if damaged - Qty: 1
- Serpentine belt - Qty: 1
- A/C compressor oil - Qty: 1 bottle
- O-ring seal kit for A/C lines - Qty: 1
- Refrigerant R-134a - Qty: 1 system charge
📋 Before You Begin
- Park on level ground and set the parking brake.
- Recover the refrigerant with approved equipment before opening the system.
- Disconnect the negative battery cable.
- Let the engine cool fully before starting.
- Take a photo of the belt routing before removal.
🔨 Step-by-Step Instructions
Follow these steps in order:
Step 1: Recover the refrigerant
- Use a refrigerant recovery machine to remove all refrigerant from the A/C system.
- Do not open any A/C lines until the system reads empty.
Step 2: Disconnect the battery
- Use a 10mm socket to remove the negative battery cable.
- Set the cable aside so it cannot touch the terminal.
Step 3: Remove the serpentine belt
- Use a serpentine belt tool to relieve tension from the belt tensioner.
- Slide the belt off the compressor pulley and remove it from the engine bay.
- Take a quick photo first.
Step 4: Disconnect the compressor electrical connector
- Use a pick tool or your fingers to release the lock on the compressor connector.
- Unplug the connector and move the harness clear.
Step 5: Remove the A/C lines from the compressor
- Use the correct metric socket set to remove the A/C line retaining bolts.
- Pull the lines straight off the compressor and cap the openings right away.
- Replace the O-rings on reassembly.
- Keep dirt out of the open ports.
Step 6: Remove the compressor mounting bolts
- Use a 13mm socket and 15mm socket to remove the compressor mounting bolts.
- Support the compressor with one hand while removing the last bolt.
- Lower the compressor out from below or out through the side, depending on clearance.
Step 7: Compare the new compressor
- Match the new compressor to the old one before installation.
- Transfer any shipping caps and confirm the ports and pulley match.
- Add the correct amount of compressor oil before installation if the new unit is dry.
Step 8: Install the new compressor
- Position the new compressor in place and start all mounting bolts by hand.
- Tighten the compressor bolts evenly with a torque wrench.
- Torque to factory specification for the compressor mounting bolts.
Step 9: Reconnect the A/C lines
- Install new O-rings lightly lubricated with the correct compressor oil.
- Use the correct metric socket set to reinstall the line retaining bolts.
- Torque to factory specification for the A/C line bolts.
Step 10: Reconnect the electrical connector and reinstall the belt
- Plug in the compressor connector until it clicks.
- Use the serpentine belt tool to route the belt back onto the pulleys.
- Make sure the belt sits fully in every pulley groove.
Step 11: Evacuate and recharge the system
- Use the A/C vacuum pump and A/C manifold gauge set to pull a deep vacuum.
- Hold vacuum and check for leaks before charging.
- Recharge the system with the correct amount of R-134a.
- Torque to factory specification for any service port caps if removed.
✅ After Repair
- Start the engine and turn the A/C on max.
- Check that the compressor engages smoothly and the center vents get cold.
- Inspect all A/C connections for leaks.
- Listen for belt noise or pulley wobble.
- If cooling is weak, recheck charge level and verify condenser fan operation.
💰 DIY vs Shop Cost
Shop Cost: $1,100-$1,900 (parts + labor)
DIY Cost: $350-$750 (parts only)
You Save: $750-$1,150 by doing it yourself!
Shop labor rates vary but typically run $100-$150/hour. This repair takes a shop approximately 3-5 hours.
🎯 Ready to get started?
HowToo makes it easy: same-day/2-day shipping on every part, plus all the tools and specialty tools you need! Check out the parts and tools sections below to add everything to your cart.