















How to Replace the A/C Compressor on a 2014-2018 GMC Sierra 1500 (Trim: Base | Engine: V6 4.3L)
Step-by-step instructions with tools, parts, torque specs, and A/C recharge tips
How to Replace the A/C Compressor on a 2014-2018 GMC Sierra 1500 (Trim: Base | Engine: V6 4.3L)
Step-by-step instructions with tools, parts, torque specs, and A/C recharge tips for 2014, 2015, 2016, 2017, 2018


🔧 A/C Compressor - Replacement
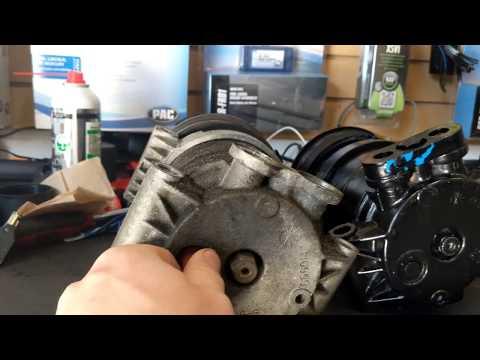
The A/C compressor on your Sierra is part of the sealed refrigerant system, so the refrigerant must be professionally recovered before removal. Once the belt, lines, and mounting bolts are removed, the new compressor goes in with fresh oil and new seals, then the system must be evacuated and recharged.
Difficulty Level: Advanced | Estimated Time: 4-6 hours
⚠️ Safety & Precautions
- Have the refrigerant recovered before opening any A/C line. Do not vent refrigerant.
- Wear safety glasses and gloves. Refrigerant and oil can injure skin and eyes.
- Keep hands clear of the serpentine belt path. The belt can snap back under tension.
- Use jack stands if you need under-vehicle access. Never rely on a jack alone.
- Replace the compressor only after checking for contamination. A failed compressor can spread metal through the system.
- Battery disconnect is recommended before electrical connector removal.
🔧 Required Tools
You'll need the following tools for this repair:
- Metric socket set
- Metric wrench set
- 3/8-inch ratchet
- Torque wrench
- Serpentine belt tool
- Line wrench set
- Drain pan
- Trim clip tool
- Floor jack (rated 3-ton minimum)
- Jack stands
- Safety glasses
- Nitrile gloves
- A/C manifold gauge set
- Vacuum pump
- Refrigerant recovery/recharge machine (specialty)
🔩 Required Parts
HowToo sells all the parts you need for this repair:
- A/C compressor - Qty: 1
- A/C compressor clutch/pulley assembly - Qty: 1
- A/C compressor oil - Qty: 1 bottle
- A/C O-ring and seal kit - Qty: 1
- Serpentine belt - Qty: 1
- Receiver drier/desiccant bag - Qty: 1
- R-134a refrigerant - Qty: 1 full charge
📋 Before You Begin
- Park on level ground and set the parking brake.
- Recover the refrigerant with proper A/C equipment before opening the system.
- Disconnect the negative battery cable before unplugging the compressor connector.
- If the old compressor failed internally, plan to flush the system and replace the receiver drier/desiccant.
🔨 Step-by-Step Instructions
Follow these steps in order:
Step 1: Recover refrigerant and disconnect power
- Use a certified refrigerant recovery machine to remove all R-134a from the system.
- Disconnect the negative battery cable using a 10mm wrench.
- Do not skip refrigerant recovery.
Step 2: Remove the serpentine belt
- Use a serpentine belt tool to rotate the tensioner and release belt tension.
- Slip the belt off the compressor pulley and remove it from the engine.
- Replace the belt if it is cracked, glazed, or contaminated.
Step 3: Access the compressor
- Remove any splash shield or lower cover using the appropriate metric socket set and trim clip tool.
- On some trucks, access is easier from underneath.
Step 4: Disconnect the electrical connector and refrigerant lines
- Unplug the compressor electrical connector by hand.
- Use a line wrench set to loosen the refrigerant line fittings.
- Cap the open lines immediately to keep dirt and moisture out.
- Replace the O-rings on reassembly with clean, lubricated seals.
Step 5: Remove the compressor
- Support the compressor with one hand while removing the mounting bolts with a metric socket set.
- Lower the compressor out of the engine bay.
- Check for metal debris or burned oil in the old unit.
Step 6: Prepare the new compressor
- Drain and measure the oil from the old compressor if possible.
- Add the correct amount and type of A/C compressor oil to the new compressor.
- Rotate the compressor shaft by hand several turns to distribute the oil.
- Match the oil type exactly.
Step 7: Install the new compressor
- Position the compressor in place and start all mounting bolts by hand.
- Tighten the mounting bolts with a torque wrench to 25-35 Nm (18-26 ft-lbs).
- Reconnect the refrigerant lines with new lubricated O-rings and tighten the fittings with a line wrench set to 18-25 Nm (13-18 ft-lbs).
- Reconnect the electrical connector.
Step 8: Reinstall the belt and covers
- Install the serpentine belt using the serpentine belt tool and verify correct routing.
- Reinstall any shields or covers with the metric socket set and trim clip tool.
- Double-check belt alignment.
Step 9: Evacuate and recharge the system
- Use the A/C manifold gauge set and vacuum pump to evacuate the system for at least 30-45 minutes.
- Verify the system holds vacuum before charging.
- Recharge with the correct factory refrigerant amount using a refrigerant recovery/recharge machine (specialty).
Step 10: Test the repair
- Reconnect the battery negative cable with a 10mm wrench.
- Start the engine and turn A/C to MAX.
- Check that the compressor engages, pressures stabilize, and cold air comes from the vents.
- Inspect all fittings for leaks.
✅ After Repair
- Confirm vent temperature drops after a few minutes of operation.
- Check for unusual noise from the compressor or belt.
- If the old compressor failed internally, monitor the system for contamination symptoms.
- Recheck refrigerant charge if cooling is weak.
💰 DIY vs Shop Cost
Shop Cost: $900-$1,800 (parts + labor)
DIY Cost: $350-$850 (parts only)
You Save: $550-$950 by doing it yourself!
Shop labor rates vary but typically run $100-$150/hour. This repair takes a shop approximately 4-6 hours.
🎯 Ready to get started?
HowToo makes it easy: same-day/2-day shipping on every part, plus all the tools and specialty tools you need! Check out the parts and tools sections below to add everything to your cart.
Guide for A/C Compressor replace for these GMC vehicles
| Year Make Model | Sub Model | Engine | Body Style |
|---|---|---|---|
| 2018 GMC Sierra 1500 | Base | V6 4.3L | - |
| 2018 GMC Sierra 1500 | Base | V8 5.3L | - |
| 2018 GMC Sierra 1500 | Denali | V8 5.3L | - |
| 2018 GMC Sierra 1500 | Denali | V8 6.2L | - |
| 2018 GMC Sierra 1500 | SLE | V6 4.3L | - |
| 2018 GMC Sierra 1500 | SLE | V8 5.3L | - |
| 2018 GMC Sierra 1500 | SLT | V8 5.3L | - |
| 2018 GMC Sierra 1500 | SLT | V8 6.2L | - |
| 2017 GMC Sierra 1500 | Base | V6 4.3L | - |
| 2017 GMC Sierra 1500 | Base | V8 5.3L | - |
| 2017 GMC Sierra 1500 | Denali | V8 5.3L | - |
| 2017 GMC Sierra 1500 | Denali | V8 6.2L | - |
| 2017 GMC Sierra 1500 | SLE | V6 4.3L | - |
| 2017 GMC Sierra 1500 | SLE | V8 5.3L | - |
| 2017 GMC Sierra 1500 | SLT | V8 5.3L | - |
| 2017 GMC Sierra 1500 | SLT | V8 6.2L | - |
| 2016 GMC Sierra 1500 | Base | V6 4.3L | - |
| 2016 GMC Sierra 1500 | Base | V8 5.3L | - |
| 2016 GMC Sierra 1500 | Denali | V8 5.3L | - |
| 2016 GMC Sierra 1500 | Denali | V8 6.2L | - |
| 2016 GMC Sierra 1500 | SLE | V6 4.3L | - |
| 2016 GMC Sierra 1500 | SLE | V8 5.3L | - |
| 2016 GMC Sierra 1500 | SLT | V8 5.3L | - |
| 2016 GMC Sierra 1500 | SLT | V8 6.2L | - |
| 2015 GMC Sierra 1500 | Base | V6 4.3L | - |
| 2015 GMC Sierra 1500 | Base | V8 5.3L | - |
| 2015 GMC Sierra 1500 | Denali | V8 5.3L | - |
| 2015 GMC Sierra 1500 | Denali | V8 6.2L | - |
| 2015 GMC Sierra 1500 | SLE | V6 4.3L | - |
| 2015 GMC Sierra 1500 | SLE | V8 5.3L | - |
| 2015 GMC Sierra 1500 | SLT | V8 5.3L | - |
| 2015 GMC Sierra 1500 | SLT | V8 6.2L | - |
| 2014 GMC Sierra 1500 | Base | V6 4.3L | - |
| 2014 GMC Sierra 1500 | Base | V8 5.3L | - |
| 2014 GMC Sierra 1500 | Denali | V8 5.3L | - |
| 2014 GMC Sierra 1500 | Denali | V8 6.2L | - |
| 2014 GMC Sierra 1500 | SLE | V6 4.3L | - |
| 2014 GMC Sierra 1500 | SLE | V8 5.3L | - |
| 2014 GMC Sierra 1500 | SLT | V8 5.3L | - |
| 2014 GMC Sierra 1500 | SLT | V8 6.2L | - |