









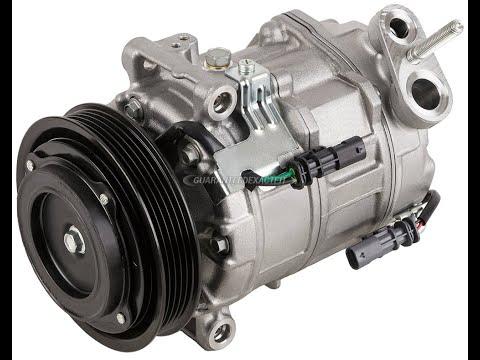






How to Replace the A/C Compressor on a 2014-2016 Chevrolet Equinox (Engine: V6 3.6L)
Step-by-step repair guide with tools, parts, safety tips, and recharge instructions
How to Replace the A/C Compressor on a 2014-2016 Chevrolet Equinox (Engine: V6 3.6L)
Step-by-step repair guide with tools, parts, safety tips, and recharge instructions for 2014, 2015, 2016


🔧 A/C Compressor - Replacement
The A/C compressor on your A4 is a belt-driven, sealed component that requires refrigerant recovery before removal. On the 3.6L V6, access is tight, so the job includes removing the drive belt, disconnecting the refrigerant lines, swapping the compressor, and then evacuating and recharging the system.
Difficulty Level: Advanced | Estimated Time: 4-6 hours
⚠️ Safety & Precautions
- Have the refrigerant professionally recovered before opening the A/C system. Do not vent refrigerant to the air.
- Wear safety glasses and gloves. Refrigerant and oil can cause frostbite and eye injury.
- Keep hands and tools clear of the belt drive when rotating the engine by hand.
- Replace any O-rings that come off with the compressor lines. Lightly oil new O-rings with the correct A/C refrigerant oil.
- Do not restart the system until it has been evacuated and recharged with the proper refrigerant amount.
- Battery disconnect is recommended before working near the belt and electrical connectors.
🔧 Required Tools
You'll need the following tools for this repair:
- Metric socket set
- Metric wrench set
- 1/4-inch ratchet
- 3/8-inch ratchet
- Extensions
- Serpentine belt tool (specialty)
- Torque wrench
- Line wrench set
- Trim clip removal tool
- Drain pan
- Safety glasses
- Nitrile gloves
- A/C manifold gauge set (specialty)
- Vacuum pump (specialty)
- R-134a recovery and recharge machine (specialty)
🔩 Required Parts
HowToo sells all the parts you need for this repair:
- A/C compressor - Qty: 1
- A/C compressor O-ring set - Qty: 1
- Serpentine belt - Qty: 1
- A/C compressor oil - Qty: 1 bottle
- R-134a refrigerant - Qty: 1 recharge set
📋 Before You Begin
- Park on level ground and set the parking brake.
- Let the engine cool fully before starting.
- Have the refrigerant recovered by an A/C recovery machine before opening any A/C line.
- Disconnect the negative battery cable with a 10mm wrench.
- If the belt routing is unclear, take a photo before removal.
🔨 Step-by-Step Instructions
Follow these steps in order:
Step 1: Recover the refrigerant
- Use an A/C recovery machine (specialty) to remove the refrigerant from the system completely.
- Do not disconnect any A/C lines until the system is empty.
Step 2: Disconnect the battery
- Use a 10mm wrench to remove the negative battery cable.
- Move the cable aside so it cannot spring back and touch the terminal.
Step 3: Remove the engine cover and intake ducting
- Remove the engine cover by lifting it straight up.
- Use a socket set and trim clip removal tool to remove the intake ducting and any air box pieces blocking access.
- Keep fasteners organized.
Step 4: Remove the serpentine belt
- Use a serpentine belt tool (specialty) to rotate the belt tensioner.
- Slip the belt off the A/C compressor pulley and remove it from the engine bay.
- Inspect the belt for cracks or glazing and replace it if needed.
Step 5: Disconnect the A/C lines and electrical connector
- Use a socket set or line wrench set to remove the compressor line retaining bolts.
- Carefully separate the refrigerant lines from the compressor.
- Cap or cover the open lines right away to keep dirt and moisture out.
- Unplug the electrical connector from the compressor clutch or control valve.
Step 6: Remove the compressor
- Use a socket set with extensions to remove the compressor mounting bolts.
- Support the compressor as the last bolt comes out.
- Remove the compressor from the vehicle.
Step 7: Transfer parts and prep the new compressor
- Remove the old O-rings from the line fittings.
- Install new A/C compressor O-ring set pieces and lightly coat them with the correct A/C oil.
- Add the correct amount of A/C compressor oil to the new compressor if it is not prefilled.
- Do not over-oil the system.
Step 8: Install the new compressor
- Position the new compressor in place by hand.
- Install the mounting bolts with a socket set and tighten them to 25 Nm (18 ft-lbs).
- Reconnect the electrical connector.
Step 9: Reconnect the A/C lines
- Install the refrigerant lines onto the compressor carefully so the O-rings do not pinch.
- Tighten the line retaining bolts with a socket set or line wrench set to 18 Nm (13 ft-lbs).
Step 10: Reinstall the belt and intake parts
- Route the serpentine belt using the belt routing diagram.
- Use the serpentine belt tool (specialty) to release the tensioner and slip the belt into place.
- Reinstall the intake ducting and engine cover.
Step 11: Evacuate and recharge the system
- Use a vacuum pump (specialty) and A/C manifold gauge set (specialty) to pull a deep vacuum for at least 30 minutes.
- Verify the system holds vacuum before recharging.
- Recharge the system with the exact refrigerant amount specified for your A4 using an R-134a recovery and recharge machine (specialty).
Step 12: Reconnect battery and test
- Reconnect the negative battery cable with a 10mm wrench.
- Start the engine and turn the A/C on MAX.
- Check for cold air, strange noises, and refrigerant leaks at the compressor and line fittings.
✅ After Repair
- Confirm the compressor engages and the cabin air gets cold.
- Listen for belt squeal, grinding, or clicking.
- Inspect all fittings for oil residue or refrigerant leaks.
- If cooling is weak, verify the recharge amount and check for proper fan operation.
💰 DIY vs Shop Cost
Shop Cost: $1,100-$1,800 (parts + labor)
DIY Cost: $350-$700 (parts only)
You Save: $750-$1,100 by doing it yourself!
Shop labor rates vary but typically run $100-$150/hour. This repair takes a shop approximately 4-6 hours.
🎯 Ready to get started?
HowToo makes it easy: same-day/2-day shipping on every part, plus all the tools and specialty tools you need! Check out the parts and tools sections below to add everything to your cart.
Guide for A/C Compressor replace for these Chevrolet vehicles
| Year Make Model | Sub Model | Engine | Body Style |
|---|---|---|---|
| 2016 Chevrolet Equinox | - | Inline 4 2.4L | - |
| 2016 Chevrolet Equinox | - | V6 3.6L | - |
| 2015 Chevrolet Equinox | - | Inline 4 2.4L | - |
| 2015 Chevrolet Equinox | - | V6 3.6L | - |
| 2014 Chevrolet Equinox | - | Inline 4 2.4L | - |
| 2014 Chevrolet Equinox | - | V6 3.6L | - |