









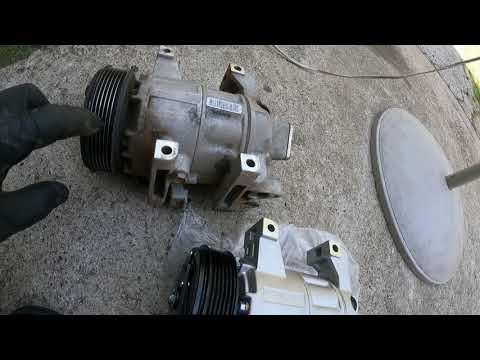







How to Replace the A/C Compressor on a 2013-2018 Nissan Altima (Trim: S | Engine: Inline 4 2.5L | Body: Sedan)
Step-by-step guide with tools, parts, torque specs, refrigerant safety, and recharge tips for 2013, 2014, 2015, 2016, 2017
How to Replace the A/C Compressor on a 2013-2018 Nissan Altima (Trim: S | Engine: Inline 4 2.5L | Body: Sedan)
Step-by-step guide with tools, parts, torque specs, refrigerant safety, and recharge tips for 2013, 2014, 2015, 2016, 2017


🔧 A/C Compressor - Replacement
Replacing the A/C compressor on your Altima requires safely recovering the refrigerant, removing the drive belt, disconnecting the refrigerant lines, swapping the compressor, then evacuating and recharging the system. This is an advanced repair because A/C refrigerant must be handled with certified recovery equipment and the system must be vacuum-tested before charging.
Difficulty Level: Advanced | Estimated Time: 3-5 hours
⚠️ Safety & Precautions
- ⚠️ Do not vent refrigerant to the air. Refrigerant recovery requires certified A/C recovery equipment.
- 🧤 Wear safety glasses and nitrile gloves; liquid refrigerant can cause frostbite.
- 🔋 Disconnect the negative battery cable before working near the compressor clutch wiring.
- 🔥 Do not work on the A/C system near open flame or hot engine parts.
- 🧪 The receiver/drier or desiccant bag should be replaced when the compressor is replaced, especially if the system has been open or the compressor failed internally.
- 🛢️ If the old compressor failed and sent debris into the system, the condenser and expansion valve may also need replacement; flushing alone may not remove all debris from modern parallel-flow condensers.
🔧 Required Tools
You'll need the following tools for this repair:
- 10mm socket
- 12mm socket
- 14mm socket
- 3/8-inch drive ratchet
- 3/8-inch drive extension set
- 14mm box-end wrench
- Serpentine belt tool (specialty)
- Torque wrench 5-80 ft-lb
- A/C manifold gauge set R-134a (specialty)
- A/C recovery machine R-134a (specialty)
- Vacuum pump 3 CFM minimum (specialty)
- Refrigerant scale 0.1 oz resolution (specialty)
- O-ring pick set
- Plastic trim clip remover
- Flat-blade screwdriver
- Floor jack rated 2-ton minimum
- Jack stands rated 2-ton minimum
- Wheel chocks
- Safety glasses
- Nitrile gloves
🔩 Required Parts
HowToo sells all the parts you need for this repair:
- A/C compressor assembly - Qty: 1
- A/C compressor line O-ring kit - Qty: 1
- PAG A/C compressor oil - Qty: As specified by compressor supplier
- R-134a refrigerant - Qty: Charge to underhood label specification
- Receiver/drier desiccant service kit - Qty: 1
- Serpentine belt - Qty: 1 if worn, cracked, glazed, or oil-soaked
- A/C condenser - Qty: 1 if compressor failed internally or metal debris is present
- A/C expansion valve - Qty: 1 if compressor failed internally or debris is present
📋 Before You Begin
- 🅿️ Park your Altima on level ground, set the parking brake, and place wheel chocks behind the rear wheels.
- ❄️ Have the refrigerant professionally recovered before opening the A/C system. Recovery means removing refrigerant with a machine so it is not released into the air.
- 📸 Take photos of belt routing, compressor wiring, and hose locations before removal.
- 🔍 Check the underhood A/C label for the exact refrigerant charge amount and oil specification.
- 🛢️ If the compressor comes pre-filled with oil, measure and adjust oil only according to the compressor supplier instructions and Nissan service information.
🔨 Step-by-Step Instructions
Follow these steps in order:
Step 1: Recover the refrigerant
- Use an A/C recovery machine R-134a connected to the high-side and low-side service ports to recover the refrigerant.
- Confirm both gauges on the A/C manifold gauge set R-134a read 0 psi before opening any refrigerant line.
- Never loosen A/C lines under pressure.
Step 2: Disconnect the battery
- Use a 10mm socket to loosen the negative battery terminal nut.
- Move the negative cable aside so it cannot spring back onto the battery post.
Step 3: Raise and support the front of the vehicle
- Use a floor jack rated 2-ton minimum at the front center jacking point.
- Place jack stands rated 2-ton minimum under the front side support points.
- Gently lower the car onto the stands and shake the vehicle lightly to confirm it is stable.
Step 4: Remove the lower splash shield
- Use a 10mm socket to remove the lower engine splash shield bolts.
- Use a plastic trim clip remover and flat-blade screwdriver to remove any plastic push clips.
- Set the shield aside where it will not be stepped on.
Step 5: Remove the serpentine belt
- Use a serpentine belt tool or 14mm box-end wrench on the belt tensioner to rotate the tensioner and release belt tension.
- Slide the belt off the A/C compressor pulley first, then remove it from the other pulleys if needed.
- Inspect the belt. Replace it if cracked, glazed, frayed, or oil-soaked.
- Draw the belt path before removal.
Step 6: Disconnect the compressor electrical connector
- Use your fingers or a flat-blade screwdriver carefully to release the compressor clutch connector lock tab.
- Move the harness away from the compressor so it will not be pinched during removal.
Step 7: Disconnect the A/C lines from the compressor
- Use a 10mm socket or 12mm socket to remove the refrigerant line retaining bolts at the compressor.
- Pull the lines straight away from the compressor by hand. Do not bend or twist the aluminum lines.
- Use an O-ring pick set to remove the old O-rings from the line fittings.
- Cap or cover the open lines immediately to keep moisture and dirt out.
Step 8: Remove the compressor mounting bolts
- Support the compressor with one hand from below.
- Use a 14mm socket, 3/8-inch drive ratchet, and 3/8-inch drive extension set to remove the compressor mounting bolts.
- Lower the compressor out through the bottom opening.
Step 9: Prepare the new compressor
- Place the old and new compressors side by side and confirm the pulley, electrical connector, and hose ports match.
- Rotate the new compressor clutch/pulley by hand several times if instructed by the compressor supplier.
- Check compressor oil amount according to the compressor supplier instructions. Add or drain PAG A/C compressor oil only as required.
- Too much oil reduces cooling performance.
Step 10: Install the new compressor
- Lift the new compressor into position by hand.
- Start all mounting bolts by hand first to prevent cross-threading.
- Use a 14mm socket and torque wrench 5-80 ft-lb to tighten the compressor mounting bolts to Torque to 25 Nm (18 ft-lbs).
Step 11: Install new line O-rings
- Use an O-ring pick set to make sure all old O-rings are removed from the line fittings.
- Lightly coat the new O-rings with clean PAG A/C compressor oil.
- Push the A/C lines straight into the compressor ports by hand.
- Use a 10mm socket or 12mm socket and torque wrench 5-80 ft-lb to tighten the line retaining bolts to Torque to 8 Nm (71 in-lbs).
Step 12: Reconnect the compressor wiring
- Push the electrical connector onto the compressor until the lock tab clicks.
- Use your hand to tug lightly on the connector and confirm it is locked.
Step 13: Reinstall the serpentine belt
- Use the belt routing photo and route the belt over the pulleys by hand.
- Use the serpentine belt tool or 14mm box-end wrench to rotate the tensioner.
- Slide the belt onto the final pulley, then slowly release the tensioner.
- Check that the belt ribs sit fully in every pulley groove.
Step 14: Replace the desiccant service kit
- Use the tool sizes required by the service kit design, typically a 10mm socket and O-ring pick set, to replace the receiver/drier desiccant cartridge if serviceable.
- Install new O-rings lightly coated with clean PAG A/C compressor oil.
- If metal debris is found, replace the A/C condenser instead of only the desiccant service kit.
Step 15: Evacuate the A/C system
- Connect the A/C manifold gauge set R-134a to the high-side and low-side service ports.
- Connect the center hose to the vacuum pump 3 CFM minimum.
- Run the vacuum pump for at least 30-45 minutes, longer if the system was open for a while.
- Close the manifold valves and confirm the system holds vacuum for at least 10 minutes.
Step 16: Recharge the system by weight
- Place the refrigerant cylinder on the refrigerant scale 0.1 oz resolution.
- Use the A/C manifold gauge set R-134a to charge the exact amount shown on the underhood A/C label.
- Do not charge by pressure alone. Ambient temperature changes pressure readings.
- Correct refrigerant weight matters most.
Step 17: Reinstall the splash shield and lower the vehicle
- Use a 10mm socket to reinstall the lower splash shield bolts.
- Use the plastic trim clip remover by hand to seat any push clips that were removed.
- Use the floor jack rated 2-ton minimum to raise the vehicle slightly, remove the jack stands rated 2-ton minimum, then lower the vehicle slowly.
Step 18: Reconnect the battery
- Use a 10mm socket to tighten the negative battery terminal.
- Make sure the terminal does not twist by hand after tightening.
✅ After Repair
- ✅ Start your Altima and set A/C to MAX cool, lowest temperature, and medium-high blower speed.
- 🌡️ Check for cold air at the center vents after a few minutes.
- 👂 Listen for unusual compressor noise, belt squeal, or clicking.
- 🧪 Use the A/C manifold gauge set R-134a to confirm pressures are reasonable for the outside temperature.
- 🔍 Check all compressor line connections for leaks using approved A/C leak detection methods.
- 🚗 Road test for 10-15 minutes and recheck cooling performance.
💰 DIY vs Shop Cost
Shop Cost: $900-$1,600 (parts + labor)
DIY Cost: $350-$850 (parts only, not including recovery/recharge equipment)
You Save: $400-$750 by doing it yourself!
Shop labor rates vary but typically run $100-$150/hour. This repair takes a shop approximately 2.5-4.0 hours.
🎯 Ready to get started?
HowToo makes it easy: same-day/2-day shipping on every part, plus all the tools and specialty tools you need! Check out the parts and tools sections below to add everything to your cart.