









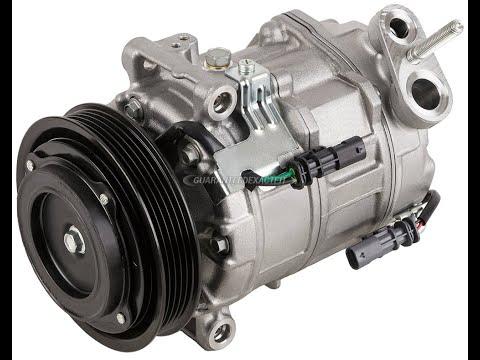







How to Replace the A/C Compressor on a 2012-2014 Chevrolet Equinox (Engine: V6 3.6L)
Step-by-step instructions with tools, parts, safety tips, and recharge guidance
How to Replace the A/C Compressor on a 2012-2014 Chevrolet Equinox (Engine: V6 3.6L)
Step-by-step instructions with tools, parts, safety tips, and recharge guidance for 2012, 2013, 2014


🔧 A/C Compressor - Replacement
On your Equinox, the A/C compressor sits low on the engine and the refrigerant system must be properly recovered before any lines are opened. This job also requires belt removal, compressor oil handling, and a careful vacuum and recharge after installation.
Difficulty Level: Advanced | Estimated Time: 4-6 hours
⚠️ Safety & Precautions
- Have the refrigerant professionally recovered before starting. Never vent refrigerant.
- Wear safety glasses and gloves. Refrigerant can freeze skin and eyes instantly.
- Disconnect the negative battery cable before working near the belt drive and starter feed area.
- Keep dirt out of the open A/C lines. Cap every line immediately after disconnecting.
- Use only the correct A/C oil type and the correct amount for your system.
- If the old compressor failed internally, replace the receiver/drier or condenser as required by contamination level.
🔧 Required Tools
You'll need the following tools for this repair:
- Ratchet
- Metric socket set
- Metric wrench set
- Serpentine belt tool
- Trim clip removal tool
- Torque wrench
- Floor jack (rated 3-ton minimum)
- Jack stands
- Drain pan
- A/C manifold gauge set
- Vacuum pump
- Refrigerant scale
- Safety glasses
- Nitrile gloves
🔩 Required Parts
HowToo sells all the parts you need for this repair:
- A/C compressor - Qty: 1
- A/C compressor clutch seal kit - Qty: 1
- Compressor oil - Qty: 1 bottle
- Receiver/drier or desiccant cartridge - Qty: 1
- A/C O-ring seal kit - Qty: 1
- Serpentine belt - Qty: 1
📋 Before You Begin
- Park on level ground and set the parking brake.
- Recover the refrigerant with approved equipment before loosening any A/C fittings.
- Disconnect the negative battery cable.
- Raise the front of the vehicle and support it securely on jack stands if needed for access.
- Label every A/C line and connector before removal. Small labels save big headaches.
🔨 Step-by-Step Instructions
Follow these steps in order:
Step 1: Recover refrigerant and disconnect battery
- Use A/C recovery equipment to evacuate the refrigerant from the system.
- Use a wrench to disconnect the negative battery cable.
Step 2: Remove the engine air intake parts for access
- Use a socket set and trim clip removal tool to remove the intake ducting and any access covers blocking the front of the engine.
- Set all clips aside in order.
Step 3: Remove the serpentine belt
- Use a serpentine belt tool to rotate the tensioner and slip the belt off the compressor pulley.
- Inspect the belt for cracks or glazing. Replace it if worn.
Step 4: Disconnect the compressor electrical connector and A/C lines
- Use a metric socket or wrench to remove the compressor line bracket bolts, if equipped.
- Unplug the electrical connector from the compressor.
- Use the correct line wrench or socket to remove the A/C line fasteners.
- Cap the open lines immediately to keep out moisture and dirt.
Step 5: Remove the compressor
- Use a metric socket and ratchet to remove the compressor mounting bolts.
- Lower the compressor out of the vehicle.
Step 6: Prepare the new compressor
- Drain and measure the oil from the old compressor if possible.
- Use compressor oil to prefill the new compressor with the same amount removed, minus any oil added elsewhere in the system.
- Install new O-rings on the A/C line connections and lightly lubricate them with clean compressor oil.
Step 7: Install the new compressor
- Position the compressor and install the mounting bolts by hand first.
- Use a torque wrench to tighten the compressor mounting bolts to factory specification.
- Reconnect the A/C lines and tighten the fittings to factory specification.
- Reconnect the electrical connector.
Step 8: Reinstall the belt and intake parts
- Use the serpentine belt tool to route the belt back onto the pulleys.
- Reinstall the intake ducting and covers with the socket set and trim clip tool.
Step 9: Evacuate and recharge the system
- Use a vacuum pump and manifold gauge set to evacuate the system for at least 30 minutes.
- Verify the system holds vacuum.
- Recharge the system with the exact refrigerant amount specified on the underhood label using a refrigerant scale.
Step 10: Verify operation
- Reconnect the battery.
- Start the engine and turn the A/C on max.
- Check for abnormal noise, leaks, and proper cold air output.
✅ After Repair
- Check all A/C fittings for leaks with an electronic leak detector or UV dye if used.
- Confirm the compressor cycles normally and the air gets cold.
- Recheck belt tracking after a short road test.
- If the old compressor failed badly, replace any contaminated A/C components as needed.
💰 DIY vs Shop Cost
Shop Cost: $900-$1,700 (parts + labor)
DIY Cost: $250-$650 (parts only)
You Save: $650-$1,050 by doing it yourself!
Shop labor rates vary but typically run $100-$150/hour. This repair takes a shop approximately 4-6 hours.
🎯 Ready to get started?
HowToo makes it easy: same-day/2-day shipping on every part, plus all the tools and specialty tools you need! Check out the parts and tools sections below to add everything to your cart.
Guide for A/C Compressor replace for these Chevrolet vehicles
| Year Make Model | Sub Model | Engine | Body Style |
|---|---|---|---|
| 2014 Chevrolet Equinox | - | Inline 4 2.4L | - |
| 2013 Chevrolet Equinox | - | Inline 4 2.4L | - |
| 2012 Chevrolet Equinox | - | Inline 4 2.4L | - |