















How to Replace Suspension Bushings on a 2007-2016 GMC Sierra 1500
Step-by-step control arm bushing replacement with tools, safety tips, and alignment guidance
How to Replace Suspension Bushings on a 2007-2016 GMC Sierra 1500
Step-by-step control arm bushing replacement with tools, safety tips, and alignment guidance for 2007, 2008, 2009, 2010, 2011, 2012, 2013, 2014, 2015, 2016


🔧 Suspension Bushings - Replacement
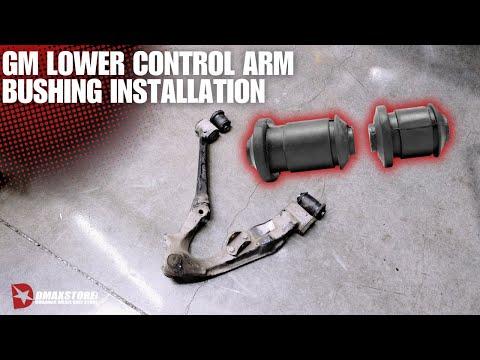
Assumption: This covers pressed-in suspension bushings on your Sierra, most commonly the control arm bushings. On this truck, many bushings are serviced by replacing the complete arm instead of pressing bushings separately.
You’ll need to remove the affected suspension arm, press out the old bushings, and install the new ones with the correct orientation. Then the suspension must be tightened at ride height and aligned after the repair.
Difficulty Level: Advanced | Estimated Time: 4-8 hours
⚠️ Safety & Precautions
- Support the truck with jack stands on solid ground. Never work under a vehicle held only by a jack.
- Use a spring compressor if the coil spring must be removed from the control arm. A compressed spring stores a lot of energy.
- Disconnect the battery if you will be unplugging any steering, ride height, or ABS-related wiring near the suspension.
- Final bushing bolts must be tightened at normal ride height, not with the suspension hanging.
- An alignment is required after control arm or bushing replacement.
🔧 Required Tools
You'll need the following tools for this repair:
- Floor jack (rated 3-ton minimum)
- Jack stands (rated 3-ton minimum)
- Wheel chocks
- Safety glasses
- Mechanic gloves
- Breaker bar
- Torque wrench
- Socket set 15mm-24mm
- Combination wrench set 15mm-24mm
- Penetrating oil
- Ball joint separator
- Pry bar
- Hydraulic press (specialty)
- Bushing driver kit (specialty)
- Spring compressor (specialty)
- Paint marker
🔩 Required Parts
HowToo sells all the parts you need for this repair:
- Front suspension bushing set - Qty: 1
- Replacement control arm assembly - Qty: 1 or 2 as needed
- New control arm bolts and nuts - Qty: 1 set
- Anti-seize compound - Qty: 1
- Alignment service - Qty: 1
📋 Before You Begin
- Park on level ground and set the parking brake.
- Chock the rear wheels before lifting the front.
- Spray all suspension bolts with penetrating oil and let it soak before removal.
- Mark cam bolt positions with a paint marker before loosening anything. This helps preserve alignment enough to drive to the alignment shop.
- If the control arm uses a coil spring, remove the spring only with a proper spring compressor.
🔨 Step-by-Step Instructions
Follow these steps in order:
Step 1: Lift and secure the truck
- Use the floor jack to lift the front of the Sierra at the frame.
- Set it securely on jack stands.
- Remove the wheel with the breaker bar and the correct socket.
Step 2: Mark the suspension settings
- Use a paint marker to mark cam bolt locations and control arm positions.
- Take a quick photo first.
Step 3: Disconnect the affected suspension arm
- Use the correct socket set and combination wrenches to remove the control arm bolts.
- If the ball joint is attached to the knuckle, use a ball joint separator to free it.
- Support the control arm with the floor jack so it does not drop suddenly.
Step 4: Remove the arm or press out the bushings
- If the bushings are serviceable, take the arm to a bench and use a hydraulic press with a bushing driver kit to press out the old bushings.
- If the bushings are bonded into the arm or the arm is heavily rusted, replace the full control arm assembly instead.
- Press only on the metal shell, not the arm itself.
Step 5: Install the new bushings
- Use the hydraulic press and bushing driver kit to install the new bushings in the same orientation as the originals.
- Make sure the alignment marks or indexing arrows line up correctly.
- Apply a thin film of anti-seize compound only where specified by the part instructions.
Step 6: Reinstall the suspension arm
- Position the arm back into place and install all bolts finger-tight first.
- Use the socket set and torque wrench to snug the hardware, but do not final-tighten yet.
- If a spring was removed, reinstall it with the spring compressor before reattaching the arm.
Step 7: Torque at ride height
- Raise the suspension slightly with the floor jack until it sits at normal ride height.
- Use the torque wrench to tighten all control arm and bushing fasteners to the factory specification for your exact suspension arm.
- Torque to factory spec for the specific bolt - this is critical on this truck because arm hardware sizes and specs vary by position.
Step 8: Reassemble and repeat if needed
- Reinstall the wheel and tighten the lug nuts with the socket in a star pattern.
- Repeat the same process for the opposite side if replacing matching bushings. Replace in pairs when applicable.
✅ After Repair
- Test drive slowly at first and listen for clunks, squeaks, or pulling.
- Check for loose fasteners after the test drive.
- Schedule a professional wheel alignment right away.
- If the steering wheel is off-center or the truck pulls, do not keep driving it long distances.
💰 DIY vs Shop Cost
Shop Cost: $500-$1,400 (parts + labor)
DIY Cost: $120-$450 (parts only)
You Save: $380-$950 by doing it yourself!
Shop labor rates vary but typically run $100-$150/hour. This repair takes a shop approximately 4-8 hours.
🎯 Ready to get started?
HowToo makes it easy: same-day/2-day shipping on every part, plus all the tools and specialty tools you need! Check out the parts and tools sections below to add everything to your cart.
Guide for Suspension Control Arm Bushing replace for these GMC vehicles
| Year Make Model | Sub Model | Engine | Body Style |
|---|---|---|---|
| 2016 GMC Sierra 1500 | - | - | - |
| 2015 GMC Sierra 1500 | - | - | - |
| 2014 GMC Sierra 1500 | - | - | - |
| 2013 GMC Sierra 1500 | - | - | - |
| 2012 GMC Sierra 1500 | - | - | - |
| 2011 GMC Sierra 1500 | - | - | - |
| 2010 GMC Sierra 1500 | - | - | - |
| 2009 GMC Sierra 1500 | - | - | - |
| 2008 GMC Sierra 1500 | - | - | - |
| 2007 GMC Sierra 1500 | - | - | - |