

















How to Replace Spark Plugs on a 2019-2024 Cadillac XT4 2.0L Turbo (DIY Guide) (Engine: Inline 4 2.0L)
Step-by-step instructions with tools, parts list, spark plug gap tips, and torque specs
How to Replace Spark Plugs on a 2019-2024 Cadillac XT4 2.0L Turbo (DIY Guide) (Engine: Inline 4 2.0L)
Step-by-step instructions with tools, parts list, spark plug gap tips, and torque specs for 2019, 2020, 2021, 2022, 2023, 2024


🔧 XT4 - Spark Plug Replacement
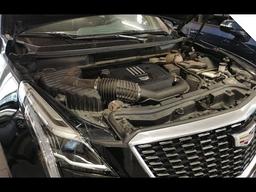
Replacing spark plugs restores strong ignition, smooth idle, and good fuel economy. On your XT4’s 2.0L turbo, the plugs sit under the ignition coils on top of the engine, so access is straightforward once the engine cover is off.
Difficulty Level: Intermediate | Estimated Time: 1.0-2.0 hours
⚠️ Safety & Precautions
- 🛑 Work on a fully cool engine to avoid burns and damaged threads in the aluminum cylinder head.
- 🛑 Keep dirt out of the spark plug holes; debris can damage the engine.
- 🛑 Pull connectors by the plastic housing, not the wires.
- 🛑 If you disconnect the battery: use a 10mm wrench and remove the negative terminal first.
- 🛑 Do not use anti-seize unless the plug maker specifically says to; most modern plugs are coated and anti-seize can cause over-tightening.
🔧 Required Tools
You'll need the following tools for this repair:
- Safety glasses
- Nitrile gloves
- 10mm socket
- 3/8" ratchet
- 3/8" extension set (3" and 6")
- 5/8" spark plug socket (rubber insert)
- Torque wrench (5–80 Nm range)
- Flat trim tool
- Compressed air blow gun
- Feeler gauge set (inch)
- Small pick tool
🔩 Required Parts
HowToo sells all the parts you need for this repair:
- Spark plugs (2.0L turbo) - Qty: 4
- Dielectric grease - Qty: 1
📋 Before You Begin
- 🅿️ Park on level ground, shift to Park, and set the parking brake.
- 🧊 Let the engine cool completely (at least 1 hour after driving).
- 🔌 Optional but safer: disconnect the negative battery terminal using a 10mm socket.
- 💨 Have compressed air ready to blow out each spark plug well before removing the plug.
🔨 Step-by-Step Instructions
Follow these steps in order:
Step 1: Remove the engine cover
- Grip the cover firmly and pull upward to release it from the rubber grommets. Use a flat trim tool if it feels stuck.
- Pull straight up to avoid cracking it.
Step 2: Unplug and remove ignition coils
- On one coil at a time, release the electrical connector lock using a small pick tool, then unplug the connector by hand.
- Remove the coil retaining bolt using a 10mm socket and 3/8" ratchet.
- Pull the coil straight up to remove it.
- Reinstall note: Torque coil bolt to 10 Nm (89 in-lbs).
- Do one cylinder at a time to stay organized.
Step 3: Clean the spark plug wells
- Blow out the area around each spark plug using a compressed air blow gun.
- This prevents grit from falling into the cylinder when the plug comes out.
Step 4: Remove the old spark plugs
- Install a 5/8" spark plug socket (rubber insert) on a 3/8" extension and 3/8" ratchet.
- Turn counterclockwise to loosen, then remove the plug.
- If a plug feels extremely tight, stop and re-tighten slightly, then loosen again to reduce thread damage.
Step 5: Check the new spark plug gap (if applicable)
- Use a feeler gauge set (inch) to verify the gap matches the spec on the underhood emissions label or the plug box.
- If the plugs are iridium/platinum, avoid prying on the tiny center electrode to “regap” unless the plug manufacturer explicitly allows it.
Step 6: Install the new spark plugs
- Thread each new plug in by hand using the 5/8" spark plug socket and extension only (no ratchet at first).
- Once seated, tighten with a torque wrench: Torque spark plugs to 25 Nm (18 ft-lbs).
- Hand-threading prevents cross-threading.
Step 7: Reinstall coils and connectors
- Apply a tiny smear of dielectric grease inside each coil boot (dielectric grease is a silicone grease that helps prevent moisture and makes future removal easier).
- Push the coil straight down until fully seated on the plug.
- Install the coil bolt with a 10mm socket and torque: Torque to 10 Nm (89 in-lbs).
- Reconnect the electrical connector until it clicks/locks.
Step 8: Reinstall the engine cover
- Align the cover over the grommets and press down firmly by hand until it snaps into place.
✅ After Repair
- 🔁 If you disconnected the battery, reconnect it using a 10mm socket (negative terminal last).
- 🚗 Start the engine and let it idle for 30–60 seconds. It should run smooth with no shaking.
- 👃 Check for any fuel smell or odd ticking (a small “tick” can be normal injector noise; a loud puffing could mean a loose plug).
- 🧰 If you had a check engine light for a misfire, clear codes with a scan tool after verifying it runs correctly.
💰 DIY vs Shop Cost
Shop Cost: $250-$450 (parts + labor)
DIY Cost: $50-$120 (parts only)
You Save: $200-$330 by doing it yourself!
Shop labor rates vary but typically run $100-$150/hour. This repair takes a shop approximately 1.0-1.5 hours.
🎯 Ready to get started?
HowToo makes it easy: same-day/2-day shipping on every part, plus all the tools and specialty tools you need! Check out the parts and tools sections below to add everything to your cart.
Guide for Spark Plug replace for these Cadillac vehicles
| Year Make Model | Sub Model | Engine | Body Style |
|---|---|---|---|
| 2024 Cadillac XT4 | - | Inline 4 2.0L | - |
| 2023 Cadillac XT4 | - | Inline 4 2.0L | - |
| 2022 Cadillac XT4 | - | Inline 4 2.0L | - |
| 2021 Cadillac XT4 | - | Inline 4 2.0L | - |
| 2020 Cadillac XT4 | - | Inline 4 2.0L | - |
| 2019 Cadillac XT4 | - | Inline 4 2.0L | - |
