


How to Replace Spark Plugs on a 2011 Honda CR-V (Step-by-Step DIY Guide)
Tools, iridium plug gap info, and torque specs for coils and plugs with safety tips
How to Replace Spark Plugs on a 2011 Honda CR-V (Step-by-Step DIY Guide)
Tools, iridium plug gap info, and torque specs for coils and plugs with safety tips


🔧 CR-V - Spark Plug Replacement
Replacing the spark plugs on your CR-V restores strong ignition, smooth idle, and good fuel economy. This engine uses coil-on-plug ignition, so you’ll remove one ignition coil per cylinder, then swap the plug underneath.
Difficulty Level: Beginner | Estimated Time: 0.8-1.5 hours
⚠️ Safety & Precautions
- ⚠️ Work on a fully cool engine to avoid burns and damaged aluminum threads.
- ⚠️ Keep dirt out of the spark plug holes; blow them out before removing plugs.
- ⚠️ Don’t pull on wires; unplug ignition coils by the connector body.
- ⚠️ Battery disconnect is not required, but avoid shorting tools on the battery/terminals.
🔧 Required Tools
You'll need the following tools for this repair:
- 10mm socket
- 3/8" drive ratchet
- 3/8" drive extension 6"
- 3/8" drive extension 3"
- 3/8" drive torque wrench (5-60 Nm range)
- 5/8" spark plug socket
- 3/8" drive universal joint
- Small flathead screwdriver
- Compressed air blow gun
- Feeler gauge 0.044 in (1.1 mm)
- Dielectric grease
- Nitrile gloves
- Safety glasses
🔩 Required Parts
HowToo sells all the parts you need for this repair:
- Iridium spark plugs (correct fit for your CR-V) - Qty: 4
📋 Before You Begin
- Park on level ground, shift to Park, and set the parking brake.
- Let the engine cool completely (warm aluminum threads can strip easily).
- Lay out 4 new plugs and keep them clean (don’t drop them).
🔨 Step-by-Step Instructions
Follow these steps in order:
Step 1: Open access to the ignition coils
- Open the hood and locate the ignition coils on top of the engine (4 coils in a row).
- If anything is blocking access, move it aside carefully (do not disconnect hoses unless necessary).
Step 2: Unplug and remove the first ignition coil
- Use a small flathead screwdriver to gently lift the connector lock (if equipped), then unplug the coil connector.
- Use a 10mm socket with a 3/8" drive ratchet to remove the ignition coil hold-down bolt.
- Twist the coil slightly and pull straight up to remove it.
- Torque to 12 Nm (9 ft-lbs) for the coil bolt during reassembly.
Step 3: Clean the spark plug well
- Put on safety glasses.
- Use a compressed air blow gun to blow dirt out of the spark plug tube (this prevents debris falling into the cylinder).
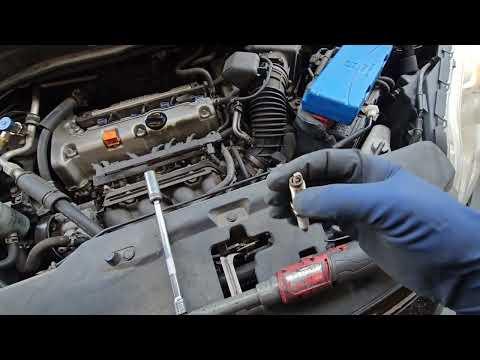
Step 4: Remove the spark plug
- Install your 5/8" spark plug socket on a 3/8" drive extension 6" and 3/8" drive ratchet.
- Loosen the spark plug counterclockwise and remove it.
- A spark plug socket has a rubber insert.
Step 5: Check the new spark plug gap (quick check)
- Use a feeler gauge 0.044 in (1.1 mm) to verify the gap is about 0.044".
- Do not bend or adjust iridium plug electrodes; if one is off, replace that plug.
Step 6: Install the new spark plug (by hand first)
- Start threading the new plug into the hole by hand using the 5/8" spark plug socket and a 3/8" drive extension 6" only (no ratchet at first).
- If it does not thread smoothly, back it out and try again (cross-threading can damage the cylinder head).
- Once seated, use a 3/8" drive torque wrench to tighten: Torque to 18 Nm (13 ft-lbs).
Step 7: Reinstall the ignition coil
- Optional: apply a very small amount of dielectric grease inside the coil boot.
- Push the coil straight down until it fully seats on the plug.
- Install the hold-down bolt using a 10mm socket, then tighten with a 3/8" drive torque wrench: Torque to 12 Nm (9 ft-lbs).
- Reconnect the electrical connector until it clicks.
Step 8: Repeat for the other three cylinders
- Do one cylinder at a time to avoid mixing connectors.
- Use the 3/8" drive universal joint if you need a better angle for any plug.
✅ After Repair
- Start the engine and let it idle for 30-60 seconds; it should run smooth with no shaking.
- Listen for misfires and confirm the check engine light stays off.
- Take a short test drive, then recheck that all coil connectors are fully clicked in.
💰 DIY vs Shop Cost
Shop Cost: $220-$420 (parts + labor)
DIY Cost: $40-$90 (parts only)
You Save: $180-$330 by doing it yourself!
Shop labor rates vary but typically run $100-$150/hour. This repair takes a shop approximately 0.8-1.5 hours.
🎯 Ready to get started?
HowToo makes it easy: same-day/2-day shipping on every part, plus all the tools and specialty tools you need! Check out the parts and tools sections below to add everything to your cart.
