


How to Replace Rear Turn Signal Bulb on a 2021 Kia Telluride (or LED Tail Lamp)
Step-by-step tail light removal, bulb vs LED identification, required tools/parts, and torque specs
How to Replace Rear Turn Signal Bulb on a 2021 Kia Telluride (or LED Tail Lamp)
Step-by-step tail light removal, bulb vs LED identification, required tools/parts, and torque specs


🔧 Telluride - Rear Turn Signal Bulb Replacement
On your Telluride, the rear turn signal can be either a replaceable bulb (twist-out socket) or an LED that’s built into the tail lamp (no bulb to replace). I’ll show you how to access the rear lamp, identify which style you have, and replace the bulb if equipped.
Difficulty Level: Beginner | Estimated Time: 0.5-1.0 hours
⚠️ Safety & Precautions
- ⚠️ Turn lights off and let bulbs cool before touching the socket.
- ⚠️ Support the tail lamp with one hand so it doesn’t drop and scratch paint.
- ⚠️ If you disconnect the battery, you may reset some settings.
🔧 Required Tools
You'll need the following tools for this repair:
- 10mm socket
- 1/4" ratchet
- 3" extension (1/4" drive)
- Trim clip removal tool
- Small flat-blade screwdriver
- Flashlight
- Nitrile gloves
- Safety glasses
- Torque wrench (inch-pound, 20–200 in-lbs)
🔩 Required Parts
HowToo sells all the parts you need for this repair:
- Rear turn signal bulb - Qty: 1 (or Qty: 2 if replacing both sides)
- Rear tail lamp assembly - Qty: 1 (only if your turn signal is LED/non-serviceable)
📋 Before You Begin
- Park on level ground, shift to Park, and turn the ignition OFF.
- Open the liftgate for access to the rear lamp fasteners.
- If you’re not sure whether you have a bulb or LED: you’ll confirm it in Step 3.
🔨 Step-by-Step Instructions
Follow these steps in order:
Step 1: Confirm which rear turn signal you’re replacing
- Turn the hazard lights ON briefly and walk behind the Telluride to confirm which side is out.
- Turn hazards OFF before disassembly.
Step 2: Remove the inner access cover (at the liftgate opening)
- At the side with the failed signal, locate the small interior trim access cover next to the tail lamp.
- Use a trim clip removal tool (a forked plastic tool that pops trim clips without damage) to pry the cover open.
- If needed, gently help the edge with a small flat-blade screwdriver.
Step 3: Remove the tail lamp retaining nuts
- Use a flashlight to locate the tail lamp retaining nuts behind the access opening.
- Use a 10mm socket, 1/4" ratchet, and 3" extension (1/4" drive) to remove the nuts.
- Set nuts aside where they won’t fall into the body cavity.
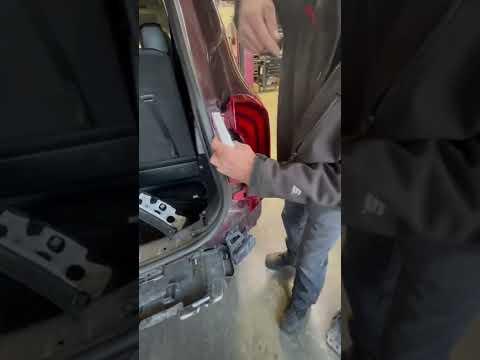
Step 4: Pull the tail lamp straight rearward
- With one hand on the lamp, pull it straight back (not sideways) to release the alignment pins.
- Wiggle gently; don’t pry against paint.
Step 5: Identify bulb-type vs LED-type turn signal
- Look at the back of the tail lamp for a removable twist-lock socket.
- If you see a round socket you can twist out: you have a replaceable bulb. Continue to Step 6.
- If there is no twist-out socket for the turn signal (sealed wiring only): the turn signal is LED and the tail lamp is typically replaced as an assembly. Skip to Step 8.
Step 6: Remove the turn signal bulb socket (bulb-type only)
- Locate the socket for the rear turn signal (it will be one of the larger bulb sockets).
- Twist the socket counterclockwise by hand and pull it out.
- Wear nitrile gloves to keep oils off the new bulb.
Step 7: Replace the bulb and reinstall the socket (bulb-type only)
- Pull the old bulb straight out of the socket.
- Install the new rear turn signal bulb by pushing it straight in.
- Reinsert the socket into the lamp and twist clockwise until it locks.
Step 8: If LED/non-serviceable, replace the tail lamp assembly (LED-type only)
- Disconnect the tail lamp electrical connector (press the tab and pull apart by hand).
- Transfer any reusable bulb sockets (if present for other functions) to the new lamp by twisting them out and into the new assembly.
- Install the new rear tail lamp assembly and reconnect the electrical connector.
Step 9: Reinstall the tail lamp and fasteners
- Align the lamp’s locating pins and press the lamp straight into place.
- Reinstall the retaining nuts using a 10mm socket and 1/4" ratchet.
- Use a torque wrench (inch-pound, 20–200 in-lbs) and 10mm socket to finish tightening: Torque to 53 in-lbs (6 Nm).
- Reinstall the access cover by pressing it back into place.
✅ After Repair
- Turn hazards ON and confirm the repaired rear turn signal flashes correctly.
- Verify the tail lamp is fully seated and the panel gaps look even.
- If the turn signal still doesn’t work, check the connector is fully latched and the bulb is seated.
💰 DIY vs Shop Cost
Shop Cost: $120-$250 (parts + labor)
DIY Cost: $5-$25 (bulb only) or $180-$450 (tail lamp assembly)
You Save: $90-$200 by doing it yourself!
Shop labor rates vary but typically run $100-$150/hour. This repair takes a shop approximately 0.5-1.0 hours.
🎯 Ready to get started?
HowToo makes it easy: same-day/2-day shipping on every part, plus all the tools and specialty tools you need! Check out the parts and tools sections below to add everything to your cart.
Quick check (so I can tailor this perfectly):
- ❓Is the turn signal you’re replacing on the outer tail lamp (on the body) or the inner lamp (on the liftgate)?
- ❓When you removed the lamp (Step 5), did you see a twist-out bulb socket for the turn signal, or does it look sealed/LED?