
















How to Replace Rear Turn Signal Bulb on a 2011-2017 BMW X3 (Bulb or LED Tail Lamp) (Body: Sport Utility)
Step-by-step access, tools/parts list, bulb vs LED identification, and tail lamp torque specs
How to Replace Rear Turn Signal Bulb on a 2011-2017 BMW X3 (Bulb or LED Tail Lamp) (Body: Sport Utility)
Step-by-step access, tools/parts list, bulb vs LED identification, and tail lamp torque specs for 2011, 2012, 2013, 2014, 2015, 2016, 2017


🔧 X3 - Rear Turn Signal Bulb Replacement
On your X3, the rear turn signal may be a replaceable amber bulb (most common) or an LED turn signal that’s built into the tail light (not a separate bulb). I’ll show you both paths so you can finish the job without guesswork.
Difficulty Level: Beginner | Estimated Time: 0.5-1.5 hours
Assumption: Rear turn signal is either a serviceable bulb in the outer tail lamp or an LED tail lamp assembly.
⚠️ Safety & Precautions
- ⚠️ Park on level ground, shift to Park, and set the parking brake.
- ⚠️ Turn lights OFF and let the lamp cool before touching it.
- ⚠️ Avoid touching glass bulb with bare fingers (skin oil can shorten bulb life).
- ⚠️ If you disconnect the battery: use a 10mm wrench and keep the key away from the vehicle.
🔧 Required Tools
You'll need the following tools for this repair:
- Nitrile gloves
- Safety glasses
- Plastic trim removal tool set
- Small flat blade screwdriver
- Torx T20 driver
- 8mm socket
- 10mm wrench
- 1/4" ratchet
- Small flashlight
🔩 Required Parts
HowToo sells all the parts you need for this repair:
- Rear turn signal bulb (amber, match your old bulb) - Qty: 1 (replace in pairs recommended)
- Tail lamp assembly (if turn signal is LED and not serviceable) - Qty: 1 (left or right as needed)
- Dielectric grease (optional) - Qty: 1
📋 Before You Begin
- Open the tailgate and remove any cargo that blocks the side access panels.
- Turn the hazard lights on briefly to confirm which side is out, then turn them OFF.
- If you’ll be removing the entire tail lamp: disconnect the negative battery cable using a 10mm wrench (optional but safer around wiring).
🔨 Step-by-Step Instructions
Follow these steps in order:
Step 1: Access the tail lamp service area
- Open the tailgate.
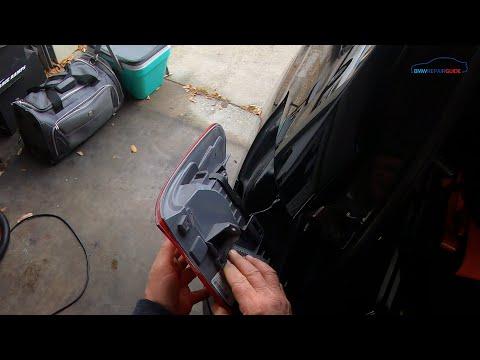
- Use a plastic trim removal tool set to open/remove the small access door in the cargo-side trim behind the tail lamp.
- Use a small flashlight to locate the bulb carrier (bulb holder board) and wiring connector.
Step 2: Identify which design you have (bulb vs LED)
- Look for a removable bulb carrier that twists/locks into the tail lamp.
- If you see a twist-out carrier with bulbs: follow Steps 3–6.
- If you do NOT see any replaceable bulb sockets (sealed LED module/assembly): skip to Steps 7–12.
Step 3: Remove the bulb carrier (bulb-style tail lamp)
- Disconnect the electrical plug by pressing the lock tab and pulling straight back (use a small flat blade screwdriver gently if the tab is stubborn).
- Rotate the bulb carrier counterclockwise to unlock it (by hand). If tight, use a plastic trim removal tool set to help pry evenly.
- Pull the carrier straight out.
Step 4: Remove the rear turn signal bulb
- Find the turn signal bulb position on the carrier (it’s typically the amber bulb location).
- Remove the bulb:
- If it’s a push-in bulb: pull it straight out using nitrile gloves.
- If it’s a twist-lock bulb: push in slightly and turn counterclockwise to release.
- Tip: Compare base and pins to match.
Step 5: Install the new bulb
- Install the new amber bulb into the same socket (use nitrile gloves so you don’t touch glass).
- If using it, apply a tiny amount of dielectric grease to the socket seal (not the bulb glass).
Step 6: Reinstall the bulb carrier and test
- Reinsert the carrier and rotate clockwise to lock it fully by hand.
- Reconnect the electrical plug until it clicks.
- Turn the ignition on and test the turn signal and hazards.
- Reinstall the access panel using the plastic trim removal tool set to snap it back in cleanly.
Step 7: Remove the cargo-side trim enough to reach tail lamp fasteners (LED-style tail lamp)
- Use a plastic trim removal tool set to pop out any push clips around the lamp area.
- If equipped, remove any retaining screws using a Torx T20 driver.
- Pull the trim back just enough to access the tail lamp nuts (do not crease the panel).
- Trim tool = plastic pry tool to prevent scratches.
Step 8: Disconnect the tail lamp electrical connector
- Unplug the tail lamp connector by pressing the lock and pulling straight out.
- If you disconnected the battery earlier, keep it disconnected until reassembly is complete.
Step 9: Remove the tail lamp retaining nuts
- Use an 8mm socket with a 1/4" ratchet to remove the tail lamp nuts.
- Keep the nuts somewhere safe so they don’t fall into the body cavity.
Step 10: Remove the tail lamp assembly
- Support the lamp with one hand, then pull the lamp straight rearward.
- If it’s stuck, wiggle gently—don’t pry against the painted body with metal tools.
Step 11: Install the replacement tail lamp assembly
- Position the lamp onto its alignment pins and press it into place evenly.
- Reinstall the nuts using an 8mm socket.
- Torque to 5 Nm (44 in-lbs)
- Reconnect the electrical connector until it clicks.
Step 12: Reassemble trim and test
- Reinstall any screws using a Torx T20 driver and clips using a plastic trim removal tool set.
- If disconnected, reconnect the negative battery cable using a 10mm wrench.
- Test turn signal, hazards, brake lights, and tail lights.
✅ After Repair
- Confirm the turn signal flashes at normal speed on both sides.
- Check for a bulb-out warning on the dash; if present, recheck connector seating.
- At night, verify the lamp is seated evenly and not letting water in.
- Tip: Replace bulbs in pairs for even brightness.
💰 DIY vs Shop Cost
Shop Cost: $80-$200 (bulb) / $350-$900 (LED tail lamp assembly)
DIY Cost: $10-$40 (bulb) / $200-$650 (tail lamp assembly)
You Save: $70-$160 (bulb) / $150-$300 (assembly) by doing it yourself!
Shop labor rates vary but typically run $100-$150/hour. This repair takes a shop approximately 0.5-1.5 hours.
🎯 Ready to get started?
HowToo makes it easy: same-day/2-day shipping on every part, plus all the tools and specialty tools you need! Check out the parts and tools sections below to add everything to your cart.
Guide for Turn Signal Light Bulb replace for these BMW vehicles
| Year Make Model | Sub Model | Engine | Body Style |
|---|---|---|---|
| 2017 BMW X3 | - | - | Sport Utility |
| 2016 BMW X3 | - | - | Sport Utility |
| 2015 BMW X3 | - | - | Sport Utility |
| 2014 BMW X3 | - | - | Sport Utility |
| 2013 BMW X3 | - | - | Sport Utility |
| 2012 BMW X3 | - | - | Sport Utility |
| 2011 BMW X3 | - | - | Sport Utility |