


How to Replace Rear Control Arms on a 2016-2021 Jeep Grand Cherokee
Step-by-step rear suspension arm guide with tools, parts, torque specs, and alignment tips
How to Replace Rear Control Arms on a 2016-2021 Jeep Grand Cherokee
Step-by-step rear suspension arm guide with tools, parts, torque specs, and alignment tips for 2016, 2017, 2018, 2019, 2020, 2021
🔧 Grand Cherokee - Rear Control Arm Replacement
This repair replaces the rear suspension control arms on your Grand Cherokee. The rear suspension uses multiple links/control arms per side, so this guide covers the common rear upper and lower control/link arms and explains how to keep the alignment close enough to drive safely to an alignment shop.
Difficulty Level: Advanced | Estimated Time: 3-6 hours
⚠️ Safety & Precautions
- ⚠️ Support your Grand Cherokee with jack stands. Never work under a vehicle held up only by a floor jack.
- ⚠️ The rear suspension and differential are heavy. Keep fingers clear when removing bolts.
- ⚠️ Do not remove all rear links at once. Replace one arm at a time so the suspension does not shift suddenly.
- ⚠️ Final-tighten control arm bolts at normal ride height. Tightening with the suspension hanging can tear new bushings.
- ⚠️ A four-wheel alignment is required after replacing rear control arms.
- ⚠️ Battery disconnect is not required for this mechanical repair.
🔧 Required Tools
You'll need the following tools for this repair:
- Floor jack (rated 3-ton minimum)
- Jack stands (rated 3-ton minimum)
- Wheel chocks
- Safety glasses
- Mechanic gloves
- 1/2-inch drive breaker bar
- 1/2-inch drive torque wrench (up to 200 ft-lbs)
- 3/8-inch drive ratchet
- 1/2-inch drive ratchet
- 21mm socket
- 18mm socket
- 15mm socket
- 21mm wrench
- 18mm wrench
- 15mm wrench
- Pry bar set
- Dead blow hammer
- Paint marker
- Tape measure
- Penetrating oil
- Wire brush
🔩 Required Parts
HowToo sells all the parts you need for this repair:
- Rear upper control arm/link - Left: Qty: 1
- Rear upper control arm/link - Right: Qty: 1
- Rear lower control arm/link - Left: Qty: 1
- Rear lower control arm/link - Right: Qty: 1
- Rear toe link - Left: Qty: 1
- Rear toe link - Right: Qty: 1
- Rear control arm mounting bolt and nut kit - Qty: 1
- Rear stabilizer bar link nuts - Qty: 2
📋 Before You Begin
- 🅿️ Park your Grand Cherokee on level ground and set the parking brake.
- 🧱 Place wheel chocks in front of the front wheels.
- 📏 Measure from the center of each rear wheel hub to the lower edge of the fender. Write both measurements down.
- 🖊️ Use a paint marker to mark any eccentric/cam washer positions before loosening bolts. These washers affect alignment.
- 💧 Spray penetrating oil on every rear control arm bolt and nut. Let it soak for 10-15 minutes.
- 🛞 Loosen the rear wheel lug nuts slightly before lifting the vehicle.
- 🔧 Replace one arm at a time. This keeps the rear suspension located and makes the job safer.
🔨 Step-by-Step Instructions
Follow these steps in order:
Step 1: Lift and Support the Rear
- Use a 21mm socket and 1/2-inch drive breaker bar to loosen the rear wheel lug nuts one turn.
- Use the floor jack under the approved rear lift point to raise the rear of your Grand Cherokee.
- Place jack stands under the approved rear frame support points.
- Lower the vehicle gently onto the jack stands.
- Keep the floor jack nearby to support the lower control arm or rear knuckle as needed.
Step 2: Remove the Rear Wheel
- Use a 21mm socket to remove the lug nuts.
- Remove the rear wheel.
- Place the wheel flat under the side of the vehicle as an extra safety backup.
- Keep lug nuts in one place.
Step 3: Clean and Mark the Alignment Bolts
- Use a wire brush to clean dirt and rust from the rear control arm mounting bolts.
- Use a paint marker to mark the position of each cam washer or eccentric washer before loosening it.
- An eccentric washer is an offset washer that changes wheel alignment when rotated.
- These marks help you drive carefully to the alignment shop, but they do not replace a real alignment.
Step 4: Support the Rear Suspension Arm or Knuckle
- Place the floor jack under the rear lower control arm or rear knuckle.
- Raise it slightly until it just supports the suspension weight.
- The knuckle is the metal part that holds the wheel hub and connects the suspension arms.
Step 5: Remove the Rear Stabilizer Link if It Blocks Access
- Use an 18mm socket and 18mm wrench to remove the rear stabilizer bar link nut if the link blocks the control arm bolt.
- Move the stabilizer link aside.
- The stabilizer link connects the sway bar to the suspension and helps reduce body lean.
- During installation, tighten the rear stabilizer link nut to Torque to 95 Nm (70 ft-lbs).
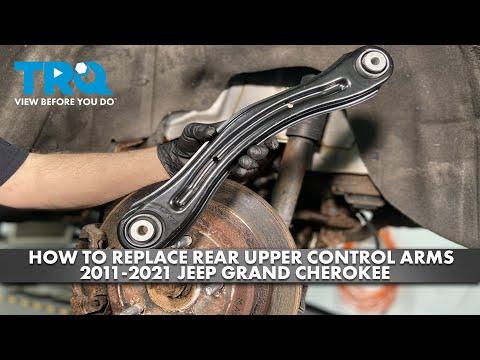
Step 6: Replace the Rear Upper Control Arm/Link
- Use an 18mm socket and 18mm wrench to loosen the inner upper control arm bolt and nut.
- Use an 18mm socket and 18mm wrench to loosen the outer upper control arm bolt and nut at the knuckle.
- Remove one bolt at a time while supporting the arm with your hand.
- Use a pry bar set gently if the arm is stuck in the bracket.
- Compare the old and new upper arm to make sure the shape and bushing locations match.
- Install the new upper arm by hand.
- Start both bolts and nuts by hand to avoid cross-threading.
- Snug the bolts with an 18mm socket and 18mm wrench, but do not final-tighten yet.
- Final upper arm/link mounting bolt torque at ride height is Torque to 115 Nm (85 ft-lbs).
Step 7: Replace the Rear Toe Link
- Use a paint marker to clearly mark the toe link adjuster position before loosening it.
- Use a 21mm socket and 21mm wrench to loosen the inner toe link bolt and nut.
- Use an 18mm socket and 18mm wrench to loosen the outer toe link bolt and nut at the knuckle.
- Remove the toe link from the vehicle.
- The toe link controls whether the rear tire points slightly inward or outward.
- Install the new toe link in the same direction as the old one.
- Line up your paint marks as closely as possible.
- Start all hardware by hand first.
- Snug the hardware with a 21mm socket, 21mm wrench, 18mm socket, and 18mm wrench, but do not final-tighten yet.
- Final toe link mounting bolt torque at ride height is Torque to 115 Nm (85 ft-lbs).
Step 8: Replace the Rear Lower Control Arm/Link
- Keep the floor jack lightly supporting the lower control arm.
- Use a 21mm socket and 21mm wrench to loosen the inner lower control arm bolt and nut.
- Use a 21mm socket and 21mm wrench to loosen the outer lower control arm bolt and nut at the knuckle.
- Slowly lower or raise the floor jack a small amount if the bolts are tight from suspension pressure.
- Remove the bolts and take out the lower control arm.
- Use a dead blow hammer to tap the arm loose if needed.
- Compare the old and new lower control arms before installing.
- Install the new lower control arm into the brackets.
- Start the bolts and nuts by hand.
- Snug the bolts with a 21mm socket and 21mm wrench, but do not final-tighten yet.
- Final lower control arm/link mounting bolt torque at ride height is Torque to 135 Nm (100 ft-lbs).
Step 9: Reconnect the Rear Stabilizer Link
- Move the stabilizer link back into position.
- Install the nut by hand.
- Use an 18mm socket, 18mm wrench, and torque wrench to tighten the stabilizer link nut to Torque to 95 Nm (70 ft-lbs).
Step 10: Set the Rear Suspension to Ride Height
- Use the floor jack under the rear lower control arm or knuckle.
- Raise the suspension until the hub-to-fender measurement matches the number you wrote down earlier.
- This puts the bushings in their normal resting position before tightening.
- Do not skip this step.
Step 11: Final-Tighten the Rear Control Arm Bolts
- Use an 18mm socket, 18mm wrench, and torque wrench to tighten the rear upper arm/link bolts to Torque to 115 Nm (85 ft-lbs).
- Use a 21mm socket, 21mm wrench, and torque wrench to tighten the rear lower arm/link bolts to Torque to 135 Nm (100 ft-lbs).
- Use a 21mm socket, 21mm wrench, 18mm socket, 18mm wrench, and torque wrench to tighten the rear toe link bolts to Torque to 115 Nm (85 ft-lbs).
- Make sure any cam washer paint marks still line up closely.
Step 12: Reinstall the Rear Wheel
- Install the wheel onto the hub by hand.
- Use a 21mm socket to snug the lug nuts in a star pattern.
- Use the floor jack to lift the vehicle slightly.
- Remove the jack stands.
- Lower your Grand Cherokee to the ground.
- Use a 21mm socket and torque wrench to tighten the lug nuts to Torque to 176 Nm (130 ft-lbs).
Step 13: Repeat on the Other Rear Side
- Use the same steps on the opposite rear side.
- Replace rear suspension arms in left/right pairs when possible for even handling and tire wear.
✅ After Repair
- ✅ Check that every rear control arm bolt, toe link bolt, stabilizer link nut, and lug nut is torqued.
- ✅ Take a short, slow test drive. Listen for clunks, pops, or rubbing.
- ✅ If the steering wheel is off-center or the vehicle pulls, drive slowly and go directly for alignment.
- ✅ Get a professional four-wheel alignment as soon as possible.
- ✅ Recheck lug nut torque after 25-50 miles.
💰 DIY vs Shop Cost
Shop Cost: $800-$1,700 including parts, labor, and alignment
DIY Cost: $250-$850 parts only, depending on which rear arms are replaced
You Save: $500-$900+ by doing it yourself!
Shop labor rates vary but typically run $100-$150/hour. This repair takes a shop approximately 3-5 hours plus alignment time.
🎯 Ready to get started?
HowToo makes it easy: same-day/2-day shipping on every part, plus all the tools and specialty tools you need! Check out the parts and tools sections below to add everything to your cart.
Guide for Suspension Control Arm replace for these Jeep vehicles
| Year Make Model | Sub Model | Engine | Body Style |
|---|---|---|---|
| 2021 Jeep Grand Cherokee | - | - | - |
| 2020 Jeep Grand Cherokee | - | - | - |
| 2019 Jeep Grand Cherokee | - | - | - |
| 2018 Jeep Grand Cherokee | - | - | - |
| 2017 Jeep Grand Cherokee | - | - | - |
| 2016 Jeep Grand Cherokee | - | - | - |
