


How to Replace Rear Brake Pads on a 2016 Volkswagen Beetle
Step-by-step instructions with tools, parts, EPB service mode, and torque specs
How to Replace Rear Brake Pads on a 2016 Volkswagen Beetle
Step-by-step instructions with tools, parts, EPB service mode, and torque specs
Assumption: Your Beetle may have an electronic parking brake. If it does, put the rear calipers in service mode before pushing pistons back.
🔧 Rear Brake Pads - Pad Replacement
Rear brake pads wear out over time and should be replaced in pairs so braking stays even. On your Beetle, the rear caliper piston must be compressed correctly before the new pads will fit.
Difficulty Level: Intermediate | Estimated Time: 2-3 hours
⚠️ Safety & Precautions
- Work on a level surface and chock the front wheels.
- Use jack stands; never rely on the jack alone.
- If your Beetle has an electronic parking brake, retract it with the proper service mode before removing pads.
- Do not press the brake pedal with the caliper removed.
- Brake dust can be harmful; wear safety glasses and a mask if possible.
- Brake fluid can damage paint; wipe spills immediately.
🔧 Required Tools
You'll need the following tools for this repair:
- Floor jack (rated 3-ton minimum)
- Jack stands (pair, rated 3-ton minimum)
- Wheel chocks
- 17mm lug socket
- Breaker bar
- Torque wrench
- 7mm hex socket
- Ratchet
- Caliper piston compressor tool
- Brake pad spreader tool
- Bungee cord or caliper hanger
- Flat-blade screwdriver
- Brake cleaner
- Wire brush
- Safety glasses
- Nitrile gloves
- Scan tool with EPB service mode (specialty)
🔩 Required Parts
HowToo sells all the parts you need for this repair:
- Rear brake pad set - Qty: 1 set
- Brake pad hardware kit - Qty: 1
- Brake grease - Qty: 1
- Brake cleaner - Qty: 1 can
📋 Before You Begin
- Park on level ground and set the parking brake if the rear brakes are not being serviced yet.
- Chock the front wheels before lifting the rear.
- If equipped with an electronic parking brake, use Menu > Vehicle > Service > Brake Pad Replacement or your scan tool's EPB service mode before opening the caliper.
- Keep the ignition off unless the EPB service procedure requires it.
🔨 Step-by-Step Instructions
Follow these steps in order:
Step 1: Loosen the rear wheel bolts
- Use the 17mm lug socket and breaker bar to loosen each rear wheel bolt about one turn.
- Do this before lifting the car.
Step 2: Raise and support the rear
- Use the floor jack at the rear lift point.
- Place the car securely on jack stands.
- Remove the rear wheel bolts and wheels.
Step 3: Put the rear caliper in service mode
- If equipped with an electronic parking brake, use the scan tool with EPB service mode to retract the rear calipers.
- If not equipped, skip to the next step.
- Never force the piston first.
Step 4: Remove the caliper
- Use the 7mm hex socket and ratchet to remove the caliper slide bolts.
- Lift the caliper off the bracket and support it with a bungee cord or caliper hanger.
- Do not let it hang by the brake hose.
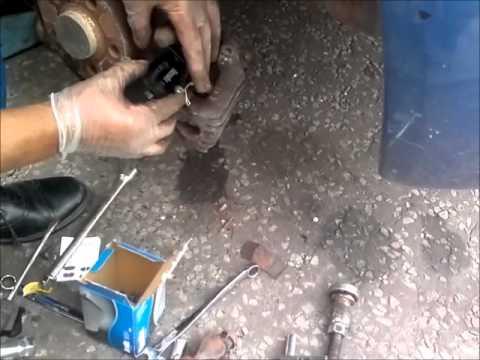
Step 5: Remove the old pads and hardware
- Pull the old pads out of the bracket.
- Remove the pad clips and hardware.
- Use a flat-blade screwdriver if the pads are stuck.
Step 6: Inspect and clean the bracket
- Use a wire brush and brake cleaner to clean rust and debris from the bracket contact points.
- Install the new hardware clips.
- Clean contact points help prevent squeaks.
Step 7: Compress the rear caliper piston
- Use the caliper piston compressor tool or brake pad spreader tool to slowly push the piston fully back.
- Watch the brake fluid reservoir so it does not overflow.
- If resistance is very high, stop and verify EPB service mode.
Step 8: Install the new pads
- Apply a thin layer of brake grease to the pad ears and backing plate contact points only.
- Install the new inner and outer pads into the bracket.
- Make sure the pads sit flat and move freely.
Step 9: Reinstall the caliper
- Set the caliper back over the new pads.
- Install the slide bolts with the 7mm hex socket and ratchet.
- Torque to 35 Nm (26 ft-lbs).
Step 10: Reinstall the wheel
- Put the wheel back on and hand-start the bolts.
- Lower the car with the floor jack.
- Use the 17mm lug socket and torque wrench to tighten the wheel bolts.
- Torque to 120 Nm (89 ft-lbs).
Step 11: Restore brake pressure
- Before moving the car, pump the brake pedal slowly several times until it feels firm.
- If you used EPB service mode, exit the service function with the scan tool.
✅ After Repair
- Check the brake fluid level and top off if needed.
- Test the brake pedal feel before driving.
- Drive slowly in a safe area and confirm the brakes stop the car evenly.
- Listen for rubbing or squealing; recheck pad seating if needed.
- For the first 200 km, avoid hard stops unless needed for safety.
💰 DIY vs Shop Cost
Shop Cost: ₹9,000-₹18,000 (parts + labor)
DIY Cost: ₹3,500-₹7,500 (parts only)
You Save: ₹5,500-₹10,500 by doing it yourself!
Shop labor rates vary but typically run ₹1,000-₹1,500/hour. This repair takes a shop approximately 2-3 hours.
🎯 Ready to get started?
HowToo makes it easy: same-day/2-day shipping on every part, plus all the tools and specialty tools you need! Check out the parts and tools sections below to add everything to your cart.
