


How to Replace Oxygen (O2) Sensors on a 2005-2017 Jeep Wrangler (Upstream & Downstream) (Engine: V6 3.6L)
Step-by-step DIY instructions with required tools/parts, safety tips, sensor locations, and 30 ft-lb torque spec
How to Replace Oxygen (O2) Sensors on a 2005-2017 Jeep Wrangler (Upstream & Downstream) (Engine: V6 3.6L)
Step-by-step DIY instructions with required tools/parts, safety tips, sensor locations, and 30 ft-lb torque spec for 2005, 2006
🔧 Wrangler - Oxygen Sensor Replacement
Your Wrangler uses oxygen (O2) sensors to measure exhaust oxygen so the computer can adjust fueling and monitor the catalytic converters. Replacing faulty sensors can fix check-engine lights, poor fuel economy, and failed emissions tests.
Difficulty Level: Intermediate | Estimated Time: 1.5-3.0 hours
⚠️ Safety & Precautions
- ⚠️ Exhaust parts get extremely hot—work on a cold engine.
- ⚠️ Support the Jeep with jack stands on a solid, level surface; never rely on a jack.
- ⚠️ Keep penetrating oil off hot exhaust and away from sparks/flames.
- ⚠️ Do not twist the sensor harness; unplug connectors before removing sensors.
- ⚠️ If you disconnect the battery, you may lose radio presets.
🔧 Required Tools
You'll need the following tools for this repair:
- Safety glasses
- Mechanic gloves
- Wheel chocks
- Floor jack (rated 3-ton minimum)
- Jack stands (rated 3-ton minimum)
- 3/8" drive ratchet
- 3/8" drive extension set
- 3/8" drive breaker bar
- Torque wrench (10–100 ft-lbs range)
- Oxygen sensor socket 22mm (7/8") (specialty)
- Penetrating oil
- Small flathead screwdriver
- 10mm wrench
🔩 Required Parts
HowToo sells all the parts you need for this repair:
- Upstream oxygen sensor (Sensor 1) - Qty: 2
- Downstream oxygen sensor (Sensor 2) - Qty: 2
- High-temperature anti-seize compound - Qty: 1
📋 Before You Begin
- Park on level ground, shift to Park (or in gear if manual), and set the parking brake.
- Chock the rear wheels with wheel chocks.
- Let the exhaust cool completely (at least 1 hour after driving).
- If you want extra safety while unplugging connectors, disconnect the negative battery cable using a 10mm wrench.
- Know the sensor naming: “Upstream/Sensor 1” is before the catalytic converter; “Downstream/Sensor 2” is after it. “Bank 1/Bank 2” refers to which side of the engine (each exhaust manifold is a bank).
🔨 Step-by-Step Instructions
Follow these steps in order:
Step 1: Raise and support the Wrangler
- Lift the front with a floor jack (rated 3-ton minimum) at the proper front jacking point.
- Set it down securely on jack stands (rated 3-ton minimum).
- Give the Jeep a firm shake test before getting underneath.
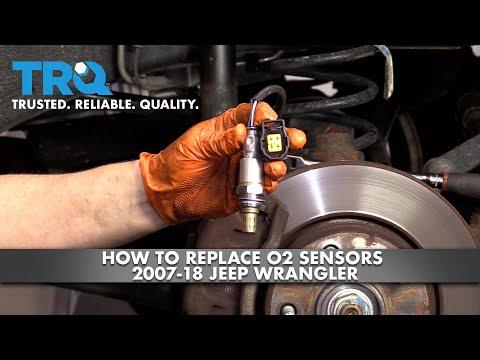
Step 2: Locate all O2 sensors
- Look along the exhaust for sensors screwed into the pipes with a wire harness coming off them.
- Upstream sensors are closer to the engine (before the catalytic converters).
- Downstream sensors are farther back (after the catalytic converters).
- Take a photo of each connector routing.
Step 3: Unplug the sensor electrical connector
- Spray the connector area lightly if dusty, then wipe clean.
- Release the connector lock tab using a small flathead screwdriver, then separate the connector by hand.
- If the harness is clipped to the body/frame, carefully free it so it can rotate with the sensor.
Step 4: Pre-soak the sensor threads
- Spray the sensor’s threaded area with penetrating oil.
- Wait 5–10 minutes, then re-spray once if it looks very rusty.
- Penetrating oil saves stripped threads.
Step 5: Remove the old oxygen sensor
- Slide the harness through the slot in the oxygen sensor socket 22mm (7/8") (specialty).
- Use a 3/8" drive ratchet with a 3/8" drive extension set to loosen the sensor.
- If it won’t break loose, switch to a 3/8" drive breaker bar and apply steady pressure.
- Once loose, spin it out by hand and remove it.
Step 6: Prepare the new sensor
- Compare the new sensor to the old one (connector shape, harness length, and thread size).
- If the new sensor threads are not pre-coated, apply a tiny amount of high-temperature anti-seize compound to the threads only.
- Keep anti-seize off the sensor tip (the vented end).
Step 7: Install the new oxygen sensor
- Start the sensor by hand and turn several full turns to avoid cross-threading.
- Tighten using the oxygen sensor socket 22mm (7/8") (specialty) and a torque wrench (10–100 ft-lbs range).
- Torque to 40 Nm (30 ft-lbs)
Step 8: Reconnect the wiring and secure the harness
- Plug the connector back in until it clicks.
- Re-attach any harness clips so the wiring stays away from the exhaust.
- Repeat Steps 3–8 for the remaining sensors (upstream and downstream).
Step 9: Reinstall and lower the Wrangler
- Remove tools from under the Jeep.
- Raise slightly with the floor jack (rated 3-ton minimum), remove the jack stands (rated 3-ton minimum), and lower to the ground.
- If you disconnected the battery, reconnect the negative terminal using a 10mm wrench.
✅ After Repair
- Start the engine and listen/inspect for exhaust leaks near where you worked.
- If you had a check-engine light, clear codes with a scan tool, or drive normally and see if it returns.
- Take a short test drive, then re-check that no harness is touching the exhaust.
- If the light comes back with the same O2 code, there may be a wiring issue or an exhaust leak.
💰 DIY vs Shop Cost
Shop Cost: $450-$1,000 (parts + labor)
DIY Cost: $180-$600 (parts only)
You Save: $270-$400 by doing it yourself!
Shop labor rates vary but typically run $100-$150/hour. This repair takes a shop approximately 1.5-3.0 hours.
🎯 Ready to get started?
HowToo makes it easy: same-day/2-day shipping on every part, plus all the tools and specialty tools you need! Check out the parts and tools sections below to add everything to your cart.
Guide for Oxygen Sensor replace for these Jeep vehicles
| Year Make Model | Sub Model | Engine | Body Style |
|---|---|---|---|
| 2017 Jeep Wrangler | - | V6 3.6L | - |
| 2016 Jeep Wrangler | - | V6 3.6L | - |
| 2015 Jeep Wrangler | - | V6 3.6L | - |
| 2014 Jeep Wrangler | - | V6 3.6L | - |
| 2013 Jeep Wrangler | - | V6 3.6L | - |
| 2012 Jeep Wrangler | - | V6 3.6L | - |
| 2010 Jeep Wrangler | - | V6 3.8L | - |
| 2006 Jeep Wrangler | - | Inline 6 4.0L | - |
| 2006 Jeep Wrangler | - | Inline 4 2.4L | - |
| 2005 Jeep Wrangler | - | Inline 6 4.0L | - |
| 2005 Jeep Wrangler | - | Inline 4 2.4L | - |
