









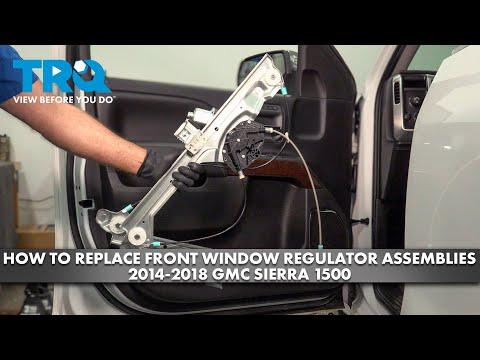






How to Replace Front Window Regulators on a 2014-2018 GMC Sierra 1500
Step-by-step repair guide with tools, parts, torque specs, safety tips, and window reinitialization
How to Replace Front Window Regulators on a 2014-2018 GMC Sierra 1500
Step-by-step repair guide with tools, parts, torque specs, safety tips, and window reinitialization for 2014, 2015, 2016, 2017, 2018


🔧 Front Window Regulators - Replacement
To replace the front window regulators on your Sierra, you’ll remove each front door panel, disconnect the glass from the regulator, then swap the regulator assembly inside the door. If both front regulators are being replaced, do one door at a time so you can compare the parts and keep the glass supported safely.
Difficulty Level: Intermediate | Estimated Time: 2-4 hours
⚠️ Safety & Precautions
- Keep fingers clear of the glass track and regulator arms. The regulator can pinch hard.
- Support the window glass before removing the regulator bolts. If the glass drops, it can break.
- Disconnect the negative battery cable before working in the door. This helps avoid accidental window motor operation.
- Be careful with the side airbag area in the front door. Do not probe yellow airbag connectors.
- If your truck has a window pinch protection or auto-up feature, it may need re-initialization after repair.
🔧 Required Tools
You'll need the following tools for this repair:
- 7mm socket
- 10mm socket
- Ratchet
- Trim panel removal tool
- Flat-blade screwdriver
- Pick tool
- Torx T20 screwdriver
- Torx T30 screwdriver
- Torque wrench
- Masking tape
- Gloves
- Safety glasses
🔩 Required Parts
HowToo sells all the parts you need for this repair:
- Front window regulator assembly - Replace in pairs if both front regulators are bad - Qty: 2
- Window regulator bolts or clips - Qty: 1 set
- Door panel clips - Qty: 1 set per door
- Butyl vapor barrier adhesive - Qty: 1
📋 Before You Begin
- Park on level ground and set the parking brake.
- Lower the affected window slightly if it still moves, then disconnect the negative battery cable.
- Wait at least 2 minutes after disconnecting the battery before touching door wiring.
- Have a clean area ready for the door panel and fasteners.
🔨 Step-by-Step Instructions
Follow these steps in order:
Step 1: Remove the front door trim panel
- Use a 7mm socket to remove the door panel screws.
- Use a trim panel removal tool to release the clips around the edge of the panel.
- Lift the panel upward to unhook it from the top window ledge.
- Disconnect the electrical connectors for the window switch and speakers.
- Work slowly so the clips do not break.
Step 2: Peel back the water shield
- Use a flat-blade screwdriver and your hands to carefully remove the vapor barrier.
- Keep the adhesive clean so you can reuse it if possible.
- If the adhesive tears, plan to reseal it during reassembly.
Step 3: Support and detach the window glass
- Raise or lower the glass until the regulator mounting bolts or clips line up with the access holes.
- Use a Torx T20 screwdriver or 10mm socket, depending on the fastener style, to remove the glass-to-regulator fasteners.
- Carefully tape the glass to the door frame with masking tape so it cannot fall.
- Do not let the glass hang loose.
Step 4: Remove the old regulator
- Use a 10mm socket to remove the regulator mounting bolts.
- Use a Torx T30 screwdriver to remove the window motor/regulator fasteners if your replacement is separate from the motor.
- Work the regulator assembly out through the large access opening in the door.
- If needed, disconnect the motor electrical connector before removing the unit.
Step 5: Install the new regulator
- Feed the new regulator into the door opening in the same orientation as the old one.
- Start all bolts by hand using a 10mm socket before tightening.
- Reconnect the motor connector if it was removed.
- Torque to 9 Nm (80 in-lbs) for the regulator mounting fasteners unless your replacement kit specifies otherwise.
Step 6: Reattach the window glass
- Remove the masking tape and carefully lower the glass onto the regulator mounts.
- Install the glass fasteners using a Torx T20 screwdriver or 10mm socket.
- Torque to 8 Nm (71 in-lbs) for the glass-to-regulator fasteners.
- Move the glass by hand only if needed, and keep it supported at all times.
Step 7: Test the window before reassembly
- Reconnect the battery temporarily.
- Use the window switch to run the glass up and down.
- Check for smooth travel, strange noises, or binding.
- If the window does not move correctly, stop and recheck the regulator alignment.
Step 8: Reinstall the door panel
- Reconnect all electrical connectors.
- Press the vapor barrier back into place and reseal it with butyl vapor barrier adhesive if needed.
- Hang the door panel on the top ledge, then press the clips into place.
- Install the screws using a 7mm socket.
- Torque to 2 Nm (18 in-lbs) for the door panel screws.
✅ After Repair
- Cycle the window fully up and down several times.
- Check that the glass seals evenly at the top.
- If the auto-up or pinch protection does not work correctly, reinitialize the window by holding the switch fully down, then fully up, for a few seconds at each stop.
- Listen for rattles from the door panel after the test drive.
💰 DIY vs Shop Cost
Shop Cost: $500-$900 (parts + labor)
DIY Cost: $180-$420 (parts only)
You Save: $320-$480 by doing it yourself!
Shop labor rates vary but typically run $100-$150/hour. This repair takes a shop approximately 2-4 hours.
🎯 Ready to get started?
HowToo makes it easy: same-day/2-day shipping on every part, plus all the tools and specialty tools you need! Check out the parts and tools sections below to add everything to your cart.
Guide for Window Motor and Regulator Assembly replace for these GMC vehicles
| Year Make Model | Sub Model | Engine | Body Style |
|---|---|---|---|
| 2018 GMC Sierra 1500 | - | - | - |
| 2017 GMC Sierra 1500 | - | - | - |
| 2016 GMC Sierra 1500 | - | - | - |
| 2015 GMC Sierra 1500 | - | - | - |
| 2014 GMC Sierra 1500 | - | - | - |