


How to Replace Front Upper & Lower Ball Joints on a 2021 Jeep Gladiator
Step-by-step front end repair with required tools/parts, safety tips, and key torque specs
How to Replace Front Upper & Lower Ball Joints on a 2021 Jeep Gladiator
Step-by-step front end repair with required tools/parts, safety tips, and key torque specs


🔧 Gladiator - Front Ball Joint Replacement
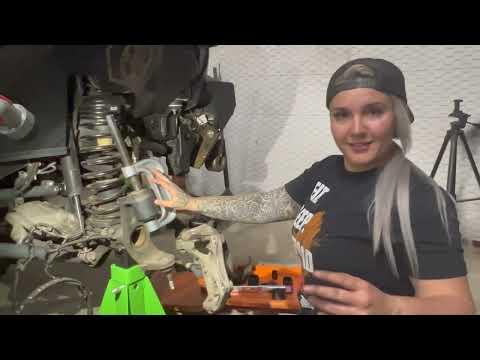
On your Gladiator, the front ball joints sit in the steering knuckle and let the knuckle pivot smoothly while supporting the axle. Replacing them requires removing the brakes, hub/bearing, axle shaft, and knuckle, then pressing the old joints out and the new ones in.
Difficulty Level: Advanced | Estimated Time: 4-7 hours
⚠️ Safety & Precautions
- ⚠️ Support the truck on jack stands; never rely on a jack.
- ⚠️ Do not let the brake caliper hang by the hose; hang it with a bungee cord.
- ⚠️ Keep fingers clear when using a ball joint press; it can release suddenly.
- ⚠️ Avoid pulling on the ABS wheel speed sensor wire near the knuckle.
- 🔋 Battery disconnect is not required for this job.
🔧 Required Tools
You'll need the following tools for this repair:
- Floor jack (rated 3-ton minimum)
- Jack stands (rated 3-ton minimum)
- Wheel chocks
- Safety glasses
- Nitrile gloves
- Breaker bar (1/2")
- Torque wrench (30–250 ft-lbs)
- Socket set (8mm–24mm, 1/2")
- Wrench set (13mm–24mm)
- 36mm socket
- Pry bar (24")
- Ball-peen hammer (16–24 oz)
- Needle-nose pliers
- Pick tool
- Bungee cord
- Ball joint press kit (specialty)
- Hub/axle puller (specialty)
- Wire brush
- Penetrating oil
- Blue threadlocker
- Grease gun
🔩 Required Parts
HowToo sells all the parts you need for this repair:
- Front upper ball joint - Replace in pairs (left + right recommended) - Qty: 2
- Front lower ball joint - Replace in pairs (left + right recommended) - Qty: 2
- Front axle nut - Qty: 2
- Front tie rod end cotter pin kit - Qty: 1
- Chassis grease - Qty: 1
📋 Before You Begin
- Park on level ground, put the transmission in 1st gear, and set the parking brake.
- Chock the rear wheels with wheel chocks.
- Break the front lug nuts loose before lifting (do not remove yet).
- Spray penetrating oil on the tie-rod nut, axle nut area, and hub/knuckle area; let it soak.
- Plan on getting an alignment afterward.
🔨 Step-by-Step Instructions
Follow these steps in order:
Step 1: Lift and remove the wheel
- Use a floor jack (rated 3-ton minimum) to lift the front axle.
- Set the axle on jack stands (rated 3-ton minimum).
- Remove the wheel using a 22mm socket.
- Reinstall later: Torque to 176 Nm (130 ft-lbs).
Step 2: Remove the brake caliper and rotor
- Remove the caliper bolts using a 13mm socket while holding the slide pins with a 15mm wrench (if needed).
- Hang the caliper from the coil spring using a bungee cord.
- Remove the caliper bracket bolts using a 21mm socket, then remove the bracket.
- Remove the rotor (tap lightly with a ball-peen hammer if stuck).
- Reinstall later: caliper bolts Torque to 41 Nm (30 ft-lbs).
- Reinstall later: caliper bracket bolts Torque to 169 Nm (125 ft-lbs).
Step 3: Remove the ABS sensor from the knuckle
- Unplug the sensor connector and open any clips by hand.
- Remove the ABS sensor bolt using an 8mm socket, then gently twist/pull the sensor out.
- If stuck, use penetrating oil—don’t pry hard.
- Reinstall later: Torque to 12 Nm (9 ft-lbs).
Step 4: Remove the axle nut
- Remove the axle nut using a 36mm socket and breaker bar (1/2").
- Reinstall later with a new nut: Torque to 271 Nm (200 ft-lbs).
Step 5: Disconnect the tie rod end from the knuckle
- Remove the cotter pin using needle-nose pliers.
- Remove the tie rod nut using a 21mm socket.
- Pop the taper loose by striking the side of the knuckle boss with a ball-peen hammer (do not hit the threads).
- Reinstall later with a new cotter pin: Torque to 88 Nm (65 ft-lbs).
Step 6: Remove the hub/bearing assembly
- From the back of the knuckle, remove the hub bolts using a 13mm 12-point socket.
- Use a hub/axle puller (specialty) to push the hub out if it’s seized.
- Remove the hub/bearing assembly and set it aside.
- Reinstall later: Torque to 115 Nm (85 ft-lbs).
Step 7: Pull the axle shaft out of the knuckle
- Carefully slide the axle shaft outward and support it so you don’t damage the axle seal.
- Use a bungee cord if needed to hold it out of the way.
Step 8: Separate the ball joints and remove the knuckle
- Remove the upper ball joint nut using a 21mm socket.
- Remove the lower ball joint nut using a 24mm socket.
- Support the knuckle so it doesn’t drop suddenly.
- Strike the knuckle “ear” near each ball joint with a ball-peen hammer until the tapers release, then remove the knuckle.
- Reinstall later: upper ball joint nut Torque to 102 Nm (75 ft-lbs).
- Reinstall later: lower ball joint nut Torque to 176 Nm (130 ft-lbs).
Step 9: Press out the old ball joints
- Set the knuckle on a sturdy surface.
- Use a ball joint press kit (specialty) with the correct cups.
- Press the upper ball joint out first, then the lower.
- Keep the press square to prevent damage.
Step 10: Press in the new ball joints
- Clean the knuckle bores using a wire brush.
- Use the ball joint press kit (specialty) to press the new lower ball joint in, then the upper.
- If your replacement joints have a grease fitting, install it and add grease using a grease gun until the boot just starts to swell (do not burst it).
Step 11: Reinstall the knuckle, axle shaft, hub, and brakes
- Position the knuckle back onto the ball joints by hand.
- Install the ball joint nuts using a socket set (8mm–24mm, 1/2"), then torque:
- Upper nut: Torque to 102 Nm (75 ft-lbs)
- Lower nut: Torque to 176 Nm (130 ft-lbs)
- Slide the axle shaft back in carefully.
- Reinstall the hub/bearing and hub bolts using a 13mm 12-point socket; apply blue threadlocker.
- Hub bolts: Torque to 115 Nm (85 ft-lbs).
- Install the new axle nut using a 36mm socket: Torque to 271 Nm (200 ft-lbs).
- Reinstall rotor, bracket, and caliper using a 21mm socket and 13mm socket:
- Bracket bolts: Torque to 169 Nm (125 ft-lbs)
- Caliper bolts: Torque to 41 Nm (30 ft-lbs)
- Reinstall the ABS sensor using an 8mm socket: Torque to 12 Nm (9 ft-lbs).
- Reconnect the tie rod end using a 21mm socket: Torque to 88 Nm (65 ft-lbs), then install a new cotter pin with needle-nose pliers.
Step 12: Reinstall the wheel and lower the truck
- Install the wheel using a 22mm socket.
- Lower the truck off the jack stands (rated 3-ton minimum).
- Final-tighten lug nuts in a star pattern: Torque to 176 Nm (130 ft-lbs).
✅ After Repair
- Pump the brake pedal until it feels firm before moving the truck.
- Turn the steering lock-to-lock and confirm nothing rubs or binds.
- Test drive slowly, then recheck for looseness or noises.
- Get a front-end alignment as soon as possible.
- After 50–100 miles, recheck lug nut torque: 176 Nm (130 ft-lbs).
💰 DIY vs Shop Cost
Shop Cost: $700-$1,400 (parts + labor)
DIY Cost: $180-$450 (parts only)
You Save: $520-$950 by doing it yourself!
Shop labor rates vary but typically run $100-$150/hour. This repair takes a shop approximately 4-6 hours.
🎯 Ready to get started?
HowToo makes it easy: same-day/2-day shipping on every part, plus all the tools and specialty tools you need! Check out the parts and tools sections below to add everything to your cart.
